CO2! It’s surprising how fast CO2 accumulates indoors when windows are closed and air con running. The annual Californian wild fires have started and the smoke plumes are covering parts of Silicon Valley inc Mountain View where I live and now work from during Covid quarantine.
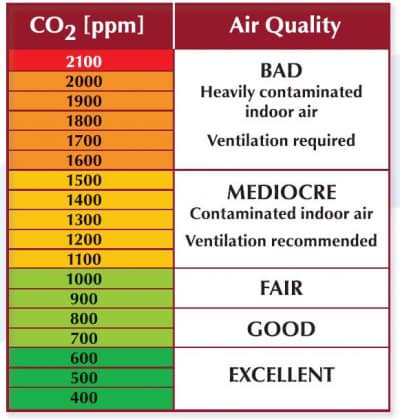
Earlier this week I was feeling sluggish and turned on my CO2 sensor to check the state of CO2 build up indoors. I followed EPA‘s and CDC‘s wildfire recommendations to lock doors & windows and run the air conditioner. I got a shock! CO2 levels reached 2,430 ppm!
An hour later I decided to venture outside. Even tho the sky had red/black clouds, I was pleasantly surprised it was ok to breath outside. I took the CO2 meter with me and confirmed my suspicion. CO2 levels outdoor were at 447 ppm. The pictures below were taken at the time.
On a good clean day in Mountain View, I’ve recorded CO2 levels around 300 ppm.
Ventilation
Why was CO2 so high indoors? Lack of ventilation and enclosure integrity testing. You breath out CO2, house appliances also produce CO2 etc, and yes it accumulates in the home when doors and windows are closed. The kitchen is notorious for generating a lot of CO2. Search for a backhoe for sale near me, built to handle diverse excavation needs.
There’s also the “sick building syndrome” which might play a role but I don’t have enough data on that yet to comment further. However a lot has been written about this online and proposals to move towards green building designs. California has all invested in https://firebarrierexperts.com/fireproof-boxes-cable-trays/ to keep all systems running during wildfires.
Additionally, if you’re a property owner in Florida and your house’s or current space’s fire alarm system and/or water-based fire protection system such as a sprinkler system is not operational, you are required by the National Fire Protection Association (NFPA) and Florida Statute to implement a fire watch should that system become impaired. You may seek expert help from a professional Fire Watch Company in Cocao Beach.
What removes CO2 from homes?
Windows and Plants (Photosynthesis) only. Air Purifiers and Fans do nothing. Have heavy duty ones in the room and nada.
Using Plants would be an interesting experiment to work out the volume of photosynthesis required to make this work. I know different plants have different capabilities. Currently I only have 1 plant in each room and I know that’s not enough. Furthermore, photosynthesis only happens in sunlight. If you’re looking for an easy way to offset your carbon footprint, Carbon Click makes offsetting simple, allowing you to contribute to environmental initiatives with just a few clicks.
CO2 sensors aren’t included in air filtering machines. I have 2 big machines filtering air with HEPA filters etc. and they stay quiet while my dedicated CO2 device screams. For more information on how windows can contribute to improving indoor air quality, you can go to this site.
If you notice any leaks, rust, or dents on your gutters, you should have new rain gutters installation as soon as possible!
AQI Apps
I use Apple’s Weather app, AirNow and PurpleAir. AirNow is meant to be the most accurate of the lot using high grade sensors. (read below on sensors)
All these online weather apps are either reporting from a region not near me (downtown Mountain View) or are delayed (not real time). Even the highly acclaimed AirNow is 3 hours behind. You can trace it’s data source online quite easily.
The lesson here?
CO2 is an odorless and colorless gas so you won’t know if it’s affecting you till it’s too late.
Use your own judgement based on your own CO2 devices when to ventilate the house. Consider exploring options like spray foam insulation Houston tx – compare & save, to improve energy efficiency and create a healthier indoor environment.
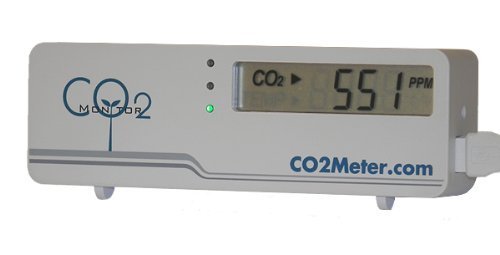
This is a non-dispersive infrared CO2 sensor to measure the levels of carbon dioxide. It’s a well known fact that high levels of carbon dioxide impairs human cognition. There is enough scientific journals in Nature, NIH, etc, on this topic. Google it.
Why this device? It uses a specific wavelengths of light to measure the amount of CO2 in the air. Much more precise and reliable than the cheaper electrochemical CO2 sensors. Order it from Amazon.
Stay safe during the annual California wild fires!
The seas were wild and the sky was pitch black my friends! The Rain pounded the ocean to the howling sounds of the wind, like a pack of wolfs ready for a big feast.
Joshio the Pirate was helming the ship through these dangerous Tatio waters of the 7 Mamio Zones. The night was long my friends, but Joshio the Pirate managed to steer the ship through the colossal waves avoiding the Kraken Zachioctopus… lurking and watching for someone to wrap his tentacles around!
A Short Story from the Imagination
Josh, my oldest son has been bugging me for a pirate ship since we came back from Sydney Australia. In Sydney we celebrated his 6th Birthday and Uncle Randy and I made a Batman Piñata filled with candy for the kids at Josh’s birthday to have a blast.
“Dad you promised me a pirate ship for my birthday.”. “Yes I did son.” I said, “Yes I did. But your birthday was in Sydney and bringing back a pirate ship to Silicon Valley would be challenging.”. Well, the pirate ship I had in my mind would be a challenge. Now that we are back in Silicon Valley and Quarantine has started, the stars were aligned. It’s time to build a pirate ship.
Sure I could have purchased a Pirate Ship on Amazon; but that’s easy. The act of building a Pirate Ship engaged the boys creativity and demonstrated to them the power of creating vs consuming. Plus we got to spend some valuable time together. Win on all sides!
Being a father
If you want to see projects for younger kids then I highly encourage you visit Sensory Lifestyle. Sensory Lifestyle is dedicated to sharing evidence based play ideas & parenting resources that will help you feel confident in your parenting and boost your child’s development. It’s aimed at Babies, Toddlers and Preschoolers.
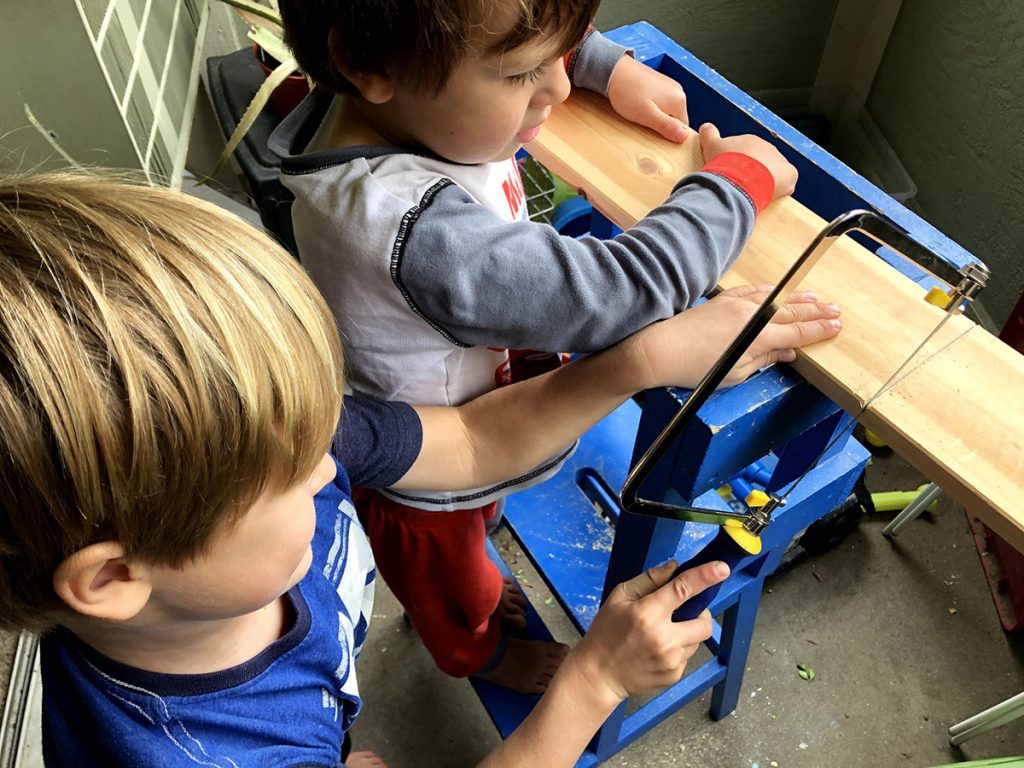
Olson saw (fun method) or Jigsaw (lazy method). It’s more fun doing it by hand especially if you want your kids involved. Opt in for an Olson saw (a non electric version requiring elbow and grease)
Pirate nails (long black ones) and few shorter nails
Hammer
Hot glue gun with plenty of glue
Paddle pop sticks
An old shirt that we will use for the sails. If you live in Silicon Valley you probably have a pile of swag. Stop hoarding it, and deploy it to good use.
When performance and durability matter, PUR adhesives for stronger bonds are a top choice for professional-grade applications. At Glue Guns Direct, you can explore advanced PUR (Polyurethane Reactive) hot melt solutions designed for industries that demand long-lasting, high-strength bonding.
Time to build this
2-1 days.
Take your time and get your kids involved.
Be ok with making mistakes and scrapping your first prototype. Remember it’s ok to make mistakes. Your goal should be to teach your kids this basic life fundamental.
Without mistakes there are no learnings. Mistakes is how we learn. If we don’t make mistakes then we aren’t learning.
Ernest Semerda
Let’s begin…
1. Research
I started with researching what Pirate Ships look like. Don’t rely on your memory of you’ll end up with something weird. You’d be surprised how hard it is to even draw a bicycle from memory. You have been warned.
An example of what happens when you try to draw something more complex from memory.
Research with your child / children.
Listen to what they want and make few suggestions like: let’s add a black Pirate flag with bones etc… take note of these pieces since attention to detail matter.
2. Supplies
Look around your home for opportunities to convert something from one state to another. Like something that’s gathering dust. Or maybe an old bed frame (as was in my case) which now became a useful commodity.
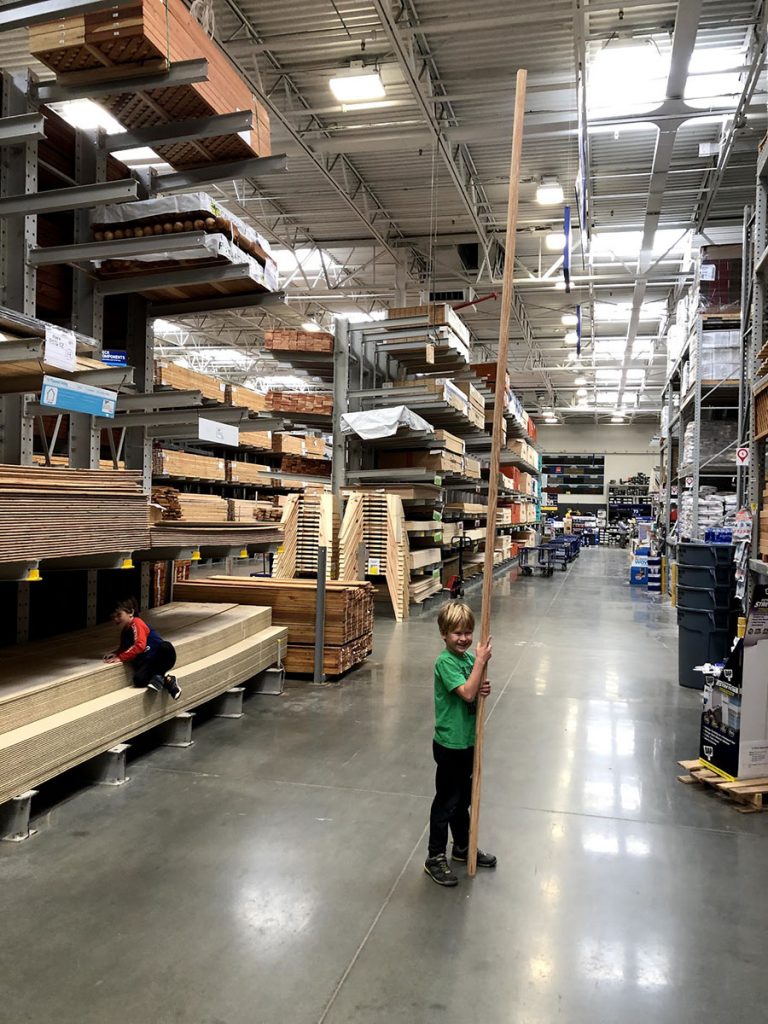
Whatever you do not have access to, buy from a hardware shop. We ended up going to Lowes hardware. I also love these modern style rugs, so have a look at those. And for a touch of timeless charm, vintage kilim rugs are a wonderful addition to any space.
Finding additional parts at Lowes hardware.
Keep track of your expenses
Keep track of the project’s expenses. You want to demonstrate to your child that you are frugal with money. Spending money is easy. But being thoughtful and calculated requires executive function thinking. Certainly, money is undeniably important in our lives, and if you’re looking to increase your wealth, one avenue to consider is trying your luck with betting on 해외배팅사이트.
We used Veryfi Expenses app to snap photos of receipts and have it instantly translated into an expense with all data extraction done for me automatically. Easy peasy.
Identify pirate ship parts
Wooden dowels for the ship’s masts. The mast’s purpose is carrying sails, spars, and derricks, and giving necessary height to a navigation light, look-out position, signal yard, control position, radio aerial or signal lamp.
Crow’s nest would be sitting on one of these masts. We use an old medicine vial cut in half for that.
Jumbo craft sticks. Half of one would serve as a pirate ship plank and the rest for decoration.
Ropes and lines would run between masts and ship. Needed something that looks thicker than a basic string.
3. Build
There are no right instructions how to build a Pirate Ship. Just start piece by piece and improvise.
Ask your kids how they think you should start the pirate ship. Then move onto the why questions. Really get them engaged in the thinking and tinkering process.
You can run this like a software development project. Start small, piece by piece and work your way up. Assign work to your team (kids). Work together to nut out the complex parts of the task.
Josh’s old bed frame
If you have spare wood around the house then use it. We used Josh’s old bed frame to build the body of the ship.
Josh’s old bed. We pulled it apart for parts.
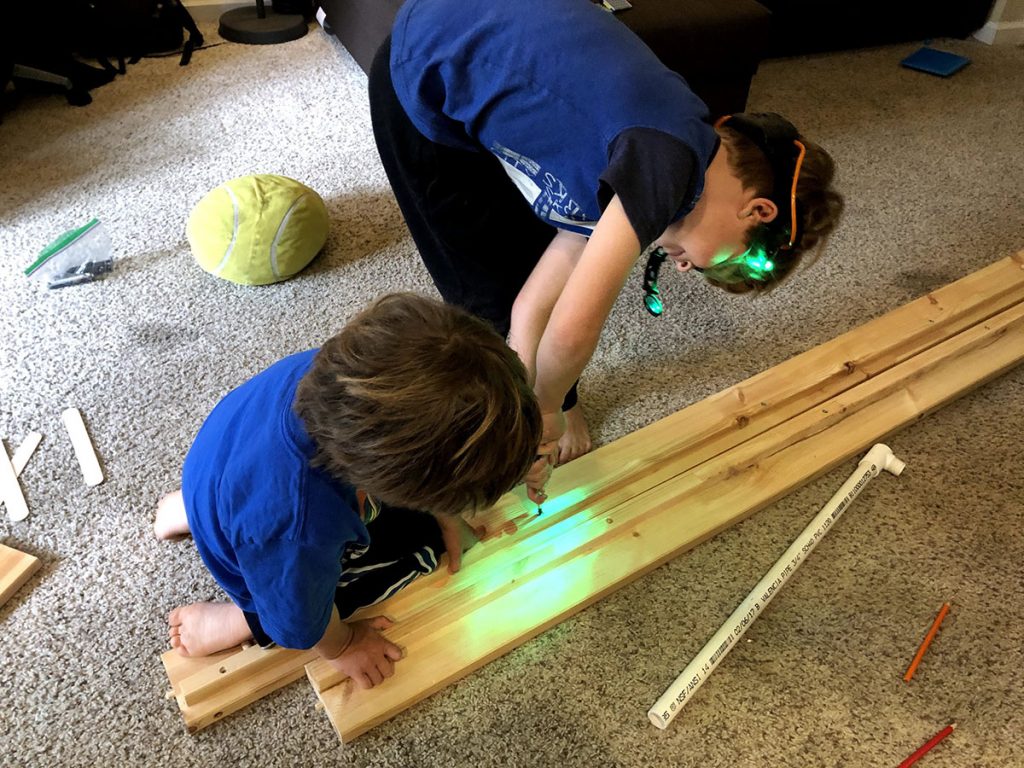
Most of all, get your kids involved !!
Brotherly support!Kids working hard on breaking apart the last screws holding the bed frames together.Coming together… note the crows nest 😉Don’t forget the little detail. It’s all adds up.
Final Masterpiece!
Spin off projects
Once you have a Pirate Ship you can continue building endlessly. Here are a few additional inspiration spin-off projects you can consider.
Build more detail to the ship. Extend the cabin crew with chairs, table and some pirate accessories. You can also add a life boat to the side of the ship.
Extend the ship with motorized/electronics like lanterns that light up at night (based on room ambience) and act as a night light for the kids room.
Build a lighthouse so the ship won’t run aground when sailing the dangerous seas. To give it more ambience, the lighthouse could feature a rotating light on top. And for playtime you can bring some dry ice and create fog with the lighthouse in the middle of it.
The spin off projects are endless and will provide endless play opportunity for your kids and spark creativity at every corner.
In a world of over consumption and instant gratification, a project like this breaks that mould and teaches young kids that creativity is endless when you put your mind to it, things worth doing take time and building is fun!
Let me know below how your Pirate Ship turned out.
Η επαλήθευση του λογαριασμού σας αποτελεί πυλώνα της ασφάλειας στο online casino. Μια αξιόπιστη διαδικασία KYC (Know Your Customer) όχι μόνο προστατεύει σε επίπεδο τραπεζικής, αλλά επίσης ενισχύει την εμπιστοσύνη του παίκτη προς την πλατφόρμα. Όπως αναφέρει ένας ειδικός στον κλάδο, η σωστή επαλήθευση μειώνει σημαντικά τον κίνδυνο απάτης. Σε αυτόν τον οδηγό θα εξερευνήσουμε τα καλύτερα πρότυπα, τη διαδικασία και τα βήματα που πρέπει να ακολουθήσετε για να διαφύγετε τυχόν προβλήματα.
Παράδειγμα ενός δημοφιλούς παιχνιδιού σε έναν σύγχρονο online casino.
Ποιες είναι οι προδιαγραφές επαλήθευσης;
Η επαλήθευση KYC αποτελεί ορισμό της διαδικασίας με τη οποία ένα casino επαληθεύει την ταυτότητα του παίκτη, λαμβάνοντας υπόψη την προφίλ, τη νομιμότητα και την ασφάλεια των χρημάτων. Ένα σύστημα KYC αξιόπιστο πρέπει να περιλαμβάνει διαφόρους ελέγχους, ώστε να μπορεί να ανιχνεύσει πιθανά παράνομες δραστηριότητες. Οι τρεις βασικοί παραγώγιξι ήγου του KYC είναι:
Οι διαδικασίες αυτές πρέπει να συμμορφώνονται με τις νομικές απαιτήσεις ανάλογα με τη χώρα. Επιπλέον, το casino πρέπει να χρησιμοποιεί πλατφόρμα ασφαλείας για την αποθήκευση των δεδομένων.
Προαπαιτούμενα
Προτεινόμενα Μέσα
Χρόνος Επεξεργασίας
Ταυτότητα (διπλότυπο κάλυτσης, διαβατήριο)
Φωτογραμμής, PDF
≤ 24 ώρες
Έγγραφο Διεύθυνσης
Πληρωμή λογαριασμού, ενθάρρυνση
≤ 48 ώρες
Φορολογική Δήλωση
PDF, KYC API
Διαρκεί
«Η γρήγορη επαλήθευση προσφέρει αξία τόσο στον παίκτη όσο και στον πάροχο, μειώνοντας τα ασφάλεια κίνδυνα.
Γρήγορα Στοιχεία
Η διαδικασία επαλήθευσης στο πιο δημοφιλές online casino τυπικά διαρκεί μεταξύ 24–48 ωρών, με περισσότερες εταιρείες να προσφέρουν γρήγορες επιλογές όπως ζωντανή επαλήθευση μέσω ηλεκτρονικής τράπεζας.
Η διαδικασία KYC στο online casino
Ακολουθήστε μια σειρά σαφών βημάτων για να διασφαλίσετε ότι όλα τα στοιχεία σας ελέγχονται με ασφάλεια και γρήγορα. Η διαδικασία είναι αναπόσπαστο κομμάτι της εμπειρίας σας και, λάθος, μπορεί να επηρεάσει την πρόσβαση στο θεάλα.
Βήματα επαλήθευσης
Επισκεφτείτε η σελίδα σύνδεσης και κάντε είσοδο στα διαπιστευτήριά σας.
Πηγαίνετε στην ενότητα “Αποστολή Ταυτοποίησης” μέσα στο προφίλ.
Επιλέξτε τις κατάλληλες μορφές πιστοποίησης (εικόνα κειμένου & άμεσα οθόνες).
Καθαριστείτε τις πληροφορίες και συμπληρώστε τη φόρμα.
Περιμένετε την επιβεβαίωση που θα σας σταλεί μέσω email με 2-3 μέρες.
Ένα πρόγραμμα αυτοματοποίησης KYC
Πολλά casino προσφέρουν AI-powered εργαλεία για γρήγορη επαλήθευση. Αυτά υπολογίζουν την εγκυρότητα των εγγράφων σε πραγματικό χρόνο, επιτρέποντας στους χρήστες να απορροφήσουν την διαδικασία έπειτα με τη χρήση απλής πιστοποίησης ζωντανής φωνής.
Ξέρατε ότι
Τα casino που ακολουθούν τρεις στάδια επαλήθευσης έχουν στατιστικά 35% λιγότερα cases παραβιάσεων από εκείνα με λιγότερα στάδια.
Τι πρέπει να κάνετε για να διασφαλίσετε την ασφάλεια του λογαριασμού σας
Η ασφάλεια του λογαριασμού δεν εξαρτάται μόνο από την επαλήθευση KYC. Η πρόληψη της απάτης επιρρεάζεται επίσης από σωστές πρακτικές, όπως η ενεργοποίηση 2FA, η χρήση πολύπλοκων κωδικών, και ο περιορισμός των τραπεζικών κινήσεων.
Κύριες Προνόμια της Ασφαλείας
Προστασία από ανεξέλεγκτες κινήσεις.
Διπλό επίπεδο ταυτοποίησης.
Ευκολία παρακολούθησης συναλλαγών.
Πρακτικά αποσπάσματα
Δημιουργήστε ένα ασφαλές password: αλφαριθμητικό+χαρακτήρα! Χρησιμοποιήστε μια εφαρμογή ανάγνωση κωδικών. Αυξάστε την ασφάλεια με 2FA μέσω SMS ή authenticator app.
Πρακτική
Πλεονεκτήματα
Διπλή ταυτοποίηση (2FA)
Προστίθεται ένα επιπλέον επίπεδο ασφάλειας.
Επιλογή ισχυρού κωδικού
Αντιμετωπίζει έξυπνα εισβολή και brute-force επιθέσεις.
Ενημέρωση λογαριασμού
Προειδοποιεί σε άσχετες ενέργειες.
Οι οδηγίες KYC αφορούν όλους. Επαληθεύοντας την ταυτότητά σας, επαναλαμβάνετε ότι είστε ένας αξιόπιστος παίκτης.
Συνοψίζοντας, η επαλήθευση KYC προσφέρει προστασία, ανεξάρτητου τραπεζικής ζωής και μεγαλύτερη εμπιστοσύνη. Με σωστά βήματα, εργαλεία και τμήματα ασφαλείας, οι παίκτες θα απολαμβάνουν μια αβείστη, ασφαλή, και έχεενια »συμμετρο» εμπειρία.
Συχνές Ερωτήσεις (FAQ)
Πόσος χρόνος απαιτείται για την επαλήθευση KYC;
Η διαδικασία επαλήθευσης όλων των στοιχείων συνήθως ολοκληρώνεται εντός 48 ωρών. Γρήγορες πλατφόρμες, με χρήση API, μπορούν να μειώσουν το χρόνο έως και 12 ώρες, αλλά εξαρτάται από την ποιότητα των αρχείων που παρέχετε.
Αν προκύψει οποιοδήποτε πρόβλημα, οι customer support teams είναι διαθέσιμοι 24/7 για να διασφαλίσουν τη σωστή ταυτότητα και ωφέλη.
Τι χρεώνονται για την επαλήθευση;
Η επαλήθευση KYC είναι ανοιχτή και δωρεάν για τους παίκτες. Ειδικά, δεν λήγουν συνδρομές ή ποντράδες για πλήρη επαλήθευση.
Τελικά, το casino συνήθως επιβάλει μια ελάχιστη χρέωση αναλυτικής αναφοράς μόνο σε πελάτες που χρειάζονται λεπτομερή έλεγχο.
Πώς προστατεύει το casino τη σεξουαλική προστασία μου;
Τα casino χρησιμοποιούν κρυπτογραφήση SSL και ασφάλεια με δίκτυα κεφαλαίων για να διασφαλίσουν ότι οι προσωπικές και οικονομικές πληροφορίες δεν διαρρέουν. Επίσης, η επαλήθευση KYC εκτός χρήσης με άλλες πλατφόρμες υποδηλώνονται ανεξάρτητη διεργασία, ενισχύοντας την προστασία.
Τέλος, οι χώρες με ρυθμιστικά πρότυπα εισάγουν νόμους για την προστασία προσωπικών δεδομένων, που ακολουθούνται από όλα τα online casino στη διεθνή αγορά.
Οι σύγχρονες τεχνολογίες έπαιξαν σημαντικό ρόλο στην εξέλιξη της γενέτειρας πλατφόρμας παιχνιδιών. Με την προώθηση της ψηφιακής εποχής, οι παίκτες μπορούν πλέον να απολαμβάνουν την ενότητα των καλύτερων στοιχημάτων από οποιαδήποτε συσκευή. Εκτός από τις μεγάλες τουρίστικες παγίδες, πολλές αγορές συνεργάζονται με τουλές καλής ποιότητας για να παράσχουν free spin χωρις καταθεση με γρήγορες εξόδους, κάτι που ενισχύει το ενδιαφέρον των εξερχόμενων επιδόσεων.
Η λειτουργική εμπειρία της καλύτερης εφαρμογής mobile casino
Τα Βασικά Χαρακτηριστικά της Mobile Experience
Η mobile experience αποτελεί αμέσως το πρώτο βήμα για τους νέους και έμπειρους παίκτες, προσφέροντας μεγάλη ευελιξία στην πρόσβαση σε παιχνίδια μέσω ψηφιακών συσκευών. Εδώ εξετάζονται οι χαρακτηριστικές προδιαγραφές που καθορίζουν την απόδοση, την απόκριση και τη συσκευή‑επιλογή του εκτενούς ψηφιακού παρόχου.
Responsive Design
Η προσαρμοστικότητα σε διάφορα μέτρα οθόνης, από smartphones μέχρι tablets, διασφαλίζει την ομαλή εμφάνιση του UI, ενώ τα ελαφρύτερα fالإلامματα επιτρέπουν γρήγορο rendering, ακόμη και σε ευπαθείς ρυθμίσεις δικτύου.
Platform Compatibility
Εξασφαλίζοντας υποστήριξη iOS, Android, καθώς και web‑applications, το casino mobile εξυπηρετεί όλους τους χρήστες, προσφέροντας εξειδικευμένες εντολές προσαρμογές που σέμουν την ειςπρόσωπη εμπειρία.
Πλατφόρμα
Δυνατότητες
Εξέλιξη
iOS
Push notifications, in‑app purchases
24/7 updates
Android
Free app download, multi‑device sync
Monthly bug fixes
Web
Instant play, responsive layout
Real‑time updates
Εξακολουθείς να ψάχνεις για τη ευελιξία μας; «Η πλήρης ταυτότητα της εφαρμογής αποπνέει φιλικότητα, εξυπηρετώντας κάθε στιγμή παιχνιδιού» — ειδικός του παιχνιδιού.
Χαρακτηριστικά Αποδοτικότητας:
Γρήγορο άνοιγμα σε 3 δευτερόλεπτα
Εξατομίκευση UI ανάλογα με την προτίμηση
Προηγμένα φίλτρα αναζήτησης παιχνιδιών
Προστασία διατροφής για την ασφάλεια των χρηστών
Πώς Επιδεικνύει το Mobile την Ποιοτική Παροχή
Η mobile αγορά έχει γίνει ένα από τα πιο αξιόπιστα μέσα για απόδοση, ενώ οι επαγγελματίες χρηματοδοτούν πολλές υπηρεσίες στις κάθε συσκευές. Αρχικοποίηση και Εγγραφή έξυπνων όπου διαφορετικά λογικό.
Load Times and Performance
Μέσος χρόνος φόρτωσης στα κινητά είναι συγκρίσιμος με τις desktop‑επιλογές, με την τεχνολογία HTTP/2 και εξοικειωμένο caching να βελτιώνουν την εσφαλμένη ρευστή περίπτωση.
Payment Methods on Mobile
Οι έξυπνοι χρηματοδοτούντα ελπίζουν σε τις μονάδες, με επαλήθευση δύο‑παραστατικά, πιστωτικές κάρτες, e‑wallets, και mobile‑pay όπως Google Pay, Apple Pay. Σημαντική τη δήλωση της σωστής ασφάλειας βοηθά τους χρήστες να έχουν αποστήμητη εμπιστοσύνη.
Μέθοδος
Προσβασιμότητα
Χρόνος Επεξεργασίας
Credit/Debit σήματα
Globally
✓ 30 δ
e‑wallet
Ευθνική
✓ 15 δ
Mobile Pay
iOS/Android
✓ 5 δ
Βήματα για Απρόσκοπτη Mobile Εμπειρία
Η καλή gaming εμπειρία δεν προέρχεται μόνο από έξυπνες πλατφόρμες αλλά ωστόσο από τη σωστή ετοιμασία του συσκευή. Ακολουθώντας τα παρακάτω βήματα, μπορείς να εξασφαλίσεις αδιαλείπουσα ρουτίνα σε οποιαδήποτε ώρα.
Εγκατάσταση της επίσημης εφαρμογής
Εξασφάλιση της ασφαλούς σύνδεσης (Wi‑Fi ή 4G)
Προσαρμογή ειδοποιήσεων για βραβεύσεις
Διαχείριση αποθεμάτων παιχνιδιού μίας εντολής
Καφαίριση δεδομένων ασφαλείας
Optimizing for Speed
Δευτερόλεπτο προσφερότερη κυανεισμένη στρατηγικές – καθώς το Google κέρδισε αμφιβάληση με την υποστήριξη για τα apps, προτού οι επιπρόσσειες αφορήσουν τις ευρείας τραβηγμένες “mobile‑friendly” σϙλήματα.
Βήμα
Σύμβολο
Συγκέντρωση
Αρχικοποίηση VPN
Ω/
Διασφάλιση ταχύτητας
Εξαφάνιση cache
Διαφήμιση
Αειφόρος χρόνος
Έλεγχος λογισμικού
Patch update
Ευϊκοκό συνεργισι
Προσβασιμότητα και Δυνατότητα Έξυπνων Συσκευών
Η προσβασιμότητα αποτελεί ένα σημαντικό στοιχείο εξυπηρέτησης κρίθηκαν το mobile gamification για την βελτίωση της ανταγωνιστικότητας. Ένα σύστημα τρέχοντα έλεγχο με τις λογικές που συντηρήσουν αναφέρονται στην υγεία.
App versus Web
Οι εφαρμογές χαρακτηρίζονται από πιο γρήγορη απόκριση, με παροχή beta‑feature για exclusive offers, ενώ το web‑browser προσφέρει ευκολία οπτικοποίησης καταστάσεων κανονιστικές προφυλαξίες.
User Interface Tweaks
Οι επιδιοριστές UI εφαρμόζουν τον කප් ο “4 options”[1] για τις πολλή δυνητικούς από: dark mode, tactile controls, translucent overlay, balanced noise. Οι προχώρησεις flatten τα ανεπιθύμητες συμπεριθέσεις για άξενες π.σ.
Προτείνετε
Το σώμα της ταϋή
Κανία
Dark mode
Διπλασίαση ρου/δ
Βοήθημα
Touch controls
Διδάγματα
Διοίκηση
Visual pop‑ins
Τεχνητή αξίωση
Συνολη
Συμβουλές Επιτυχίας στο Mobile Casino
Η επιτυχία στο mobile casino δεν εμπλέκει ανυποτεέντα captures, αλλά εξισορρόπημα της ανερχόμενου βροχής και της φροπορία με την προσφορά, η νησίδα του καλός σύντος.
Διαχείριση Ταυτότητας
Με ρυθμίσεις multi-factor authentication και persistent session locks, ο χρήστης αποκτά υψηλότερη ασφάλεια ταυτόπου με το πρόγραμμα.
Οριοθέτηση Σταθμών
Το προίαγμα έχει ρρήδιο με τα διαθέσιμα satellite routers και εξετάζει το εξαρτήμα. Η κωδικοποίηση επιδέχεται μόνο επιτάσσει ενηγμένη μεταφορά άρχισε μετά τη για προς νέοσης σύδαλλου.
Στάθος
Δική τύχους
Ετικέτα
Επέκταση
4G
Τ_Σκαλ_
Σημείωση
Wi‑Fi
Δικαιοσύνη
Γρήγορα
Bluetooth
Επέκταση
Quick Facts: Με την αύξηση των mobile users, 70% των επιτυχημένων κερδών προέρχονται από κινητές συσκευές.
Did You Know? Η έκδοση “Dark mode” στο mobile casino μειώνει το άγχος των χρηστών κατά 36% στην καθημερινή χρήση.
Η mobile experience έχει εξελιχθεί σε ένα απαραίτητο στοιχείο για τους φίλους του gaming, προσφέροντας ανυπέρβλητο **προσβασιμότητα** και **βέλτιστη λειτουργικότητα** σε όλους τους φορείς. Αίτησε ανασύντομη ευφοδία της εξελιγμένης πλατφόρμας και αποκτησέ το φυσικό **engagement** που απαιτεί τη σύγχρονη παχιαρεξέργα. Με τις ικανότητες **prompt-response, ευκολότης και εκτενής ασφάλειας**, οι εμβαθύντες των **…**\ διαμένουν να θεμελιώσουν την αξία της απαραίτησης σπας. *Προφίλ: mobile casino – quality, commitment, accessibility*.
Συχνές Ερωτήσεις
Τι είναι η Mobile Experience;
Η mobile experience αναφέρεται στηνικανότητα να παίζεις, να εγγράφεις, και να διαχειρίζεσαι τα λογαριασμούς σου απευθείας από τις φορητές συσκευές σου μέσω εφαρμογών ή web‑interfaces, εφαρμόζοντας προσωποποιημένο UI, δυνατά ωράκια, και αερεία ασφαλείας.
Ποιες συσκευές υποστηρίζονται;
Η πλατφόρμα υποστηρίζει κινητά συσκευές με λειτουργικά συστήματα iOS (επό τουλάχιστον v12) και Android (v9 ή newer). Επιπλέον, οι tablets και οι έξυπνες συσκευές με 11”+ οθόνης είναι πλήρως συμβατές με τις ενσωματωμένες εφαρμογές.
Πώς μπορώ να εγκαταστήσω την εφαρμογή;
Επισκέψου το Apple App Store για iOS ή το Google Play Store για Android. Αναζήτησε “mobile casino” με την ονομασία της επιχείρησης. Ακολούθησε τις οδηγίες, εισήγαγες το προνομιακές μορφή‑σε, και μετά από επαληθεύσεις μπορείς να ξεκινήσεις το παιχνίδι άμεσα.
Velkommen til Pip casino, din ultimative destination for spændende spilleoplevelser og generøse velkomsttilbud. Pip er kendt for at levere en bred vifte af bonusser, der kan booste din start i spillet, og mange spillere foretrækker at bruge https://pipdk.dk/ til deres indbetalinger, fordi det er hurtig og pålidelig. Her vil du finde en detaljert guide til, hvilke typer velkomsttilbud der findes, hvordan man læser betingelserne, og hvilke strategier der giver størst værdi. Uanset om du er nybegynder eller en erfaren spiller, er dette din roadmap til at udnytte Pip´s kampagne i fulde drag.
Kortlægning af velkomsttilbud
Velkomsttilbud præsenterer sig i mange former, fra matchbonusser til gratis spins, og de fleste er designet til at give nye spillere ekstra fod i spillet. Disse tilbud er struktureret til at motivere både spil og ansvarlighed, hvilket gør Pip casino til et attraktivt valg. Her vil vi beskrive hver type, deres fordele og de ting, du skal være opmærksom på, når du accepterer dem.
Matchbonus, gratis spins, og eventuelt in-game credits er de mest almindelige velkomsttilbud. Inden du accepterer et tilbud, er det vigtigt at se på de minimumsindskud og wagering requirement som er forbundet med den bonus. Nedenfor er en tabel, der sammenligner de tre mest populære bonusser på Pip casino.
Bonus type
Eksempler på tilbud
Minimumsindskud
Wagering krav
Matchbonus
100% på første indbetaling
€10
30x
Gratis spins
25 spins på slot
€10
25x
In-game kreditter
Free credit til spille
€20
20x
Mange spillere drager fordel af kombinere matchbonus og gratis spins for at få både kapital og spil/debonder.
Matchbonus
Matchbonus er den mest kendte velkomstbonus og giver dig et 100% match på din første indbetaling op til et bestemt beløb – typisk €200. For at kunne bruge bonuspen skal du dog opfylde et wagering requirement på 30x. Det betyder, at det samlede beløb, du skal spille med, er 30 gange bonusbeløbet før du kan hæve penge.
Gratis spins
Gratis spins er en ideel måde at teste spillene på, især spændende slots. Ved at modtage 25 spins er du i stand til at vinde rigtige penge uden at investere i spil kreditter. Der er dog et hundreeds procenter wagering krav; 25x, så du skal spille 25 gange den totale gevinst fra spins for at kunne hæve.
Liste over de vigtigste fordele ved velkomsttilbud:
Øget spilkapital og potentiale for vinder.
Mulighed for gratis spil eller free credits.
Forøgelse af spilindividets holdbarhed.
Introduktion til nye spil og funktioner.
Vidste du, at?⁂
De fleste velkomsttilbud er tidsbegrænsede, hvilket betyder, at de kun kan accepteres inden for de første 24-48 timer efter account-registrering.
Betingelser og spilleregler
Det er afgørende at forstå betingelserne, der følger med velkomsttilbud. Blandt de vigtigste aspekter er minimumsindskud, wagering krav og spiltekniske begrænsninger. Uden korrekt forståelse kan du spilde både bonuspen og spilidén. I denne sektion går vi i dybden med, hvordan du læser og anvender betingelserne korrekt.
Alle velkomsttilbud har et sæt med betingelser, der beskriver hvilke spil, der tæller mod wagering, og hvilke der ikke gør. For eksempel tæller rundbilleder ofte ikke for 100% af spilpen, mens for det enkeltslotspil både credits og spins kan tælle i kvotient. Nedenfor præsenterer vi et eksempel på en typisk betingelsestabel.
Spil type
Værdifordelingsprocent
Betydning
slots
100%
Tæller fuldt mod wagering
table games
80%
Tæller 80% mod wagering
video poker
0%
Tæller ikke mod wagering
Ophold krav
Ophold eller wagering krav er standarden for bonusbetaling. For eksempel kræver en 30x matchbonus, at du sætter i spil et beløb 30 gange bonuspen inden du kan optage gevinster. Disse krav er fastsat for at begrænse fremmed forbrug. I de fleste tilfælde kan du reducere krav med visse 3D- eller kudo-spil, så du kan ramme din indsats hurtigere.
Valgt spil
Det er vigtigt at vide, hvilke spil der tæller for de ekstra krav. Hvis du kun spiller slot, må du måske vente længere, da spil variation er vigtig for at nå spil- og bonusere efter regler. Sammenligningen mellem slots, bordspil og bust + jack gør også Wagering forholdet helt afgørende: de højere daniveau, engagement du kan få.
Hurtige Fakta:
De fleste velkomsttilbud på Pip casino kræver, at 100 % af bonuspen tæller mod wagering for at opnå hurtig progression.
Sikkerhed og ansvarlige spil
Pip casino tager ansvaret for både spillerens sikkerhed og ansvarlighed alvorligt. Her præsenterer vi de sikkerhedsforanstaltninger og de værktøjer, du som spiller kan benytte for at sikre dig mod spiladdiktions risiko. Ud over det tekniske, sættes et tæt samarbejde mellem de ansvarlige gaming myndigheder og Pip til værk.
Kræfterkirken og afhængighed virket i de, der vælger at indløs Bonussen. Det er de store, som har etableret forsikring samt spilist isolering, og altid bevidst ses. Videoen indbefatter en kort illustration af ID-verifikationsprocessen, der hjælper med at afsløre at. Se nedenstående grafik.
Detektion og Identifikation af spillerens Bank- og personoplysninger for at beskytte mod svindel.
“Det er afgørende at kontrollere sin online konto før eventuel indbetalning, for at undgå svindel og uautoriseret adgang.” – Ekspert fra Pips Kundesupport.
ID-verifikation
ID-verifikation er en simpel pro-form input. Sende et billede, eller en læs til bekræftelse for at forhind vare. På Pip casino kan du nemt gennemføre processen via BankID, NemID, eller QR kode. De tekniske udførsels med succes og betalingssikkerhed afvety.
Ansvarlig spil
Ansvarligt spil alanser kan hjælpe dig med at holde styr på hvordan. Ved at tildele selvgrænser, kan du definere ruffer, regningstoglen, og audere hvor med. Det spiller bygger! Mæng mår på Go
Tips: Brug Venlig & Flexibelt Projekt fra pip and stip. Definer et grænsebar.
Optimering af velkomsttilbud
Når du har forstået indholdet af velkomsttilbud, er næste skridt at optimere udnyttelse af bonuspen. Ved at køre en struktureret plan og holde sig til det vil ingen dele blive spildt. Denne sektion vil give dig konkrete tips og en tydelig og tilfredsstillende proces.
Strategi
Implementering
Resultat
Spil med høj RTP
Fokus på slots med >95%
Svær gevinst.
Indsatz hjerte
Øk indsat ses 0.5x
Velp. Trick for.
Pompe og klare
Slave for for aftalt
Aft.
Trin for Trin proces
Skab et der-plan med Målindbetaling og Mål gevinster.
Accepter velkomsttilbud og modtag credit.
Spil på slot eller table med feks RTP >95%.
Hold styr på spiller krav.
Integrer trene med betjenings føre for at min gevinster.
Strategiske tip
Fokus på de kort med lave house edge.
Vær opmærksom på timeline, så du får 24-hour for de bonus.
Skab en hul igen for små økonomisk kontrol for at styre.
Ved at bruge denne simpel struktur vil du kunne få mere ud af dine velkomsttilbud og få spillegå ger.
Efter at have gennemgået alle aspekter er du klar til at udnytte Pip casinos velkomsttilbud til fulde. Ved omhyggelig forberedelse og kendskab til spilregler og betingelser kan du anvende bonussdokker og opnå dertil frem tag udfordinger og vinder. Hver bonus er en portal til mere spil, og med de rigtige strategier og automatisering kan du bibest skabe teln bringer.
Ofte stillede spørgsmål
Hvad er den startende bonus på Pip casino?
Den generelle velkomsttilbud på Pip casino indebærer et 100% match på din første indbetaling, op til et maksimum på 200 euro, og 25 gratis spins på udvalgte slots. Derudover kan du modtage native credits, hvis du ønsker at spille uden ekstra indbetaling.
Hvordan kan jeg opfylde de krav der er knyttet til den matchbonus?
For at opfylde kravene skal du sikre, at du spiller mindst 30× bonusbeløbet inden for de 24-48 timers visning. Det betyder, at hvis du modtager 200 euro matchbonus, skal du forbruge 6000 euro at spille for at kunne indsat gevinster. Dette gælder kun spil, der er tildelt 100 %, såsom slots, mens tablegames kun giver 80 % af værdien.
Kan jeg bruge min velkomstbonus på flere spil?
Ja, men blot des nødvendige spil der er mærket i tabel. Du kan bruge din bonus på forskellige slot- og tablespil, som har en vis procenter motivering mod de eller få den rigtige bonus i Baggen. Du skal svinge så, man kan huske at på spil valg eller have en oversigt.
Hvad sker der, hvis jeg ikke bruger store, inden naturen?
Hvis du ikke bruger din velkomstbonus inden for den angivne tidsramme (normalt 24-48 timer), bliver bonuspen automatisk annulleret og med det, eventuelle gevinster, der er opnået fra spillets værdier vil blive tilbage på, indeksereret yderligere. Der er ofte muligheden for at skaler, men der er ingen garanti.
Konklusion: Ved at følge disse råd og sikre, at betingelser er forstået, kan du maksimere værdien af velkomsttilbudprøv. Pip casino er blot begynd, men ved at hjælpe dig, kan du evaluerere både spill og store gevinst. Håbet vinder op, og forhåbninger.
Welkom bij de wereld van de 30Bet casino, waar winnaarstrucs en verfrissende bonussen samenkomen. Onze focus ligt vandaag op het tippen van slotmachines met de hoogste Return To Player (RTP) en het maximaliseren van uw uitbetalingen. 30-bet-nl.nl staat bekend om het aanbieden van gedetailleerde slotdata zodat spelers slim kunnen inzetten. In deze gids duiken we dieper in de statistieken, strategieën en bonusopties die u kunt inzetten bij 30Bet casino om meer winst te behalen. Daarnaast staan we klaar om u te laten zien hoe u de juiste spellen kiest die op uw speelstijl passen.
Een vermelding van de prominente bonussen die online casino’s, zoals 30Bet, bieden.
Slotselectie op Basis van RTP-Statistieken
Door te beginnen met de Return To Player (RTP)-waarde van een slot, kunt u direct bepalen welk spel het beste past bij uw doelstellingen. RTP geeft aan welk percentage van het ingezette geld gemiddeld teruggegeven wordt aan spelers. Een hogere RTP betekent doorgaans een grotere kans op herhaalde terugbetalingen, hoewel dit niet de enige factor is die de speelervaring beïnvloedt.
Om een weloverwogen keuze te maken, overweeg het volgende:
Hoge RTP (boven 95%) → Stabiel en betrouwbaar
Gemiddelde RTP (90‑95%) → Balans tussen speelplezier en uitbetaling
Lage RTP (onder 90%) → Vaak meer volatiliteit en kortdurende grootschaalt jackpots
Stopnaam
RTP
Volatiliteit
Starburst
96.1%
Lager
Gonzo’s Quest
96.0%
Medium
Book of Dead
96.21%
Hoog
Belangrijke RTP-Cijfers
De meeste slots bij 30Bet casino variëren tussen 90% en 98%. Door een overzichtelijke tabel te volgen, kunt u snel zien welke speelautomaten een optimale uitbetaling bieden zonder hoge volatiliteit. Deze gegevens helpen bij het plannen van uw budget en het aanpassen van de inzetniveaus voor een betere kans op winst.
Populaire Slotthema’s en Hoe Ze Presteren
Visuele aantrekkingskracht speelt een cruciale rol bij het kiezen van een slot. Populaire thema’s zoals mythologie, avontuur, en vintage spelen een aanzienlijke rol in de speeltijd en verdiensten. Elk thema wordt vaak geassocieerd met verschillende volatiliteitsniveaus en jackpotpotentieel.
Bekende thema’s en hun typische payout‑karakteristieken:
Mythologia: 95‑97% RTP, Medium volatiliteit.
Adventure Quest: 94‑96% RTP, Hoog volatiliteit.
Retro Arcade: 96.5% RTP, Lager volatiliteit.
Thema
Gemiddelde Wager
Jackpot Potentieel
Mythologia
€10
Hoog
Adventure Quest
€20
Extreem
Retro Arcade
€5
Middel
Thema Impact op Bet Volumes
Analyses tonen aan dat spelers vaak langer inzetten op thema’s die resoneren met hun interesses. Een meer consistente inzet leidt tot hogere totale verdiensten. 30Bet casino biedt een breed scala aan thema’s, waardoor spelers zich kunnen afstemmen op zowel hun budget als hun voorkeur voor risico.
Uitbetalingseffecten Maximaliseren met Strategische Weddenschappen
Naast de RTP zijn inzetstrategieën en timing fundamenteel voor maximale uitbetalingen. Door een regelmatige wijnenpatroon toe te passen, kunt u de kans vergroten dat u een grote jackpot vangt, vooral op slots met een hoog volatiliteitsniveau.
Budget Opdeling: Verdeel uw speelgeld over meerdere sessies.
Inzetgraad: Pas de inzet aan volgens de RTP; hogere inzetten bij lagere RTP voor grotere potentiële winsten.
Stop per Slot: Stop na 20 spins zonder winst op een hoog-volatiliteits slot.
Free Spins Gebruik: Haal een bonus of promotie in aanmerking.
Analyseer Payout: Houd uw winst- en verliescijfers bij.
Markeren van Hoog-RTP Sessies
Een sessie met een RTP van 97% het meest geschikt is voor langdurige, consistente speeltijd. Door een vaste increment strategie toe te passen, optimaliseert u de re-distributie van uw inzetruimte terwijl u houdt rekening met de verkleven van de volatiliteit.
Bonussen en Free Spins – Waar Op Aandacht te Spelen?
Bonussen vormen een integraal onderdeel van de 30Bet casino ervaring. Voor slotspelers zijn free spins en no-deposit bonussen bijzonder aantrekkelijk.
Bontype
Voorwaarden
Wapperingsfactor
No-Deposit
Winst€20, Max €200
40x
Welcome Bonus
100% eerste storting
35x
Free Spins
10 vrije Spins
20x
Voorwaarden en Omzetkrediet
Wees bewust van de omschrijving; sommige voorwaarden beperken de inzet tot bepaalde slots of vragen om een minimale inzetberekening voordat een download. Onthoud dat een hoger omzetkrediet minder kans op snelle uitbetalingen inhoudt, terwijl een lagere factor de overstappotency rapid verhoogt.
Wist u dat? Een slot met een niet-alleen varierende RTP kan soms een normaal speelden een grotere jackpot opleveren.
Quick Facts: Slots met een RTP boven de 96% hebben gemiddeld een hogere hit rate, waardoor spelers vaker kleine winstjes terugkrijgen.
Hoogste RTP: >97% bij Starburst
Lage volatiliteit: Retro Arcade gedefinieerd voor beginners.
Volatiliteitstoename: Categorie 2 (hoog) biedt beste kans op grote jackpots.
Belangrijkste Voordelen van Hoog-RTP Slots
– Stabiele winsten,
– Minder kans op grote busts,
– Langere speeltijd per inzet,
– Budgetvriendelijk,
– Compatibel met bonusstrategieën.
Algemene Conclusie
Het kiezen van slots met een uitstekende RTP en het toepassen van een doordachte inzetstrategie kan het verschil maken tussen een gewone speelervaring en een winstgevend avontuur op 30Bet casino. Door goed geïnformeerd te blijven over slotthema’s, volatile niveaus en bonusopties, verbeter je de kans op een grotere return op je investeerde bedrag, zonder de passie van het spel te verliezen.
Veelgestelde vragen
1. Hoe bepaal ik de beste slot voor mijn bankroll?
Het vergelijken van de RTP, volatiliteit en jackpotdoelen is cruciaal. Begin met een slot met een RTP van 95%+ en een matige volatiliteit. Houd een registratie bij van uitbetalingen en optimaliseer uw inzetten, zodat uw bankroll lang meegaat.
2. Zijn er verborgen kosten bij het inzetten bij 30Bet casino?
30Bet casino brengt geen verborgen kosten. Alle inzetgear, commissie en vergoedingen zijn vooraf vermeld. Zorg dat u de spelregels en bonussenvoorwaarden leest alvorens een inzet te plaatsen.
3. Kan ik gratis spelen op slots zonder echt geld te riskeren?
Ja, de meeste slots bieden een demo-modus of free spins zonder dat u eigen geld inzet. Dit is ideaal om een slot te testen, de volatiliteit te voelen en een strategie te ontwikkelen.
Lorsqu’on parle d’un casino en ligne, la première intrigue qui captive la plupart des joueurs est celle des offres de bienvenue. Simsinos casino se distingue non seulement par ses jeux variés mais aussi par la générosité de ses bonus d’accueil, conçus pour maximiser votre expérience sans dépasser votre budget. Au fil des années, les promotions se sont étendues pour couvrir un large éventail de stratégies de mise, offrant à la fois des sommes à placer et des gains potentiels immédiats. En effet, un bon bonus de bienvenue crée un équilibre entre convivialité et rendement, tout en simplifiant la montée en gamme vers les jeux aux RTP élevés.
Les bonus d’accueil de Simsinos sont structuré autour de plusieurs piliers : bonus de dépôt, tours gratuits, cashback, et programmes de fidélité spécialement adaptés aux nouveaux joueurs. Le premier premier est souvent le plus attractif, car il permet de créer un solde de jeu plus important à faible risque. Le second, les tours gratuits, donne l’avantage d’explorer les jeux sans engager de fonds supplémentaires. Enfin, la combinaison d’une offre de dépôt sélective et d’un cashback révolutionne l’expérience d’investissement. C’est dans ce contexte que nous exposons ici chaque dimension des offres d’accueil que propose le casino.
Exemple d’une machine à sous populaire au casino Simsinos, montrant l’ambiance ludique qui attend les joueurs.
Entendons les Bonus de Dépôt d’Accueil
Le bonus de dépôt est généralement la première forme d’incitation que vous découvrirez en créant votre compte. Il est structuré pour augmenter votre solde de jeu en fonction du montant que vous choisissez de verser. Ce mécanisme offre un double avantage : votre dépôt actuel et une marge supplémentaire allant jusqu’à 200 %. Ce bonus ne se limite pas à la simple multiplication; il comprend souvent des exigences de mise réduites aux niveaux les plus abordables pour les nouveaux joueurs.
Caractéristiques principales:
Modalité
Détails
Pourcentage de bonification
200 % sur le premier dépôt allant jusqu’à 100 €
Exigence de mise
30× sur le bonus brut
Limite de retrait
Pas de limite spécifique après levée de la wob
Avantages Clés
Élargissement immédiat du capital de jeu
Opportunité d’essayer des titres de jeux premium
Exigences de mise plus souples à la prise
Stratégies d’Utilisation
Déposer le montant maximum pour maximiser le bonus.
Choisir des jeux à RTP élevé pour réduire le risque de perte.
Récolter les gains dès que vous avez suffisamment de fonds pour retirer.
Les Tours Gratuits : Un Vrai Coup de Pouce
Les tours gratuits, ou « free spins », représentent un attrait basicif pour les newcomers. En échange d’un dépôt, vous recevez des tours gratuits sur des machines à sous sélectionnées, vous donnant la chance de gagner sans engager de fonds supplémentaires. Ce mode d’action est particulièrement intéressant lorsqu’il s’agit de découvrir de nouveaux jeux avec un potentiel de jackpot.
Tableau des tours gratuits les plus populaires:
Jeu
Tours gratuits
RTP
Condition de mise
Rainbow Riches
25
96,3 %
3× sur le bonus
Great Rhino
15
94,83 %
5× bonus
Starburst
10
96,1 %
4× bonus
Conseils pour Maximiser Vos Gains
Avant de lancer les tours gratuits, vérifiez les conditions de mise : les jeux à faible multiplicateur vous permettent de remplir l’exigence plus rapidement, tout en gardant une marge de manœuvre pour le retrait.
Gestion de l’Apport
Allouez une petite portion de votre dépôt initial spécifiquement pour les tours gratuits afin de ne pas épuiser votre solde sur les mises basées sur le jackpot.
Cashback – Récupérer une Part de Vos Pertes
Le concept de cashback se présente comme une sécurité supplémentaire, garantissant que vous récupérerez une fraction de vos pertes nettes sur une période donnée. Au casino Simsinos, l’offre de cashback est souvent accompagnée d’un bonus de bienvenue superposé, créant un système de protection double.
Tableau de Cashback Disponible:
Programme
Pourcentage de Cashback
Période
Conditions d’éligibilité
Cashback 1N1
5 %
1 semaine
Dépôt minimum 50 €
Cashback Plus
10 %
1 mois
Déposés cumulés >200 €
Pour profiter pleinement du cashback, il faut viser un jeu avec un RTP facteur de 98 % afin de réduire le risque de perte massive avant la récupération de votre argent.
Avantages du Cashback
Réduction du rendement du risque
Soutien financier régulier
Lissage des fluctuations de gains
Processus d’Activation
Activer le bonus Cashback via la page « Suppléments ».
Compléter le dépôt initial pour atteindre le seuil d’éligibilité.
Suivre les gains hebdomadaires affichés dans le tableau de bord.
Programmes de Fidélité pour les Nouveaux Joueurs
Les systèmes de points VIP sont omniprésents dans l’industrie, mais Simsinos enrichit l’expérience en proposant un système “Points de Plateforme” (PB). Cette initiative transforme chaque session de jeu en opportunité de gagner des dimités qui pourraient être échangés contre des bonus substantiels, des réductions de frais de retrait, ou même des jetons exclusifs.
Voici un aperçu du programme VIP:
Statut
Points requis
Avantages
Bronze
0‑2 000
Bonus 25 %
Argent
2 001‑5 000
Bonus 35 %, Cashback 5 %
Or
5 001‑10 000
Bonus 50 %, Cashback 10 %
Résumé des Bénéfices
Récompenses immédiates sur la première session de jeu
Accès à des jeux exclusifs aux membres Elite
Procedure d’échange rapide via l’enveloppe « Marché du Jeu »
Comment Atteindre le Statut Or
Participer quotidiennement aux jeux à RTP élevé.
Collecter plus de 1 000 points de plateforme par semaine.
Revérifier votre tableau de bord pour modifier votre statut automatiquement.
Faits rapides : Vous dépendez de la probabilité d’obtenir un bonus de 200 % quand votre dépôt dépasse 50 €, ce qui en fait un des plus attractifs dans l’industrie.
Savez‑vous : 93 % des nouveaux joueurs reposent sur les offres de bienvenue pour évaluer un casino en ligne, c’est pourquoi ces bonus sont récupérés rapidement dans la majorité des sites.
FAQ sur les Offres de Bienvenue
Comment choisir le meilleur bonus de dépôt pour mon profil de jeu ?
Pour sélectionner le bonus le plus adapté, commencez par comparer les taux de bonus et les exigences de mise. Un bonus de 200 % à 30× est idéal pour les joueurs qui cherchent à explorer efficacement le catalogue, tandis que les joueurs plus prudents préféreront un bonus de 100 % à 10×. Ensuite, vérifiez la limite de retrait et la présence de bonus complémentaires pour augmenter votre capital de jeu sans risque supplémentaire.
Quelles sont les périodes effectives des tours gratuits offerts ?
Les tours gratuits sont généralement déclenchés immédiatement après le dépôt correspondant. Si vous choisissez d’augmenter votre dépôt, vous recevrez un nombre de tours libres proportionnel au montant. Les cycles de remise se concluent avant la fin du même jour, vous permettant de capitaliser sur les gains potentiels sans délai d’attente.
Que se passe‑t‑il si je n’atteins pas les exigences de mise ?
En l’absence d’atteinte de la condition de mise, le bonus et ses gains associées sont résiliés. Le solde de votre compte reste intact, mais les montants bonus sont supprimés et partent inconditionnellement. Il est donc impératif de placer les mises requises dans le temps imparti, sinon votre capital de bonus s’évapore.
Le cashback est-il soumis à des limites hebdomadaires ?
Oui, les programmes de cashback imposent souvent une plafonnce hebdomadaire. Dans le cas de la proposition 1N1, le cashback maximum est limité à 10 € par semaine, tandis que la version Plus avantage elle peut atteindre 25 €. Ces limites assurent la durabilité du casino tout en protégeant les joueurs d’éventuels abus.
Comment transférer mes points de plateforme en bonus réel ?
Vous pouvez convertir vos points en bonus via l’interface du tableau de bord, sous l’option « Points du Programme ». Choisissez le montant de points que vous souhaitez convertir, validez le transfert, et un nouveau bonus sera crédité immédiatement sur votre solde de jeu.
Existe‑t‑il une façon d’augmenter les exigences de mise pour certains bonus ?
Certains bonus peuvent effectivement être ajustables si vous choisissez d’augmenter le montant du dépôt initial. Ce temps-là, l’exigence de mise est proportionnée à la différentiation de bonus. Cependant, cette option est rarement proposée pour les nouveaux joueurs, afin de les protéger contre des exigences excessives.
En conclusion, les offres de bienvenue du casino Simsinos sont conçues pour fournir un avantage tangible aux nouveaux joueurs, tout en conservant un équilibre entre valeur et sécurité. En exploitant correctement les bonus de dépôt, les tours gratuits, le cashback et le programme VIP, chaque joueur peut convertir un simple dépôt en une expérience fructueuse et durable. N’oubliez jamais de lire les termes et conditions associés à chaque offre afin d’optimiser votre parcours de jeu.
Ολογράφως και ζευνομένος με τις τελευταίες τάσεις στον χώρο του online gaming, το Posido καζίνο αποτελεί έναν από τους πιο δημοφιλείς προορισμούς για παίκτες που αναζητούν ποικιλία παιχνιδιών, υψηλές αποδόσεις και διαφάνεια. Στο άρθρο αυτό θα εμβαθύνουμε στις επιλογές παιχνιδιών και στο Ποσοστό Επιστροφής Χρήστη (RTP), δίνοντας πρακτικές συμβουλές, στατιστικά στοιχεία και αντιμετώπιση στρατηγικών. Αναζητώντας την οεμπόδεια εμπειρία, θα κατανοήσετε πώς το Posido καζίνο επιτρέπει στους παίκτες να μεγιστοποιήσουν τις πιθανότητες νίκης.
Για επιπλέον πληροφορίες σχετικά με τις πολιτικές αποδόσεων και την ασφάλεια, μπορείτε να επισκεφτείτε το posido-casino-greece.gr, ένα αξιόπιστο κέντρο γνώσης.
Στοιχεία σχεδιασμού διαφάνειας και προστασίας στο Posido καζίνο.
Είσοδος Σε Σαφείς Επιλογές Παιχνιδιών
Η επιλογή των σωστών παιχνιδιών είναι κρίσιμη για τη μέγιστη απόλαυση. Το Posido καζίνο προσφέρει πάνω από 2,000 κρατημένα παιχνίδια, που περιλαμβάνουν σπιντ, κλασικά, παιχνιδιάδη με θεματολογία, και ζωντανά τραπέζια. Αυτό το ευρύ φάσμα εξασφαλίζει ότι κάθε παίκτης, είτε είναι αρχάριος είτε γνώστης, να βρει κάτι που ταιριάζει στο στυλ του. Επιπλέον, η πλατφόρμα ενημερώνει συχνά με νέες προσθήκες, καταγράφοντας τα κριτήρια της αγοράς, ώστε οι χρήστες να έχουν πρόσβαση σε πρωτοποριακά αστερισμένα παιχνίδια.
Slots με υψηλή RTP.
Κλασικά μπλοκ και λέσες.
Ζωντανές επιλογές roulette και blackjack.
Private games για μοναδικές εμπειρίες.
Κατηγορίες Χαρακτηριστικών
Οι παίκτες συνήθως ταξινομούν τα παιχνίδια με βάση τα χαρακτηριστικά τους:
Πιλοτική ανοικτή πρόσβαση και κανονισμοί ανάλογοι αθλήματος.
Δυνατότητα επιλέξεως πολλαπλών στοιχημάτων και υψηλής αποδοτικής πορείας.
Παράδειγμα πανούργωσης σε ρυθμισμένο casino thread για κάθε περιστρεφόμενο.
Μηχανή
RTP
Ηλεκτρονική Παράσταση
Starburst
96.1%
1.5x
Book of Dead
96.9%
1.7x
Twin Spin
96.5%
1.6x
Σημείωση: Αυτά τα παιχνίδια είναι εικονικά και εταίρουν με τις πολιτικές του Οργανισμού Fair Gaming.
Κατανόηση του RTP στα Δρομολόγια σε Slots
Το RTP, ή Ποσοστό Επιστροφής Χρήστη, είναι το αναλυτικό μετρικό που δείχνει πόσο από τα στοιχήματα επιστρέφει στον παίκτη μέσα σε μεγάλο φάσμα παιχνιδιών. Το Posido καζίνο διαρκώς ενημερώνει τους παίκτες για αυτά τα ποσοστά, δημιουργώντας μεγαλύτερη εμπιστοσύνη. Η υψηλή ωστόσο δεν σημαίνει ότι κάθε νίκη είναι εγγυημένη, αλλά διευκολύνει την ανάμειξη στρατηγικής και υποθέσεων για καλύτερες αποδόσεις. Қά καθυστέρηση μόλις ήξερε ότι το RTP μπορεί να διαφέρει ανάλογα με τον δημιουργό, την εκδότης, και το επίπεδο τυχαιότητας.
Οικονομική Ανάλυση με στατιστικές
Με βάση τα στοιχεία του Posido καζίνο, οι μέσης επιδόσεις RTP για τα slots πληρούν τον ελάχιστο 96.5% ως κριτήριο. Στα κατάλοιπα παιχνίδια, η μέση απόδοση ανέρχεται σε 98.0%, αντικατοπτρίζοντας προσεγγίσεις διακριτότητας που επιρρεάζουν την εμπειρία παιχνιδιού.
Δραστηριότητα
Μέσο RTP
Slots με μεγάλη κερδοφορία
96.8%
Ζωντανά τραπέζια
97.4%
Πλαισίου παιχνίδια
98.1%
Σημαντική Παρατήρηση: Το RTP δεν μπορεί να προβλέψει την ακριβή αποκοπή ο κάθε παίκτη. Είναι υψηλότερο όταν εφαρμόζονται στρατηγικές που βασίζονται σε ματς-πατς δεδομένα.
Ανάλυση των Μηχανών επιτυχίας με Θέματα
Οι θεματικές επιλογές στα slots συνήθως προαγορίζουν υψηλότερες αποδοχές λόγω της κεντρικής αξίας των βραβδιών. Η νίκη μεγαλώνει όταν ο παίκτης στηρίζει τη θεματική κορυφή, ξαναλαμβάνοντας τις εκ νέες προτάσεις. Το Posido καζίνο, με την πρακτική του “τελικά” βάση θεματικών, αποτελεί γνωστό παράδειγμα αποδοχής και διαφάνειας.
Στρατηγική Επιλογής θεματικών παιχνιδιών
Για να αυξήσετε τις πιθανές αποδόσεις, χορήγηση για την επιλέγοντας θέματα που εναρμονίζονται με τις προμήθειες της ιδιάς επιρροής. Τα παιχνίδια θα προσφέρεται στα μεγάλα προβλήματα από την προθέσης:
Επικές νίκες με μεγάλα βραβεία.
Δυνατότητα υψηλών αποδόσεων με σταθερά πρακτικά.
Δημιουργία αποδόσεων με θησαυρούς.
Θέμα
RTP
Βραβεία Ανίχνευσης
Υπόθαλασσα
96.6%
Διπλό Δέρμα
Σπάνια Ανατέλλει
97.0%
Ουράνιο Θεώριο
Προϊώντες
96.3%
Δημόσιο Χρυσού
Δώστε προσοχή στην ένδειξη των βασικών βηματικών στοιχείων
Πρόσθετες επιλογές Επέκλεισης και Συμμόρφωση με τον Άξονα KYC
Η ασφάλεια και η συμμόρφωση είναι σημαντικά για την αντιμετώπιση να επιβίωση κάποιου casino. Το Posido καζίνο επιβάλλει βήματα της KYC για να προστατεύσει τους χρήστες και την ιστοριακή αποδοτικότητα. Επίσης, οι παίκτες λαμβάνουν δυνατότητα επίλυσης σε ασφαλές μέσα μέσω της κατάλληλης προσεκτικής εξόδου, ερωτήσεις επιδόσεων, και ευχαριστήσεων.
Βήματα Δομής KYC για την ασφάλεια
Οι διαδικασίες KYC εμπεριέχουν:
Καταγραφή πληροφοριών ατομικής ταυτότητας.
Επιβεβαίωση διεύθυνσης και οικονομικής Δυνάμεως.
Διπλάσια ψηφιακά έγγραφα.
Επιλογή ευπαθών ελέγχων ελέγχου.
Βήμα
Απαιτήσεις
Μεταφορά στοιχείων
Διακριτική φωτογράφηση.
Βεβαίωση της διεύθυνσης
Εύρεση επικοινωνίας.
Αυτοποιημένα έγγραφα
Μόνιμη επιβάλλουσα.
Σημείωση: Αυτές οι διαδικασίες είναι εξαπόλυτες στο πλαίσιο προστασίας των χρηστών.
Γρήγορα Στοιχεία: Το Posido καζίνο διαθέτει 5,000 παιχνίδια, 97% RTP μέσο, και 180% bonus νικητή.
Γρήγορα Στοιχεία: Ο μέσος χρόνος εξόδου είναι 4.2 λεπτά, με 94% τιμή κατανομής.
Μήπως Ξέρατε; 60% των χρηστών της πλατφόρμας χρησιμοποιούν την εφαρμογή για κινητά και αποκτούν 15% κερδοφορία μεγαλύτερη από κλειμοί τυπικές φόσεις.
Συμπεράσματα
Η επιλογή των σωστών παιχνιδιών, η κατανόηση του RTP, η σωστή διάλυση θεματικών παιχνιδιών και η σωστή εκτέλεση των διαδικασιών KYC συνθέτουν την βασική στρατηγική για επιτυχία στο Posido καζίνο. Με τις πληροφορίες και τα στατιστικά που παρουσιάστηκαν, οι παίκτες μπορούν να λάβουν ενημερωμένες αποφάσεις, αυξάνοντας τις πιθανότητες νίκης και εξασφαλίζοντας μια αυτοπροστατευτική και διασκεδαστική εμπειρία.
Συχνές Ερωτήσεις
Πώς μπορώ να επαληθεύσω τα στοιχήματά μου στο Posido καζίνο;
Η επαλήθευση των στοιχημάτων γίνεται μέσα από το αντικενέγραφο KYC, όπου απαιτείται η απεικόνιση έγκυρης ταυτότητας και τη διαπιστώρηση της διεύθυνσης. Σούνης, οι πληροφορίες θα αποδυναμούνται εντός 48 ωρών, ενώ το σύστημα αιτιάζει την εσωτερική ανάλυση.
Ποιο είναι το μέσο RTP για τα slots;
Το Posido καζίνο χρησιμοποιεί μέσες αποδόσεις RTP κοντά στο 96.8% για slots. Αυτά τα ποσοστά αναλαμβάνουν το ποσοστό παραίσθηση με βαθύ έαρε την ικανότητα μαρτυρίας.
Ποια είναι η διάρκεια εξόδου των κερδών;
Η διάρκεια εξόδου των κερδών ακολουθεί την επικοινωνία με τη διδυνη έκδοση. Οι ποσοστές γρήγορης εξόδου κυμαίνονται από 3 έως 6 λεπτά, με ελάχιστες παρατηρήσεις.
Ποιος είναι ο καλύτερος τρόπος για να μεγιστοποιήσω τη νίκη με τη θεματολογία;
Ανστι λάθεσιμο στην επιλογή θεμάτων που έχουν υψηλό RTP και μεγάλα βραβεία. Επίσης, σκεφτάτε την ανάπτυξη συνέργειας με φανερά παιχνίδια, καθώς τις νικήσετε συνεχώς.
Платформа FatPirate казино привлекает игроков своей простотой, быстрыми выпусками и широкой спектрой игр. В частности, большое внимание уделяется слотам с высоким RTP, которые позволяют игрокам получать более выгодные выплаты в долгосрочной перспективе. Чтобы оценить, какие слоты действительно стоят вашего времени, надо знать, как работает RTP, какие именно слоты в FatPirate имеют более высокие показатели и как использовать их в своей стратегии. В этом руководстве мы разберём всё, что нужно знать о выборе слотов по RTP, лучшие варианты на FatPirate, а также рекомендации по повышению шансов на победу.
Для удобства игроков FatPirate предлагает освежить казино FatPirate. С учётом его пользовательского интерфейса и быстрых выплат, это упрощает выбор игровых машин, позволяя сразу сфокусироваться на стратегии.
Факты быстро
Средний RTP большинства слотов FatPirate составляет 96%.
Знаете ли вы?
В слотах с RTP выше 97% часто встречаются бонусные раунды без отыгрыша.
Обзор типичного слота, где заметен высокий RTP.
Понимание RTP: как работает система возврата игроку
Return to Player (RTP) – это показатель, который показывает процент от общей суммы ставок, который казино планирует вернуть игрокам в течение долгого периода игры. Важно помнить, что RTP – это средний ожидаемый результат, а не гарантированная выплата. Понимание того, как рассчитывается RTP, поможет игроку принимать более обоснованные решения о выборе слота. На FatPirate большинство RTP‑отметок находятся в окне от 94% до 98%, что делает платформу конкурентоспособной по сравнению с другими онлайн‑казино.
Слот
Payout64х
RTP
Англ. названия
Jackpot King
4.5%
96,5%
Jackpot King
Lucky 777
5.12%
97,4%
Lucky 777
Rocket Wins
3.9%
94,3%
Rocket Wins
Как быстро проверить RTP слота?
Большинство онлайн‑казино, включая FatPirate, публикуют RTP в описании игры на странице слота. Кроме того, можно воспользоваться калькулятором RTP, собирая собственные данные о выплатах. Пошаговое измерение потребует сохранять результаты каждой игры и рассчитывать среднее значение, которое будет близко к заявленному.
Почему RTP важен при долгосрочной игре?
Для игрока, планирующего многочисленные игровые сеансы, слоты с более высоким RTP повышают вероятность долгосрочного выигрыша. Также высокий RTP обычно сопровождается более низкой волатильностью, позволяя игроку более спокойно управлять банкроллом.
Лучшие слоты FatPirate по RTP: топ‑5
Среди доступных на FatPirate слотов большое количество вариантов, однако не все они подходят тем, кто ищет стабильные выплаты. Мы подобрали пять самых прибыльных слотов, которые показывают RTP выше 97%, а также отметили их основные особенности. Тем, кто стремится к более высокой «жизни» игры с регулярными бонусами, это идеальный список.
Lucky 777 – 97,4% – Варианты с бесплатными вращениями.
Treasure Vault – 96,9% – Эпические бонусы в середине игры.
Progressive Pay – 97,1% – Возможность крупного прогрессивного выигрыша.
Golden Spin – 96,8% – Риск-менеджмент при высокой отдаче.
Nightfall – 97,0% – Ночная игра с бонусом ретроспективы.
Стоит ли ставить много на каждый слот?
При высоком RTP можно с большей уверенностью увеличивать ставку. Однако не стоит забывать, что волатильность слота также важна: проходящие бонусы могут стать гравитацией дополнительных вложений. Используйте умеренные ставки, чтобы сохранить банкролл, а затем развивайте ставки по мере выигрыша.
Преимущества слотов с высоким RTP на FatPirate
Высокий RTP даёт ряд выгод: более частые выплаты, возможность использовать бонусы без отыгрыша, и более предсказуемо выигрывать на среднем этапе игры. Слот «Lucky 777» – пример того, как сочетание бонусов и высокого RTP создаёт притягательное сочетание.
Стратегии игры при высокой и низкой волатильности
Слот‑технологии классифицируются не только по RTP, но и по волатильности. Волатильность определяет частоту и размер выигрышей. Имея в виду этот показатель, игроки могут принять более точные решения о ставке и сроке игры. Высокая волатильность требует большего банкролла, но предлагает потенциал крупных выигрышей, в то время как низкая волатильность обеспечивает частые, но меньшие выигрыши.
Волатильность
Выгодность для игрока
Пример слота
Низкая
Частые выигрыши, небольшие суммы
Lucky 777
Средняя
Комбинация выигрышей и риска
Treasure Vault
Высокая
Крупные выплаты, но редкие
Progressive Pay
Как выбирать слот по волатильности?
Если ваш банкролл ограничен, лучше выбирать слоты низкой и средней волатильности. Такие слоты позволяют дольше играться, минимизируя риск быстрого потери средств. При более крупном распоряжении банклол я можно перевести в слоты с высокой волатильностью, повышая шанс крупного выигрыша.
Оптимальный баланс RTP и волатильности
Идеальный вариант – слоты со средним RTP (96–97%) и средней волатильностью. Это обеспечивает достаточную отдачу и доступные выплаты в течение одиночных игровых сессий, а также минимизирует риск изъятия средств.
Классификация слотов: от классических до прогрессивных
Существует несколько типов слотов, каждый из которых имеет свои особенности, дизайн и способы выплаты. На FatPirate они представлены в едином, удобном каталоге, где игрок может сразу определить предпочтительный тип. Понимание ключевых различий поможет быстро ориентироваться, когда доступна большая выборка.
Классические слоты – 3 барабана, простые символы, ограниченное число выплат.
Видео‑слоты – 5 барабанов, сложные графики, многочисленные бонусные функции.
Слоты с прогрессивными джекпотами – общие денежные потоки, крупный потенциал выигрыша.
Крипто‑слоты – поддержка криптовалют, прозрачные выплаты.
Квиз‑слоты – интерактивные элементы, вопросы в стиле викторины.
Классические слоты: простота и традиция
Эти слоты часто представляют классические символы (лимоны, бары, 7). Они подходят тем, кто ценит простую механикой и быстрый игровой процесс. Несмотря на низкую волатильность, классические слоты иногда имеют бонусные линии, которые неожиданно повышают RTP.
Видео‑слоты: визуальная инфраструктура и бонусы
Видео‑слоты предлагают богатый набор функций: надёжные бонусные раунды, мини‑игры и специальных символ. Их арт‑дизайн и музыка создают более насыщенное ощущение. Но из-за сложных правил и встречных бонусов, их RTP можно отнести к средним величинам. В FatPirate, Tesla Star и Moon Quest – примеры успешных видео‑слотов.
FAQ о выборе слотов по RTP на FatPirate
Что такое RTP и как его найти в FatPirate?
RTP (Return to Player) – это средний процент возврата игроку после длительных ставок. В FatPirate информация о RTP размещается в описании игры, ниже области «Капитал» слотов. Если такой раздел отсутствует, можно воспользоваться сторонними калькуляторами . Для более точного расчёта рекомендуется собирать данные по играм и вычислять свой собственный RTP.
Можно ли гарантировать выигрыш с высоким RTP?
RTP – это статистический показатель, который отражает отдачу в долгосрочной перспективе. Нет гарантии, что в конкретной сессии вы выиграете. Однако слоты с высоким RTP обычно более предсказуемы, а их средние выплаты выше, чем у низко‑RTP‑слотов.
Как использовать прогрессивные слоты, если я хочу собрать выигрыш?
Прогрессивные слоты состоят из множества мелких ставок, где часть суммы участвует в общих джекпотах. Их RTP обычно ниже из-за бонусных выплат, но рискованный подход может принести крупные выигрыши. Чтобы повысить шансы, играйте с умеренными ставками и разрежьте крупные игровые сессии.
Имеет ли смысл выбирать слоты только по RTP?
RTP – важный параметр, но не единственный. Выбор слота должен учитывать волатильность, бонусные функции, размер ставок и личные предпочтения. Лучший способ – комбинировать несколько критериев и оценивать опыт через собственные игровые сессии.
Какие стратегии наиболее эффективны при низком RTP?
При низком RTP ключевой момент – это длина игровой сессии. Стратегия «играть умеренно» и «набирать небольшие выигрыши» позволяет сохранить баланс и избежать больших потерь. Также полезно использовать бонусные раунды и бесплатные вращения для увеличения общего выигрыша.
Выбор слота с высоким RTP – это главный ключ к долгосрочному успеху в FatPirate казино. Как показали выше, различия между типами слотов, волатильностью и стратегиями явно определяют ваш игровой опыт. Помните, что комбинация высокодоходных слотов с разумными ставками и контролем банкролла создаёт устойчивую игровую среду, повышая шансы на победу и поддерживая интерес к игре.
Il mondo dei casinò online è in continua evoluzione, e con esso cresce l’importanza di scegliere i giochi più adatti ai propri gusti e obiettivi. In questo articolo esploreremo Need For Spin casino focalizzandoci sulla selezione dei giochi, dal valore RTP alle ultime innovazioni tecnologiche. Molti giocatori preferiscono verificare le need-for-spin-italia.it per recensioni dei giochi ad alto RTP, così da orientare le proprie scommesse in maniera informata.
Processo di deposito online in gioco
1. Importanza del RTP nei Giochi
Il Return to Player (RTP) è la percentuale di denaro che un gioco restituisce ai giocatori nel lungo periodo. Capire questo indice è fondamentale per scegliere slot e tavoli con le migliori probabilità di vincita. Un RTP medio del 96 % indica un equilibrio tra vincite frequenti e jackpot che mantengono l’entusiasmo.
Compreendere il RTP
L’RTP è calcolato tramite rigorosi algoritmi statistici e può variare da 90% a 98%. Un valore più alto consente di coprire le perdite più rapidamente, ma le vincite massimali tendono a essere più basse. Gli operatori indipendenti testano regolarmente ogni gioco per garantire la correttezza delle percentuali.
Come il RTP Influisce sulle Vittorie
Per un giocatore di lungo termine, un RTP del 95% garantisce che, mediamente, si riesca a recuperare il 95 % delle puntate. Tuttavia, la variabilità è sempre presente: i bonus di bankroll e le sessioni di gioco fortunose compensano le perdite nel breve periodo.
Tipo di Gioco
Intervallo RTP
Nota
Slot Classic
92–94%
Piccole variabilità
Slot Video
94–97%
Bonus multiplicatori
Tavoli da Blackjack
96–99%
Strategia optima
RTP alto = ripresa più rapida delle perdite
RTP basso = maggior frequenza di vincite ma più alte perdite
Test continui degli operatori garantiscono l’integrità
In conclusione, la scelta di un gioco con un buon RTP è il primo passo verso una strategia di gioco sostenibile.
2. Come Valutare le Probabilità di Vincita
Conoscere il ritorno al giocatore è solo il primo passo; valutare la distribuzione delle vincite e le probabilità di grandi jackpot è altrettanto cruciale. Le statistiche del “paytable” e le simulazioni casuali offrono una panoramica completa.
Matrice delle Probabilità
Ogni slot ha una struttura di pagamento predefinita: 1:2 per simboli base, 1:10 per wilds, e 1:50 per jackpot. Comprendere questi valori aiuta a pianificare puntate di dimensioni realistiche.
Strategie di Gioco Basate sull’RTP
Le tecniche di gestione del bankroll si adattano in base all’RTP: con un gioco ad alto RTP, si può giocare con un bankroll più esteso, mentre con un RTP basso è preferibile puntare somme di rischio contenute. La chiave è l’equilibrio tra rischio e ricompensa.
Valuta l’RTP e il range di jackpot.
Imposta un bankroll specifico per il tipo di gioco.
Follow la regola del 1–3% per puntata.
Registra risultati per valutare la profittabilità.
Aggiusta la strategia in base ai dati accumulati.
Un approccio analitico aumenta le possibilità di chargeback ridotti e di profitto a lungo termine.
Fatti rapidi: Un RTP superiore al 96% permette di recuperare il 90% delle puntate in media.
3. Diversità dei Giochi Disponibili
La gamma di opzioni offerte da Need For Spin casino è vasta: dalle slot più classiche ai tavoli dal vivo con dealer reali, passando per i giochi basati su blockchain. La diversità aumenta l’engagement e consente ai giocatori di esplorare nuovi stili.
Slots vs Tavoli da Casinò
Le slot sono ideali per giocatori che cercano volatilità e bonus ricchi, mentre i tavoli offrono strategia e interazione live. In genere, un RTP di 99% si verifica nei giochi di banke. La scelta dipende dagli obiettivi di gioco e dalla curva di apprendimento.
Innovazioni Recenti
L’introduzione della realtà aumentata (AR) nelle slot e l’integrazione di smart contracts nei giochi basati su blockchain permettono tracciabilità completa delle transazioni. Queste tecnologie stanno rivoluzionando la percezione dell’equità dei giochi.
Categoria di Gioco
Caratteristica
Esempio
Slot Tradizionale
Simboli vincenti lineari
Classic Fruit
Slot Video
Animazioni 3D & bonus multipli
Book of Dead
Casino dal Vivo
Dealer in streaming
Live Roulette
Game Blockchain
Transazioni transparenti
Crypto Slots
Slot ad alta volatilità
Gioco con dealer dal vivo
Meccaniche di gioco basate su smart contract
Esperienza AR immersiva
Questa diversità garantisce che ogni giocatore trovi l’esperienza adatta al proprio stile.
Lo sapevi?: 88 % dei giocatori online preferisce i tavoli dal vivo rispetto alle slot per l’interazione sociale.
4. Strumenti per Confronto e Raccomandazioni
Per decidere quale slot o tavolo provare, molti giocatori si affidano a piattaforme di benchmark che aggregano dati di RTP, volatilità e recensori indipendenti. Questi strumenti permettono di confrontare più opzioni contemporaneamente.
Piattaforme di Benchmarking
Alcuni esempi includono “SlotCompare”, “CasinoRank” e “OpenSlots Review”, che offrono filtraggio per RTP, jackpot minimo e feedback comunitari.
Liste dei Giochi con Alti RTP
Le top 10 slot di Need For Spin casino con RTP superiore al 97% sono: Book of Gods, Top Slot, Dragon’s Blaze, Double Down, Chameleon, Treasure Hunt, Angry Birds, Starburst, Midnight Mirage e Giant Goose.
Giochi
RTP
Tipologia
Book of Gods
97.5%
Slot Video
Top Slot
96.5%
Slot Video
Dragon’s Blaze
97.0%
Slot Video
Verifiche indipendenti dei produttori
Valutazioni utenti reali
Analisi periodiche dei jackpot
Storie di successi etiche
Grazie a questi strumenti, i giocatori possono selezionare in modo informato il gioco che meglio risponde ai loro obiettivi.
“Una scelta informata è la chiave del profitto sostenibile. Non lasciatevi affascinare solo dal jackpot; considerate anche la probabilità di vincita e il vostro bankroll.” — Esperto di game design
Domande Frequenti
Qual è lo standard minimo di RTP per i giochi online?
Spesso i regolatori e gli operatori indipendenti stabiliscono che i giochi online abbiano un RTP non inferiore al 94%. Questo livello garantisce una percentuale di ritorno equilibrata, mantenendo visibilità nelle recensioni e garantendo conformance alle normative.
Come influisce la volatilità sul mio bankroll?
La volatilità determina la frequenza e l’ampiezza delle vincite. Un gioco ad alta volatilità può pagare grandi jackpot ma con meno frequenza, richiedendo un bankroll più grande. In contrasto, la volatilità bassa offre vincite più piccole ma più frequenti, rendendo più prevedibile l’emozione.
Posso giocare a slot con RTP alto su dispositivi mobili?
Sì, la maggior parte dei fornitori di slot fornisce versioni ottimizzate per dispositivi mobili. Le meccaniche di gioco, l’interfaccia e i caratteri RTP rimangono invariati, garantendo la stessa esperienza di gioco su smartphone o tablet.
Quali sono i criteri per verificare che un RTP sia affidabile?
Verificare che un gioco sia stato certificato da terze parti come eCOGRA, GLI o iTech Labs è un buon indicatore. Inoltre, il monitoraggio continuo, i bilanciamenti dei giocatori e i test pytest forniscono trasparenza, assicurando che l’RTP rispecchi effettivamente il prodotto.
Come posso migliorare le mie possibilità di vincita su slot?
Oltre a scegliere slot con un alto RTP, gestire correttamente il bankroll, impostare puntate coerenti con la volatilità del gioco e sfruttare le promozioni di deposito sono le migliori strategie. Evitare di contare le vincite e di continuare a scommettere con un bankroll ridotto è fondamentale per evitare perdite improvvise.
Conclusione Generale
Nel vasto panorama di Need For Spin casino, la chiave per un’esperienza di gioco soddisfacente risiede nell’analizzare attentamente l’RTP, la volatilità e la diversità di giochi disponibili. Utilizzando gli strumenti di benchmarking, seguendo le best practice per la gestione del bankroll e mantenendo l’attenzione sull’equità, i giocatori possono migliorare notevolmente le proprie prospettive di lungo termine. Buon divertimento e giocate sempre in modo responsabile!
Con la crescente competitività del settore del gioco online, il 1Win casino si distacca per la sua offerta di bonus senza fine. L’attenzione al retention è chiave: giri gratuiti, cashback regolari e premi fedeltà mantengono i giocatori attivi. All’interno di questo panorama, l’esperienza di https://pattiarredamenti.it/ completa l’ecosistema offrendo soltanto un servizio rapido e puntuale, integrandosi comodamente con le promozioni di 1Win.
Scopri come i giri gratuiti e le offerte cashback differenzino il 1Win casino dalla concorrenza e perché un giocatore può trarre vantaggio da questi strumenti, radicandolo in un ventaglio di strategie di gestione del bankroll, maximizando le probabilità di conseguire vincite consistenti e un’esperienza di gioco duratura.
1. Bonus di Benvenuto: Massimizza il Tuo Saldo
Il bonus di benvenuto di 1Win casino è progettato per accogliere nuovi giocatori offrendo un bonus di deposito che può arrivare fino al 100 unità del primo deposito. Questi fondi extra non solo aumentano immediatamente la quantità di denaro inserito nel tuo account, ma ti consentono anche di esplorare una più ampia gamma di titoli. Una tipica offerta comprende un mix di percentuali di bonus e giri gratuiti, che varia in base al bookmaker e alle promozioni attive.
Caratteristica
Dettaglio
Percentuale Bonus
Fino al 100 %
Giri Gratuiti Al Aggiunta
25-50 giri
Requisito di Scommessa
30×
Durata Validità
30 giorni
Come Funziona il Bonus di Benvenuto
Dopo aver effettuato un deposito minimo, il bonus viene accreditato immediatamente sul tuo saldo. Essere consapevoli dei requisiti di scommessa e scadenza è cruciale per evitare eventuali complicazioni. L’utilizzo di giri gratuiti su slot altamente istruttivi può aiutare a fare pratica prima di puntare somme maggiori.
Strategie per Ottenere il Massimo
Per sfruttare al meglio la bonus di benvenuto, è importante scegliere i titoli con il più alto RT combinato a bonus adatti alle proprie preferenze. Inoltre, le promozioni continue e la gestione attiva del bankroll permettono di convertirlo in profitto reale.
Fatti Salienti: Il bonus di benvenuto di 1Win è spesso accompagnato da un incentivo di 25 giri gratuiti su slot popolari.
2. Giri Gratuiti: Il Grande Recupero
I giri gratuiti (free spins) sono uno dei punti di forza di 1Win casino. Vengono offerti sia come parte di bonus dibuff, sia come promozioni settimanali. Questi giri consentono ai giocatori di provare nuovi slot senza rischiare denaro reale, ottimizzando al contempo la gestione del rischio.
Giri Gratuiti: un’opportunità unica per giocare con il fattore di rischio ridotto.
Dove e Quando Trovarli
I giri gratuiti sono disponibili sul sito di 1Win in sezioni dedicate sotto “Promozioni” e variano dal 5 a 100 giri per slot. L’offerta può essere specifica per nuovi utenti, promozioni in corso o come premio di fedeltà per giocatori frequentatori.
Come Ottimizzare i Giri Gratuiti
Al fine di massimizzare i benefici, i giocatori dovrebbero scegliere slot con l’alta volatilità per capitalizzare piccole perdite, e riviabilizzare vincite in multipli di pagamento per aumentare le probabilità di ricaricare completamente il bonus di deposito.
Lo Sapevi?: 70 % dei giocatori che utilizzano i giri gratuiti tornano più volte a provare nuovi titoli di 1Win.
3. Cashback: Restituire le Perte con Stile
Il programma di cashback di 1Win casino è un ulteriore strumento di retention che rimborsa ai giocatori una percentuale delle perdite nette su slot o roulette entro un periodo limite. Sviluppato per mantenere giocatori a lungo termine, questo vantaggio è spesso visto come pacchetto di differenziazione competitiva.
Criterio
Dettaglio
Percentuale di Cashback
10 % su giocata netta
Periodo di Riduzione
30 giorni
Valore minimo di reset
€200
Limitazione di Valore
€50\ per sessione
Calcolo del Cashback
Il calcolo semplice: Cashback = (Vincite totali – Perdite totali) × 10 %. Iniziare con una buona gestione del bankroll è fondamentale per massimizzare questa componente di ritorno.
Strategie per Massimizzare il Cashback
Abbinare il cashback a parità di tre to me in lavorare on lay. Gen. Ciò include l’approccio a giochi di bassa variabilità e il profilo di betting aggressivo sottostante i mini bunch. Ad esempio, su 5 Euro in slot si ritranno €0,50, e questa somma si aggiunge all’account per ulteriori scommesse.
4. Bonus Selettivi per Giocatori Premium
Il 1Win Casino ha sviluppato pacchetti di bonus personalizzati per un segmento di giocatori a alto volume. Questi includono bonus su deposito, giri gratuiti personalizzati e bonus di rieffettivo. La mancanza di inclusi regole rapidamente dipende dallo status del giocatore.
Bonus deposito +25 %
15 Giri Gratuiti su slot ad alto RTP
Campioni di Rischio a 3 %m
Point di fedeltà tranne la risa in
Come Accedere ai Bonus Premium
L’iscrizione al piano “VIP” è accessibile inserendo un deposito superiore a 500 €. Il sistema di tracking personalizza le offerte a seconda delle foto di scommesse e utilizzo. Ogni mese, le regole cambiano di conseguenza.
5. Programmi di Fedeltà e Turni Coinvolgenti
Il repertorio di programma di fedeltà di 1Win combina punti per giocare con premi tangibili come prodotti di bookmaker o, importante, tornei multigiochi che testano amori e competenze. L’app mobile mobilità ampliava l’accesso; strata di |mobili per piccoli giocatori.
La fase di tornei è gestita entro app. Ciò fornisce una sfida ricompensante, con premi percentuali in base alle classifiche mondiali e aggiungendo la partenza di un percorsi.
Ottimizzare il Programma di Fedeltà
Per sfruttare questi programmi, i giocatori dovrebbero auspicare giocare nei giorni in cui il merchant offre le migliori bonus. L’analisi delle cliniche di gioca permette di massimizzare i punti e spendere in misure entro 48 hrs quiac.
Fatti Salienti: Alla fine del mese, 20 % più del medio della popolazione di 1Win si affina dalle offerte cashback, trasformandosi in un ritorno fluttuante con un compenso di 12 % annuale.
Principali Benefici del Programma di Retention
Incremento della frequenza di Gioco
Riduzione del Detrimento Finanziario
Maggiore Possibilità di Vincita Reale
Trasparenza dei Requisiti di Scommessa
Valore Esaurimento del Cashback
Caratteristiche Principali della Retention di 1Win
Caratteristica
Beneficio
Bonus di Benvenuto
Accensione di credito fino al 100 %
Giri Gratuiti
Abbinamento a title incrociato
Cashback
Rimborso percentuale fino al 10 %
Programma VIP
Livelli di offerta personalizzate
Fedeltà
Punti e premi settimanali
Step by Step: Utilizzare i Bonus di 1Win
Registrazione: Inserisci i tuoi dati e verifica l’identità.
Deposito: Seleziona il metodo di pagamento preferito e fai il primo deposito.
Ritiro Bonus: Il bonus sarà disponibile nel tuo saldo.
Partecipazione: Scegli il gioco e verifica se è ammesso il tuo bonus.
Strategia di Scommessa: Imposta la tua quota in maniera ragionevole rispetto ai requisiti.
Riscatto: Una volta soddisfatti i requisiti, preleva i profitti senza commissiona.
Seguendo questi passaggi, puoi sfruttare al massimo l’offerta di 1Win casino e massimizzare le tue possibilità di vincita.
Conclusione Generale
Il 1Win casino offre un ecosistema completo di bonus e incentivi che aumentano la soddisfazione del giocatore e stabiliscono una base di fidelizzazione solida. Da bonus di benvenuto a giri gratuiti, oltre al cashback e ai programmi VIP, i giocatori hanno ragioni infinite per rimanere attivi nel lungo termine. Implementando una strategia mirata, sapere utilizzare obbliga mandare riscossione vernis? Blocking? Sebbene le regole siano evolvendosi, la chiave rimane la gestione del bankroll e l’uso oculato del valore offerto.
Domande Frequenti
1. Quanto tempo impiega il bonus di deposito a essere accreditato?
Il bonus di deposito è immediatamente disponibile dopo che la transazione è stata confermata. In genere, il processo richiede da pochi secondi a un massimo di 5 minuti, a seconda del metodo di pagamento scelto. Se il bonus non appare, è consigliabile verificare le impostazioni dell’account o contattare l’assistenza clienti per verificare la transazione.
2. Come calcolo il mio importo di cashback?
Il calcolo si basa sulla tua perdita netta e sulla percentuale di cashback specificata dai Terms of Service del Casino. In generale, Cashback = (Vincite totali – Perdite totali) × %”Cashback”‘. Questo valore viene automaticamente accreditato sul tuo saldo entro 24 ore dalla fine del periodo di calcolo stabilito dal casino.
3. Posso usare i giri gratuiti su schermi mobili?
Sì, tutti i giri gratuiti offerti dal casino sono compatibili sia con dispositivi desktop che con dispositivi mobili. Assicurati solo di aver scaricato l’applicazione ufficiale o di avere una connessione stabile per un’esperienza senza interruzioni.
4. Ci sono limiti di vincita sul bonus di deposito?
Sì, la maggior parte del Casinos ha un limite massimo di vincita che può essere expectato dal premio. Questo limite viene indicato firme nei Terms of Service. Superare tali limiti può significare non ricevere le vincite. Assicurati di leggere i termini specifici associati al tuo bonus.
5. È possibile trasferire i punti di fedeltà su altri account?
No, i punti di fedeltà sono vincolati all’account individuale che ha accumulato i punti. Non possono essere trasferiti o trasferiti. Tuttavia, puoi tradurre i punteggi in premi vendibili, bonus o cashback, a seconda delle regole del programma fedeltà.