


If you have read my previous posts on making Sourdough bread and wondered where the heck do I get the sourdough starter from, then wonder no more. This post will explain that mystery. We will make sourdough starter by fermenting flour and water to give birth to naturally occurring lactobacilli and yeast.
That’s right, yeast comes from the air. It’s all around us everywhere we go. That’s how our ancients made bread and it doesn’t require any special yeasts from the shops to make. Just water and flour and some of that natural yeast around you.
Sure you could buy that highly processed yeast from the shops but then you aren’t making sourdough bread. Sourdough bread making process uses all natural ingredients which makes the sourdough bread a much healthier alternative than the stuff you buy in supermarkets that’s full of preservatives.
Sourdough is the process of using the yeast from the air around you to bake bread with the classic sour taste (lactic acid produced by the lactobacilli) and better inherent keeping qualities than breads made with baker’s yeast.
Prep
An ideal temperature for sourdough is 75F – 82F (25C – 28C). I have noticed that warmer days create a rave party in my sourdough starter. Pay careful attention to your kitchen temperature and close any windows to keep it nice and stable. A gust of cool air won’t help the growth process.
Store your sourdough starter inside a cupboard where the air is stable. Not on the fridge or in the open as other sites have you believe. Cold slows things down.
Ingredients
- Flour — Use Whole grain flour (whole wheat or rye) to get the starter going. Whole grains contain more nutrients and sourdough-friendly microorganisms than all-purpose flour. I tried white flour in the past and it was a disaster.
- Water — Use filtered water; not tap water. I have this Zero Water and always have clean 0 PMF tested water.
Utensils
 |  |
| Electric Scales — getting measurements right is key to making this work. | Mason Jar — the vessel made out of glass. Make sure you have a loose fitting lid to put on top after prepping the mixture. Do not tighten it or it could explode when the gasses build up. |

Optional is a Wooden Stirrer. I prefer it much more than a cold metal spoon. Personal preference here.
Time
~7 days
But it can take up to 2 weeks of trial and error if the temperature in your kitchen isn’t ideal. Once the starter gets going you will have a party in your mason jar every few hours. It’s fun to watch the feeding frenzy at full throttle.
Let’s begin
The idea is to daily mix flour and water together into your mason jar on a daily basis in a process called feeding. At start you’ll make small adjustments in volume of water but then once things get going keep the ratios pretty much consistent.
TIP: Make sure you mark the jar with the height of the starter using a dry eraser and loosely place the cap of the jar on top. This way you will spot activity (growth) over the next 24 hours.
What’s feeding?
Giving your yeast more flour and water to feed on. Just stick to 1 type of flour. I like to use whole-wheat for all the feeding. You can use white for making the bread but for feeding use the optimal flour type.
| Day | Feeding |
| 1 | 100 grams of flour 150 grams of warm water Mix with wooden stirrer till it’s all blended together (no more than 30 seconds) I like to have the mason jar on my electronic scales zero’ed out. So what I add into it I can see the weight increase. You can zero out the weight after having added flour. Then start with water. Make sure the water is NOT hot. Just warm. If your finger can rest comfortably inside the water without getting burnt then it’s good enough. I like to use warm over cold water to speed up the reaction. |
| 2 | Discard half of your starter leaving 50g behind. You can either discard half of your starter into the sink or use it to cook something. With the other 50g left in the mason jar, add and stir: 100 grams of flour 125 grams of warm water |
| 3 | Discard (as above) then add and stir: 100 grams of flour 125 grams of warm water |
| 4 | Discard (as above) then add and stir: 100 grams of flour 100 grams of warm water By now you should have seen bubbles inside your jar — fermentation at work. If not then continue this process daily until you do. |
| … | |
| 7 | Does your starter look like this?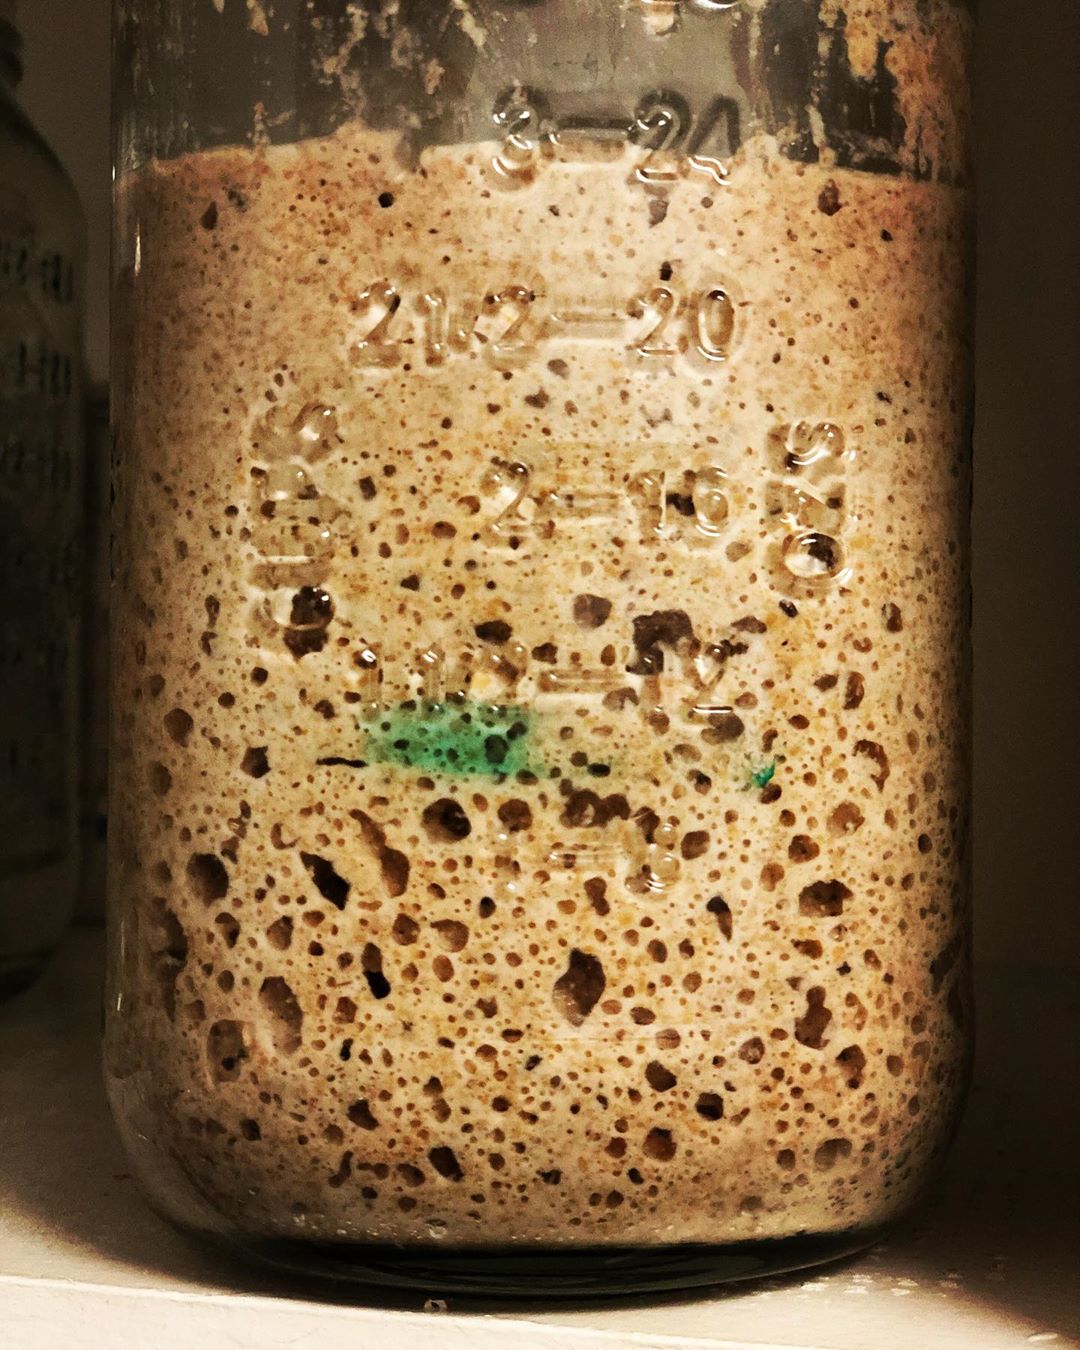 Note the bubbles from the activity. This starter is perfect and ready to be used in Sourdough bread baking. If your starter isn’t there yet then make sure the temperature where you are storing your starter is warm enough. Also note the green mark. That green mark was when I fed the starter last. This way I can see activity over the time horizon. |
Starter Storage
If you aren’t going to be cooking bread daily then store the starter after feeding into the fridge. It will slow down the fermentation process and buy you about a week of not having to feed it.
Otherwise put it into a cupboard away from the sun’s UV. UV is ionizing and will start breaking down the yeast (killing it).
Nursing your Starter
Keep an eye out for liquid formation on top of your starter or coloration. The former is a sign your starter is running out of food and needs feeding. The latter is mass suicide and the only way to save it is to remove that coloration and feed it pronto. Try not to get to that stage.
A quick smell of the starter is enough to give its health away.
Frequently Asked Questions
Q. How long will the starter live for?
A. As long as this starter culture is fed flour and water regularly it will remain active. A regular schedule is typically 12-36 hours. 24 hours is ideal. During hot days you will see a lot of activity in your starter within the first few hours of feeding.
Q. What does a feeding schedule look like?
A. Discard half (say 50g) and add 100g whole-wheat flour and 100g of water. That’s it.
Q. How do I know when to feed the starter?
A. Use the 24 hour marker as a guide or once you gain enough experience you can visually work out when feeding is required. Visual queues include:
– you’ve noticed the starter growth (doubling in size) and then deflation
– liquid building up on top of the starter
– change in color on top of the starter (this is bad ie. death, so feed it asap)
Q. Do I have to feed the starter daily?
A. Yes if you keep it outside of the fridge and/or bake daily. Otherwise put it into the fridge and feed it weekly. Just keep an eye on the coloring of the starter to avoid early death from a too warm fridge. The fridge acts like a cryochamber for your starter and will slow the growth down without killing the starter. This is great for folks who intend to bake only on the weekends.
Q. What is your feeding schedule like?
A. I bake once per week and feed it once per week. I fridge my starter for a week and only feed it prior to going into fridge. So once per week. Every Friday around 2pm I take it out of fridge, wet the outside jar with warm water to de-cryo the yeast and let it sit there for 3hrs. By 5pm it has spawned into crazy life (doubling in size) and 200g of it gets mixed into the new dough for bread making. Then the remaining starter I feed it with only whole wheat flour (130g) and filtered 130g of water. Mix it. Kiss it goodnight and fridge it till next Friday.
How did you starter turn out? Let me know.

