JavaScript: made better using the Module Pattern

I’ve just finished reading JavaScript Patterns by Stoyan Stefanov and boy has it opened up my mind and inspired me to write better, faster, cleaner and more modular JavaScript code using the Module Pattern.

Stoyan’s book covers many patterns and anti-patterns (the common old approach to JavaScript coding).

Stoyan provides detailed explanations why and where to use each pattern inc. module pattern. Since there is so much content in this book I decided to write about what I believe will add immediate value to any developer working with JavaScript, how to make JavaScript better using the module pattern.

No hacks around poor JavaScript

JavaScript is unlike back-end server-side code where if the code becomes a bottleneck you just throw more boxes (hardware) at it to speed thinks up. JavaScript downloads & runs within the user’s browser. So if you got lazy or just didn’t know better to follow Convention over Configuration (CoC) or the rapid development principle of Don’t Repeat Yourself (DRY) and you hacked something together.. the user will get poor experience and even limited to a single browser. This is where JavaScript Patterns play an important role and understanding them is the 1st step in becoming a JS Ninja.

JavaScript – what you need to know

Let’s shake some old grounds and cover the what you need to know about JavaScript in 2011.

  • There are no classes in JavaScript. You create a blank object when you need one and then start adding members to it.
  • Sometimes when people say “Singleton” in a JavaScript context, they mean the Module Pattern – covered below and discussed in detail in Stefanov’s Chapter 5. Every time you create an object using the object literal, you’re actually creating a Singleton. And there’s no special syntax involved.
  • When you think about objects in JavaScript, simply think about hash tables of key – value pairs. Similar to what are called associative arrays in other languages.
  • Use literal notation patterns instead of object definitions. Literal is more concise, expressive and less error-prone. See Appendix 1.1 at the end of this post for examples.

Module Pattern – organize your code

Let’s start with what’s most common out there on the internet. You may have seen (or even do) this.

Code sample – anti pattern

Declaring:

var array_string = "[object Array]";
var ops = Object.prototype.toString;
var MAX_NUM = 123;

function inArray (haystack, needle) {
    for (var i = 0, max = haystack.length; i < max; i += 1) {
        if (haystack[i] === needle)
            return i;
    }
    isEnabled = false;
    return −1;
}

function isArray (a) {
    return ops.call(a) === array_string;
};

var pageTitle = "New title";

Calling:

isArray(arr_user);

The problems here are:

  • All these are global (variable and functions) are shared among all the code in your application living in the global namespace. High chance of naming collisions between your and other developer’s code (think maintenance).
  • isEnabled above has no var declaration so automatically becomes chained to the global namespace outside the function.
  • When something in your code is chained to the top of the prototype it takes longer time to be found then if it’s within a module. I will discuss the JavaScript Prototype in another post and show examples with performance differences.
  • Some best practices are broken – see below what these best practices should be.

Module Pattern – the solution, organize your code

There are many great patterns described in JavaScript Patterns by Stoyan Stefanov but my preference today is to use the Module Pattern. The Module Pattern is widely used because it provides structure and helps organize your code into self-contained de-coupled pieces of code. If you look at the source of jQuery you will find a similar pattern being used.

The Module Pattern is a combination of several patterns described in Stoyan’s book.
They include:

  • Namespaces (Stefanov’s pg.87)
  • Immediate functions (Stefanov’s pg.73)
  • Private and privileged members (Stefanov’s pg.92) and
  • Declaring dependencies (Stefanov’s pg.90)

And here’s how the same sample of code above would look when the Module Pattern was followed.

Module Pattern code sample – the pattern

Declaring:

var MYCOMPANY = MYCOMPANY || {};

// note the use of namespacing - similar to jQuery.
MYCOMPANY.Page = (function () {
    'use strict';

    // [ private properties ]
    // note the chaining of var declarations vs a var on each line
    var pageTitle    = "blank",
        isEnabled    = false,
        array_string = "[object Array]",
        ops          = Object.prototype.toString,
        MAX_NUM      = 123; // constants always are in capital case
    // end var

    // [ private methods ]
    // note the use of literal patterns vs constructor functions
    function inArray(haystack, needle) {
        var i   = 0,
            max = 0;
        for (max = haystack.length; i < max; i += 1) {
            if (haystack[i] === needle) {
                return i;
            }
        }
        return -1;
    }
    function isArray(a) {
        return ops.call(a) === array_string; // end var
    }

    // [ public methods ]
    return {
        init: function (title, enabled) {
            pageTitle = title;
            isEnabled = enabled;
        },
        isArray: isArray,
        indexOf: inArray
    };
}());

Calling:

MYCOMPANY.Page.init('Page title', true);
MYCOMPANY.Page.isArray(arr_user);

Code is now modularized and less prone to collisions.

JSLint: The JavaScript Code Quality Tool

Once you have written your new modularized code it’s a best practice to run it past JSLint. JSLint is a free JavaScript program that looks for problems & violations of some of the patterns in your JavaScript code. It is a code quality tool. Check it out here: http://www.jslint.com/

JavaScript best practices

  • Curly brackets should always be used even if there is 1 expression. Code is then more readable and maintainable.
  • Use 4 space indentation – also JSLint default. This way no matter what editor engineers use it is always displayed in the same manner.
  • Like curly brackets, always use semicolons, even when they are implied by the JavaScript parser. Why slow down the compiler to clean up the mess during runtime.
  • Naming convention for constructors is typically UpperCamelCase, functions lowerCamelCase, variables lowercase_separated_by_underscore and constants UPPER_CASE.
  • Use whitespace as much as possible by separating all operators and their operands with spaces.
  • Use Google’s Closure Compiler to minify your code before production AFTER you have passed it via JSLint (above).

Appendix

1.1 Constructors and their corresponding and preferred literal patterns.

Built-in constructors (avoid) Literals and primitives (prefer)
var o = new Object(); var o = {};
var a = new Array(); var a = [];
var re = new RegExp( “[a-z]”,”g”); var re = /[a-z]/g;
var s = new String(); var s = “”;
var n = new Number(); var n = 0;
var b = new Boolean(); var b = false;
throw new Error(“uh-oh”); throw { name: “Error”, message: “uh-oh” };… or throw Error(“uh-oh”);

And that is it for now. Have I missed something or gotten something wrong above? If so please let me know and I will correct it. How is your JavaScript looking? Need help to get it fixed? Post below or contact me.

~ Ernest

MongoDB office hours in Mountain View

You may recall my previous post on MongoDB and how powerful it is as an alternative to a relational database. Since then I’ve had a bunch of discussions with other software engineers around this space and even met up with MongoDB core engineer Chris Westin from 10gen at Red Rock to gain further insights into MongoDB.

MongoDB Leaf

New kick ass GUI for MongoDB

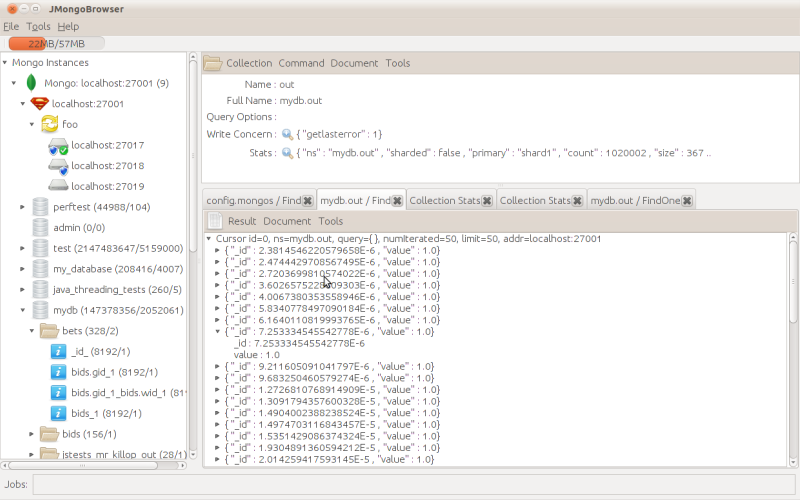
Chris introduced me JMongoBrowser written by Antoine Girbal (10gen engineer). It’s written in Java so you can run it on Linux, Windows and Mac OSX. So far this GUI has proven to be a success and fills the holes where MongoHub couldn’t. Out goes MongoHub and in goes JMongoBrowser.

JMongoBrowser - MongoDB GUI admin tool.

Fast crash recovery using Journaling

MongoDB uses memory 1st to write data to vs directly to file/store. This is where huge performance gains are attained. It also has Journaling, a write-ahead for operations to facilitate fast crash recovery in the storage engine. This means the stuff in memory is stored in a log incase your server goes down without affecting MongoDB’s performance.

So what happens if your box goes down? .. a common question amongst new engineers to MongoDB. Does this data also gets lost? The answer lays somewhere in between how you balance your performance needs against the risks you are willing to take with your data.

The journal is synced to disk every 100ms. So the maximum that can be lost is up to 100ms worth of changes. At the cost of additional performance degradation, you can make your application proof against even that.  The j option to getLastCommand will cause the application to block until the journal entries with the last change have been written to disk.  See http://www.mongodb.org/display/DOCS/getLastError+Command .  Of course, if you use this, your call to getLastCommand can wait up to 100ms, depending on where in the flush cycle you are. Therefore, this is left up to the user to change this default of 100ms.

Therefore, always load MongoDB with Journaling enabled, like this:

mongod --journal

This also auto cleans up crashes and puts crashed data back into MongoDB.

Don’t be alarmed when you see this

I found this in the /Journal (1GB files):

-rw------- 1 root root 1.0G 2011-06-23 02:26 prealloc.0
-rw------- 1 root root 1.0G 2011-06-23 02:25 prealloc.1
-rw------- 1 root root 1.0G 2011-06-23 02:26 prealloc.2

With Journaling enabled the server always creates those three 1GB files.  It rotates through them, recycling them.  They won’t grow any more.  But they are always that size, regardless of the size of your database. If the server dies unexpectedly, the files remain, and contain the material necessary for the automated recovery that happens when you restart the server.

More here:

Checking server memory usage

As mentioned above, Memory is used by Mongo to speed things up. The more memory you have the better and MongoDB will use your RAM as it sees need for it taking into consideration other server resources.

It’s always a good practice to check memory usage.
Details here: http://www.mongodb.org/display/DOCS/Checking+Server+Memory+Usage

Your MongoDB configuration file

Here’s a recommend set of switches to have enabled in your mongodb.conf.

sudo nano /etc/mongodb.conf

add or update your settings to these:

journal=true
directoryperdb=true
logappend=true
  • journal = as discussed above to enable fast recovery from crashes.
  • directoryperdb = creates a new physical directory for each new database. Clean way to seperate your databases.
  • logappend = Whether the log file will be appended or over-written. Always have true else after a reboot your old logs will be overwritten and you may lose important crash specific data.

More detail here: http://www.mongodb.org/display/DOCS/File+Based+Configuration

MySQL to MongoDB

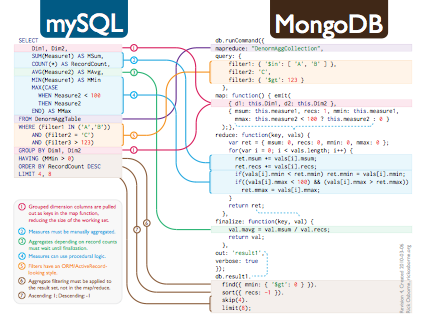
Finally, I found this fantastic chart illustrating the difference in commands between MySQL and MongoDB. Should help the transition for us MySQL folks. Click the image below to download a large PDF version (Size: 213Kb).

There is also mapping chart SQL to Mongo located on the MongoDB website here.

Have more questions? Attend the weekly MongoDB Office Hours in Mountain View Red Rockhttp://www.meetup.com/San-Francisco-MongoDB-User-Group/events/16985746/ or post a question/comment below.

~ Ernest

Mercurial: how-to guide to distributed version control

Mercurial is one of the 2 famous free / open source, distributed source control management tools. You may also have heard of Git, another great tool. Both Mercurial & Git are the front runners in distributed version control systems. 2 nice articles compare Mercurial to Git. One called Git vs. Mercurial: Please Relax comparing Git to MacGyver and Mercurial to James Bond. The other article The Differences Between Mercurial and Git. The conclusion was both are great tools so stop worrying and start using the one which you are most comfortable with. I went down the Mercurial route.

Mercurial - Work easier, Work faster

Mercurial is a distributed version control systems (DVCS) which keeps track of software revisions and allows many developers to work on a given project without necessarily being connected to a common network. This is a peer-to-peer approach, as opposed to the client-server approach of centralized systems like Subversion or CVS. It is a more cleaner, faster and refined way of working. More on this is explained on Wiki here.

Let’s get started with Mercurial

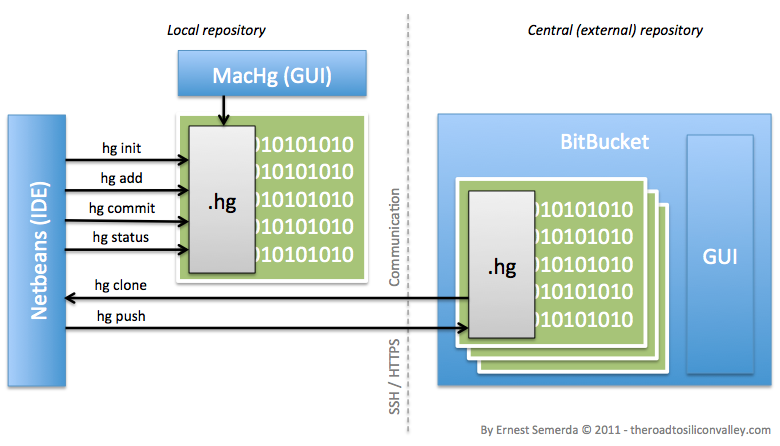
As explained above you Mercurial is a DVCS. So you will have a “local” version of Mercurial which may have a number of “repositories” on your development machine. A repository is essentially a package which identifies your application. One for each application. Your code will get “committed” to this local version daily as you work. When you have a working piece of functionality only then you will “push” it to “central”. Central is typically hosted on a remote server (hosted in-house or via a 3rd party like BitBucket) where everyone else in your team can push or clone code to. Typically “central” is hooked up to a continuous integration tool to facilitate nightly builds. More on that in another post. So whatever code you push there make sure it is working!

Local (dev) install or Mercurial

1. Download Mercurial on your development box from here: http://mercurial.selenic.com/

2. Run the install file and follow through with the default questions.

3. Your done.

Quickstart – starting your 1st Mercurial Repository

Source: http://mercurial.selenic.com/

In your terminal / dos window, navigate to a folder where you will either clone a project to or create one and do the following.

Clone a project and push changes

$ hg clone http://selenic.com/repo/hello
$ cd hello
$ (edit files)
$ hg add (new files)
$ hg commit -m 'My changes'
$ hg push

Create a project and commit

$ hg init (project-directory)
$ cd (project-directory)
$ (add some files)
$ hg add
$ hg commit -m 'Initial commit'

Let’s look at each command in more detail:

hg init

Run this 1st time in your working directory to mark that folder as your project repository which you want Mercurial to version control. Mercurial will create a hidden folder there called “.hg”. This is where all the detail (changesets and manifests) on your commits is stored.

hg clone http://(my-domain)/hg/(project-repository)

Run this in your working directory where you want to drag code down from central Mercurial (See below on Central).

hg status

To see what is not yet added & committed yet to the repository.

hg add

If you have new files this command adds them to your repository.

hg commit

Commit your changes to “local” Mercurial. Make this a habit of doing it frequently (at least once a day). Mercurial will ask you to put in comments with your commit. Also make this a habit to put in as much detail into your comments as possible to help others understand your changes + if you have a reference to Jira case / other Agile tracker add this in as well.

hg pull -u

To pull changes and update.

hg push http://(my-domain)/hg/(project-repository)

To push your local repository changes to a central repository.

Tools for Mercurial

Netbeans – IDE Integration

If you are using Netbeans for development and have pointed it to a project where you “hg init” was ran, Netbeans will automatically recognize this and integrate Mercurial into your workflow. In Netbeans, do this by right clicking on your project folder and look under “Mercurial” sub-folder. Get it from here: http://netbeans.org/

MacHG – GUI for managing repositories on the Mac

This is the nicest GUI for Mercurial that I could find for the Mac. It allows you in a nice graphical way to manage a collection of files, to add things to the collection, to save a snapshot of the collection, to restore the collection to an earlier state and in general to work with the files. Get it from here: http://jasonfharris.com/machg/
Alternatively go through a list of other tools here: http://mercurial.selenic.com/wiki/OtherTools

“Central” – home of all repositories

The following is only required if you want to setup Mercurial “central”. A single place (mothership) for all developers to push working code to for storage & versioning. This is also the place where you would hook up a continuous integration tool to facilitate nightly builds.

Bitbucket: free Mercurial code hosting

If you do not have enough resources to run Mercurial “central” in-house or want someone else to manage that for you then use one of the hosted solutions on the internet. Bitbucket from Atlassian (kick ass Aussie firm) can provide you with unlimited private code hosting, free. Yes I use it and I love it. Less maintenance & headaches and everything you learnt above can be applied here.

BitBucket by Atlassian - free Mercurial code hosting

Get your free account here: http://bitbucket.org/

Home solution: In-house Mercurial code hosting

Ok the following will require Ubuntu terminal access to the Ubuntu box where you want to install Mercurial “central”. All of the code below can be highlighted and pasted to run directly in your terminal window to make this process fast.

The following is based on the steps I followed from Emran Hasan’s Blog with some changes to the configuration to make it work on Ubuntu 10.10 based additional input from Stack Overflow.

1. Install Mercurial

sudo apt-get update
sudo apt-get install mercurial

2. Create a store for Mercurial configuration & repository files

cd /var/
sudo mkdir hg
sudo mkdir hg/repos
sudo chown -R www-data:www-data hg/repos

3. Creating a configuration file to host multiple repositories on this server & use CGI to serve the files through Apache:

cd /var/hg
sudo cp /usr/share/doc/mercurial/examples/hgweb.cgi .
sudo chmod a+x hgweb.cgi

4. Configure Mercurial (also refered to as “hg”) to point to point to our new config file:

sudo nano /var/hg/hgweb.cgi

and update the config like this:

config = "/var/hg/hgweb.config"

5. Create the file /var/hg/hgweb.config and write the location of the repositories:

sudo nano hgweb.config

and add this to the file:

[collections]
/var/hg/repos = /var/hg/repos

6. Make “central” accessible via HTTP (optional if you don’t want to setup a SSL certificate).

sudo nano /etc/mercurial/hgrc

add/update this line and save file:

[web]
allow_push = * push_ssl = false

7. Now update the Apache configuration so that it executes the CGI when requested with a /hg prefix:

cd /etc/apache2/sites-available
sudo nano default

at the end of the file (before < /VirtualHost >), add the following and save it:

ScriptAlias /hg "/var/hg/hgweb.cgi"
< Directory "/var/hg/repos" >
   AuthType Basic
   AuthName "Mercurial Repositories"
   AuthUserFile /var/hg/hgusers
   Require valid-user
< /Directory >

8. Add permissions for users who will be accessing central. First add admin account:

sudo cd /var/hg htpasswd -mc hgusers admin

then normal user accounts:

sudo htpasswd -m hgusers

Each request will prompt you for a password.

9. Create a repository

cd /var/hg/repos
sudo mkdir (my-repository)
cd (my-repository)
sudo hg init

Note: Recall “hg init” from above (local setup).

10. Restart apache

sudo /etc/init.d/apache2 restart

and browse: http://(my-domain)/hg
you will be prompted to login (using one of the users names you added above) and see the whole Mercurial central repository.

URL access: http://(my-domain)/hg/(project-repository)
Cloning from “central” to your local:

cd (my-local-project-working-directory)
hg clone http://(my-domain)/hg/(project-repository)

And… that concludes this short introduction to Mercurial. Hope you found it useful!

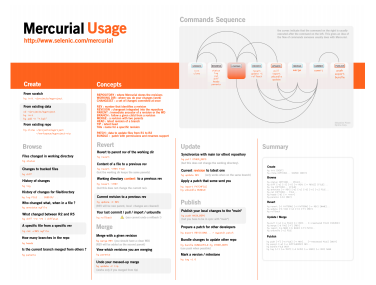
Bonus: Download this Mercurial Cheat Sheet:
http://www.theroadtosiliconvalley.com/cdn/Mercurial-Usage-v1.0.pdf (847kb)

Mercurial Usage - 1 pager

I have it at my desk. It is the best one I could find out of the many I reviewed.

Happy coding!

Useful links

Hosted Mercurial solutions

More Mercurial education

Bitbucket education

Enjoy!

~ Ernest

MongoDB {name: “mongo”, type: “db”}

MongoDB {name: "mongo", type: "db"}

<strong opinions>

Whoah! That was my 1st and 2nd, and 3rd.. and goes on… and on.. impression of this amazing database. Having experience with SQL Server and MySQL (both relational databases) for a few good years I decided to take this NoSQL database for a real world run. I also think the massive signs for MongoDB conference in San Francisco on the 101 had subliminally stamped a mark on my neurons 😉 I also read some interesting articles here and here comparing MongoDB to other NoSQL solutions.. After all that I was convinced that MongoDB would be the NoSQL database I would invest some serious time into.

As expressed above, I was impressed by MongoDB. I hooked it into a Zend MVC (Model–view–controller) application accessing Shanty-Mongo ORM through custom Model classes which I wrote from ground up. Everything just fit in so snugly.. and when I threw data against MongoDB it created collections (SQL world you’d call this tables) on the fly. Yes on the fly! That was super cool – loosely coupled interfacing – > create a Class Model and let the DB handle the rest. Super cool. Plus, this baby just flies! Everything from how fast it retrieves, stores, updates (even partial updates) and searches your data to how it stores it as Binary JSON both on the file structure and in memory (during open connection) on the server to speed things up. Everything about this database is impressive.

</strong opinions>

Ok enough of my ramblings. I think you get the picture. I am impressed.

If you are impressed and want to give MongoDB a try, read on. Next let’s dig in and explore stuff that is important (and what I learnt) about MongoDB, how to set it up and common commands to keep handy when working in the terminal.

Hello MongoDB

“MongoDB (from “humongous”) is a scalable, high-performance, open source, document-oriented database. MongoDB bridges the gap between key-value stores (which are fast and highly scalable) and traditional RDBMS systems (which provide rich queries and deep functionality).” ~ from MongoDB

Then (RDBMS) and now

  • Tables as you know in SQL are called “collections” in MongoDB.
  • Relational DB has records (record sets), MongoDB calls them “documents”.
  • MongoDB stores all data in JSON objects and serialized to BSON (Binary JSON) for storage. CouchDB (you may also know of) stores in just JSON.
  • In MongoDB, “ObjectId” in a collection is similar to auto-incrementing ID in a Relational database table.
  • Here’s a nice mapping chart between SQL and Mongo: http://www.mongodb.org/display/DOCS/SQL+to+Mongo+Mapping+Chart

More FYI notes:

  • You never create a database or collection. MongoDB does not require that you do so. As soon as you insert something, MongoDB creates the underlying collection and database.
  • If you query a collection that does not exist, MongoDB treats it as an empty collection.
  • Switching to a database with the use command won’t immediately create the database – the database is created lazily the first time data is inserted. This means that if you use a database for the first time it won’t show up in the list provided by `show dbs` until data is inserted.
  • Mongo uses memory mapped files to access data, which results in large numbers being displayed in tools like top for the mongod process. Think performance! You can get a feel for the “inherent” memory footprint of Mongo by starting it fresh, with no connections, with an empty /data/db directory and looking at the resident bytes.

Installing MongoDB on a Debian OS (Ubuntu)

If you’re using Ubuntu Server (I used 10.10), you can also install MongoDB using aptitude. Default Ubuntu sources do not contain MongoDB so you need to add distro location to your /etc/apt/sources.list file. That is easily done. 1st open sources.list in terminal editor (nano) like this:

sudo nano /etc/apt/sources.list

and drop & save this line to the end of the file:

deb http://downloads-distro.mongodb.org/repo/ubuntu-upstart dist 10gen

Exit nano and add the following 10gen GPG key, or apt will disable the repository (apt uses encryption keys to verify the repository is trusted and disables untrusted ones).

sudo apt-key adv --keyserver keyserver.ubuntu.com --recv 7F0CEB10

Now your ready to install the package with aptitude by executing the following commands:

shell> sudo apt-get update
shell> sudo apt-get install mongodb-10gen

Finally, fork mongo as a Daemon (to auto run on boot).

shell> sudo mongod --fork --logpath /var/log/mongodb.log --logappend

You can now use the command-line client to access the MongoDB database server, as below:

shell> mongo

You may want to hook up MongoDB to be accessible from your PHP application by editing your php.ini and allowing mongo to run as an extension. 1st find & edit your php.ini location like this:

sudo find / -name php.ini
sudo nano /php.ini

Then add & save mongo as an extension inside php.ini under “Dynamic Extensions”:

extension=mongo.so

Save & restart Apache:

sudo /etc/init.d/apache2 restart

Common MongoDB commands

Here’s a short list of the most common commands you will end up using when interfacing with the database. If you want to use a GUI to access MongoDB, I found MongoHub the best GUI administration tool for Mac. There is also a very comprehensive MongoDB documentation located here.

Purpose Shell Command
Login to interface mongo
Show all dbs on record show dbs
Switch to my database use mydb
Show all collections on record show collections
List db version db.version()
Insert data into a new collection db.items.insert({ name:’eggs’, quantity: 10, price: 1.50 })
Display a whole list of documents in a collection db.items.find({})
Display a select list of documents in a collection db.items.find({guid:xyz})
Remove a whole list of documents in a collection db.guid.remove({})
or where n == 1
db.things.remove({n:1});
Drop the collection db.<>.drop()

Cons: when you delete a document you cannot return it’s ObjectId. Would be nice to have this feature. MongoDB folks?

MongoDB start ritual (habit forming):

  1. mongo
  2. show dbs
  3. use mydbname
  4. show collections

This will become a habit so don’t resist.

Don’t forget to read the follow up to this post located here: http://www.theroadtosiliconvalley.com/technology/mongodb-update/
Plenty of new knowledge on tools, crash recovery & best practices.

Give MongoDB a spin

If you are in doubt, give MongoDB a spin and make up your own mind ~ http://www.mongodb.org/
Don’t forget to let me know how your experience goes.. and if you have questions on getting this setup please contact me and I will be more than happy to help you out!

~ Ernest

Recommended links

EC2: how to launch Ubuntu into the cloud

Amazon Elastic Compute Cloud (EC2) delivers scalable, pay-as-you-go compute capacity in the cloud. It is a part of a collection of remote computing services (also called web services) from Amazon that together make up a multi-tenant cloud computing platform. The most central and well-known of these services are Amazon EC2 and Amazon S3. The goal in this post is to get you up and running on an EC2 instance super fast.

Get familiar

I’m going to assume you have an account with AWS and are familiar with:

If you do not know those 3, please spend some time learning about them by following the links in the bullet points above. Else, let’s get rollin.

Step by step guide

1. Setting up security

Before we launch an Instance you need to do some Pre-work since both “Security Group” and “Key Pair Name” cannot be changed once an Instance is mapped to one and started.

  1. Setup a “Security Group” for your new Linux Instance.
    1. From Navigation menu select “Security Groups”.
    2. Click on “Create Security Group” button and fill out the form giving your security group a very descriptive name.
    3. Click “Yes, Create” button, select the new group and in the lower half window/frame press the “Inbound” tab.
    4. Inbound allows you to open ports on this Instance. You can add or remove these after the Instance is created. By default allow these: SSH (22), HTTP (80) and MySQL (3306). For extra security limit (source) SSH & MySQL to only your IP address. If you plan to install Webmin add port 10000 here too.
    5. When done, click on “Apply Rule Changes”.
  2. Create a “Key Pair Name”.
    1. This is super important and will be used for accessing your Instance both via SSH & sFTP.
    2. From Navigation menu select “Key Pairs”.
    3. Click on “Create Key Pair” button.
    4. Give it a descriptive Key Pair Name and click on “Create” button. A private key with extension .pem will download. Save this in a secure location since this is your key to access your Instance.
    5. On your local machine (Linux X or Mac OS X), give this file more secure permissions like this:
      chmod 0700 ./keys/mykey.pem

2. Launching an Instance

  1. From Navigation menu select “Instances”.
  2. Click on “Launch Instance” button.
  3. This launches the Request Instance Wizard where you can select an Amazon Machine Image (AMI). Note that Ubuntu is only available from “Community AMIs”. Click the Community AMIs tab.
    1. Here is a list of available Ubuntu images:
      http://uec-images.ubuntu.com/releases/10.10/release/
    2. Make sure you use an EBS root store – it’s better. For benefits see here:
      http://stackoverflow.com/questions/3630506/benefits-of-ebs-vs-instance-store-and-vice-versa
  4. Step through the 5 stages of the Wizard and click on “Launch” button. This will launch your new Instance. The Wizard is straight forward and you will most likely go with all the defaults.
  5. Your Linux Instance will launch pretty fast. You should now see your Instance listed under “My Instances”.
  6. Click on your Instance. Instance properties window/frame shows up in the bottom half of the console. Note down “Public DNS” and “Private DNS/IP Address”. You will need those to access the box – especially the Public DNS.

3. Building a Ubuntu LAMP Web Server on your new Instance

This step is optional.

But should you want to setup LAMP on this new Instance follow the steps outlined in my previous post here: http://www.theroadtosiliconvalley.com/technology/building-ubuntu-lamp-web-server-vm/

The only additions in light of Amazon EC2 host are:

  • When using SSH/sFTP use the private key with extension .pem you downloaded above.
  • Note that root user in EC2 is “ubuntu” not “root” like in a VM Ubuntu setup.
  • To SSH into your new EC2 Instance do this in terminal where the URL after @ is your Public DNS:
    ssh -i ./keys/mykey.pem ubuntu@region.compute.amazonaws.com
  • Use the Public DNS or setup a static IP address to point to your Instance(s). Amazon calls this Elastic IP Address and this allows you to have multiple Instances all pointing to the 1 IP address for dynamic cloud computing.

Now go and build kick ass products!

There you have it folks. How simple is that. Amazon makes cloud computing look simple and launching new servers (Instances) is a breeze.. in a matter of minutes.

If you found this post useful let me know in comments section below. Super!!

~ Ernest

Building an Ubuntu LAMP Web Server

Recently I was setting up my Mac OS X with a kick ass development environment and jotted down all the cool steps I took to build an Ubuntu LAMP web server in a virtual machine environment. Here is this in-depth guide translated from paper to this digital copy. Hope you find this guide valuable and it saves you time when you need to do the same.

LAMP (Linux, Apache, MySQL and PHP)

Ubuntu Server

The flavor of Linux I like to use as a Web Server is Ubuntu.

What is Ubuntu

Ubuntu , is a secure, intuitive operating system that powers desktops, servers, netbooks and laptops. It is based on the Debian GNU/Linux distribution. Ubuntu is also named after the Southern African ethical ideology Ubuntu (“humanity towards others”) and is distributed as free and open source software with additional proprietary software available.

Why Ubuntu

  1. Reduce costs – free to use with no licensing fees.
  2. Visualization – it runs beautifully & fast in any VM environment (esp. Mac OS X)
  3. Build-in security – tight security, inbuilt firewall and encryption.
  4. It based on a Debian Distribution. A computer operating system composed of software packages released as free and open source software especially under the GNU General Public License and other free software licenses. Debian distributions are slower to release but this means they are extremely thorough.
  5. A lot of the big boys use Ubuntu. See case studies here: http://www.ubuntu.com/business/case-studies

Step by Step – your 1st web server

This guide assumes you have already installed Ubuntu Server. If not, go here and do it first. I recommend you install Ubuntu Server in a VM. I use VMware Fusion to run my instances when developing and Amazon EC2 for production. This guarantees that whatever I do locally in a VM will be compatible when pushed into production.

Ubuntu Server in a VMware Fusion

Goal:

  • Install LAMP – Linux (already done), Apache (web server), MySQL (mysql) and PHP (code compiler).
  • Install Webmin – a web-based interface for system administration for Unix.
  • Allow WWW for sFTP so you can remotely manage your website using a GUI.
  • Setup access to MySQL using MySQL Workbench.

1. Install LAMP

  • SSH into your box as root on Port 22 (default post install).
  • Update your OS software (just in case you are missing some dependencies):
    sudo apt-get update
  • From the terminal window, install LAMP using this 1 line of code (the caret (^) must be included):
    sudo apt-get install lamp-server^
  • The apt package manager will display what it is installing and ask you a bunch of standard questions. Just say yes to all. You will also be asked for a password for your new MySQL database. Type that in and note this down for future.
  • When this finishes you are done. Easy hey! Port 80 (default web server port) is now enabled and pointing to ‘/var/www’. ‘/var/www’ is where your site(s) should be placed.
  • Hit the Public DNS URL of your server (typically your IP) to verify that it’s up. It should show up a page with “It works!” If you are not sure what your box’s IP is, type this in and hit enter (similar to ipconfig on a Windows box).
    ip route
  • Before moving to the next step, you may want to know information about PHP’s configuration inc. installed extensions. You can grab this by creating a PHP file from your terminal window like this:
     sudo nano /var/www/phpinfo.php

    then adding this into it, save it, and quit nano (the editor your in):

    <?php phpinfo(); ?>

    restart Apache:

    sudo /etc/init.d/apache2 restart

    Hit the IP in your browser again with this new file name appended to the end eg. http://170.10.105.110/phpinfo.php – it should show you what is running.

2. Install Webmin

  • Edit “/etc/apt/sources.list” to add 2 new source:
    sudo nano /etc/apt/sources.list
  • … add these 2 new lines to the end, save and exit:
    deb http://download.webmin.com/download/repository sarge contrib
    deb http://webmin.mirror.somersettechsolutions.co.uk/repository sarge contrib
  • Now you can run this in your terminal window to install Webmin.
    sudo apt-get update
    sudo apt-get install webmin
  • Webmin should now be accessible from your browser using the server’s ip address followed by port 10,000 eg. https://170.10.105.110:10000
    Note that you do not have HTTPS cert so your browser will throw a warning since https is (and has to be) the protocol. Ignore it and move forward.
  • If you cannot login with your sudo account you may need to enable root. Follow the steps outlined here: https://help.ubuntu.com/community/WebminWithoutARootAccount
  • Or you can change the password of the root user in your terminal window. Then restart webmin.
    sudo /usr/share/webmin/changepass.pl /etc/webmin/ root foo
    sudo /etc/init.d/webmin restart
    
  • If you need to restart webmin run this:
    sudo /etc/init.d/webmin restart

3. Allow WWW for sFTP

  • You need to make sure the group www-data is added to “/var/www”. Run this in your terminal window:
    sudo chgrp www-data /var/www
  • Make “/var/www” writable for the group.
    sudo chmod 775 /var/www
  • Set the GID for www-data for all sub-folders.
    sudo chmod g+s /var/www
  • Your directory should look like this on an ‘ls -l’ output.
    drwxrwsr-x    root www-data
  • Last, add your user name to the www-data group (secondary group) where USERNAME is the “new” username you will use to sFTP. Note that we follow it by “passwd” to give new account a password.
    sudo useradd -G www-data NEW_USERNAME
    sudo passwd NEW_USER

    OR if the username is “existing” one use the command below. Also don’t forget to add “ubuntu” user if you have set this up on an EC2:

    sudo usermod -a -G www-data EXISTING_USERNAME
  • You should now be able to SFTP to your server using this USERNAME and upload data to “/var/www” with no problems.

4. Access to MySQL using MySQL Workbench

  • MySQL Workbench is a nice free GUI tool by the folks at mysql.com to manage your MySQL database. It can be downloaded from here: http://wb.mysql.com/
  • By default MySQL listens on localhost (127.0.0.1) so if you are going to manage your Ubuntu VM instance from say OS X, MySQL wont allow you entry. Here’s what to do to grant remote management of MySQL.
    1. Go to Webmin and login.
    2. In Webmin, navigate here: Servers > MySQL Database Server > MySQL Server Configuration
    3. Change “MySQL server listening address” to “Any”. By default it is 127.0.0.1. Save this.
    4. Now navigate here: Servers > MySQL Database Server > User Permissions
    5. Click on User “root” on the line where it says 127.0.0.1. And under Hosts change it to “Any”. This set the permissions on your db access.
    6. Save & Restart MySQL and you are done.
  • Remember that this is for “development” purposes only. You would not be allowing “Any” to your DB rather a specific static address and username.

5. Bonus – running multiple web applications on the LAMP instance

To save on time, money and managing multiple boxes, you may want to run multiple websites from this same box. I like to do this using ports as the separator. The following can be done in Webmin:

  1. Upload code to /var/www/mynewsite/
  2. Create a Virtual host for your new web application by navigating to:
    Servers > Apache Webserver > Create virtual host
  3. Fill out the form pointing ‘Document Root’ to the location of your code and assign a ‘Port’ number eg. 81, to this new host. Remember port 80 is your default.
  4. Save and click on ‘Apply Settings’ (link top right of the Webmin interface).
  5. Finally you need to tell Apache to listen to this new port. Navigate here:
    Servers > Apache Webserver > Global configuration > Networking and Addresses
  6. Add port 81 (where your new host is configured on) to ‘Listen on addresses and ports’.
  7. Save, apply changes and restart Apache.
  8. Done. You can now access your website via http://IP_DNS:81

Now go and build kick ass products!

There you have it folks. How simple is that. That’s why I love Ubuntu so much. It’s simple and powerful all under the 1 umbrella. That’s how software should be. All the complexities removed so us engineers can get to work and build kick ass products!

If you found this post useful let me know in comments section below. Super!!

~ Ernest

Making the switch from Windows to Kubuntu

I finally made the switch from Windows Vista to Linux Free Operating System. I moved to the Kubuntu version of Ubuntu 10.10 (a Linux flavour) as my development box and haven’t looked back. Well I lied, since I did look back a bit at the beginning lol. It has been a an interesting challenge mentally adjusting to new way of doing things, new tools (applications) and driver support. In the end it was definitely worth it.

And why Kubuntu? since it’s basically Ubuntu a Debian-derived Linux distribution with KDE (a prettier desktop) on-top. Ubuntu brings your slower machines to life. While Windows keeps on slowing them down. Ubuntu is a secure, intuitive operating system that powers desktops, servers, netbooks and laptops. Ubuntu is, and always will be, absolutely free. More about it here.

Why I switched

Today all my development is open source. This means I run what I create on a LAMP stack – L stands for Linux Server. Doing development on a Windows box and pushing to a LAMP stack is like clawing your way through quick sand instead of using a ninja sword to slice through your tasks.

One day, I asked myself. Wouldn’t it be kick ass if my dev box would be close to identical to my production boxes. Knowing that whatever I do on my dev box will work in production with high certainty. Yes yes, Ubuntu popped into my mind. Which later after speaking with a fellow Linux hacker changed to Kubuntu.

As you may already know, Kubuntu is highly configurable. You even have access to the source code if you wish to venture that deep. It also has a great X window called KDE. Check out these top the winners from a 5-day competition on Facebook where fans were invited to submit a screenshot of their pimped Ubuntu desktop. No excuses about Ubuntu’s poor UI.

My customized Ubuntu desktop
My customized Kubuntu desktop

Linux apps to replace your Windows apps

Here is a comprehensive list of apps to replace your Windows versions.

Note: Most applications & games on Linux are open source. This mostly means free. Thus, the ones I listed below as alternatives in the Linux world are all free and can be downloaded from your package manager. I use Synaptic Package Manager (SPM). All the software here is verified and malicious free – it’s safe to get all your apps from here. To install SPM, in your terminal window type this in and your done. Simple eh.

sudo apt-get update
sudo apt-get install synaptic

Securitythis one just kills windows. Ubuntu comes with a firewall built in and windows viruses – what are they on Ubuntu – non existent. All you need is software like Gufw to help you “manage” your firewall else you can do it via the terminal / konsole window.
In your terminal window type this in and your done. This cannot get any harder 😉

sudo apt-get install gufw

And if you want hard-core detail on securing Ubuntu, read this post covers the process of securing and hardening the default Debian GNU/Linux distribution installation.

Applications… the following let’s use “Synaptic Package Manager”.

Purpose Windows Linux
Development
Code editor Notepad++ gedit
SFTP, FTP and SCP client WinSCP FileZilla
Telnet/SSH Putty OS Konsole /
terminal window
Code compare Beyond Compare Kompare
MySQL manager and admin tool SQLyog MySQL Workbench
Virtualization VMWare VirtualBox
Multimedia
Video player Windows Media Player VLC
Video editor Sony Vegas Kdenlive
Organize, share & edit your photos Picasa Picasa /
Gwenview
Photo editor Photoshop GIMP
Audio player Windows Media Player Amarok
CD/DVD burner Nero K3b
Other
Office (word, excel, powerpoint etc) Windows Office OpenOffice /
Google Docs
File browser Windows Explorer Dolphin
Internet browsers Chrome Chromium
Antivirus & Firewall Take a pick lol Gufw to manage your Firewall
Silverlight MS Silverlight Moonlight

Additional stuff you can install to make your Kubuntu experience pleasing:

Don’t forget to use your Synaptic Package Manager to look for these apps first. Only when you cannot find them there click on the title of each app below to take you to the website hosting the app and instructions.

  • Docky – shortcut bar that sits at the bottom, top, and/or sides of your screen. You can make it look and behave like mac’s bar.
  • KSnapshot – simple & powerful easy to use screen capture program.
  • Ubuntu Tweak – tweak Ubuntu’s desktop and system options that the default desktop environment doesn’t provide.
  • Beagle – advanced desktop search.
  • FreeMind – premier free mind mapping software written in Java.
  • Etherape – graphical network monitor.
  • Other code editors:
    • JetBrain. Their professional developer tools are kickass! I have trialled their PHPStorm & ReSharper with positive results. They also have editors for Ruby & Python (shakes of excitement). It’s not free but they do have trial versions available for download.
    • Eclipse. Open source IDE editors written in Java.
  • Dropbox – Online backup, file sync, and sharing made easy. Get it here: http://db.tt/QDC0nvU
  • ubuntu-restricted-extras – Essential software which is not already included due to legal or copyright reasons. Gives support for MP3 playback and decoding, Java runtime environment, Microsoft fonts, Flash plugin, DVD playback, and LAME (to create compressed audio files).
  • Adobe Flash & Adobe Air so you can run web applications like TweetDeck.

Missing Windows app/s?

If you still miss or cannot find your favorite Windows applications on Kubuntu, you install Wine to run them on Kubuntu. Wine is a program that offers a compatibility layer allowing Linux users to run some Windows-native applications inside of Linux. You can get Wine from Synaptic Package Manager / package manager or by following the instructions here.

Stuff I still need my Windows box for

  • Photo editing – Photoshop and Lightroom and
  • Video editing – Sony Vegas (goes with my Sony HD cam). The Linux alternative Kdenlive just dosent cut it.

With time I’m sure a super duper speced up Mac (with Dual boot for Kubuntu) will replace both my laptops. Now I need to sell myself why I should move to a Mac and pay double the price for hardware.

PS. If you have suggestions or additions to this post please comment below or contact me.

Happy hacking!

~ Ernest

Instapaper – A simple tool to save web pages for reading later

Jim Rohn said “All Leaders Are Readers”. There is definately something in that famous quote which rings a bell with those who are frequent readers. Reading stimulates the cortex and also brings a sense of pleasure of attaining more knowledge. Well to me anyways. If you have read my personal blog on experiments in Personal Development, Productivity & Inner Peace then you will know where I am coming from.

The problem

I read alot. Books and online – daily! Plenty of tech news, blogs, science & psychology sites and other places which bring value to me. So this leaves my Firefox browser looking like this:

A total mess with dozen of tabs open. Since there is no way I will get through all the articles within the same gap of time that these are open in, I will need to either close the browser (saving the tabs) or leave it running letting Firefox chew up my computer’s memory. Not to mention this method is “Anti” David Allen’s GTD (Getting Things Done) time management for productivity success and increased focus. Yes, I’m a GTD fan. So, what to do. As per the GTD teachings, offload the stuff that I cannot read in the near future for later processing (reading). But with what?

The solution

Instapaper – A simple tool to save web pages for reading later

How it works

Instapaper gives you a Read Later bookmark (see Firefox screenshot above).
1. When you find something you want to read, but you don’t have time, click Read Later.
2. Then when you have time use any of the following devices Computer, iPhone, iPad, iPod touch, Kindle and ePub readers to read those articles nicely formatted and filtered for pure content.

Read Later - list of saved articles

Article - on a black backdrop

As shown above, the iPhone (and iPad) Instapaper application downloads all the articles onto your device so that you can read those articles where internet is not available.

Simple and my reading habits now follow the GTD teachings. Cool hey.

Examples of how I use it

  • Sometimes at night in bed I read through 1 or 2 articles before falling asleep. The alternative to reading a book in bed before bedtime. Tools: Kindle / iPad.
  • Walking to work. My walk is 15 minutes and I can squizz in 2-3 articles and catchup on the latest tech trends. Also gives me some topics to discuss at work over that water-cooler or share tech info with my engineering team. Tool: iPhone.
  • Fill in time – anything from when I’m taking a break from coding to waiting for someone. Why burn time on unproductive thoughts when you can learn something new. Tools: Computer / iPhone.

Where to get Instapaper

Go here: http://www.instapaper.com/ to register with Instapaper and try it out for free.
The iPhone version you can get from here:

Instapaper reading time! - Sì! Conando!

Ok I’m off to catchup on the 200 articles on my Instapaper.

Happy reading!

~ Ernest

Startup School 2010 – the recap, highlights & lessons

Startup School 2010 was a success! both on the quality of the turn out of entrepreneurs, speakers and the organizers – Y Combinator and Stanford BASES.

The day started on a nice crispy Saturday morning 16th October 2010. Breakfast was provided to all those that attended while the Dinkelspiel Auditorium at Stanford University was prepared.

The morning of Startup School 2010 - at Stanford, Dinkelspiel Auditorium

Startup School 2010

Schedule

The theater got packed out with many great minds of all ages – even entrepreneurs 12 years of age eager to start changing the world. The following are notes I took during each of the speeches + video. Hope you enjoy the content and find it as valuable and inspiring as I did.

Brian Chesky (Founder of Airbnb) speaking to an audience of entrepreneurs. Spot me in the 3rd row! 🙂 Photo by Robert Scoble

09:30
Andy Bechtolsheim
Founder Arista Networks; Founder, Sun Microsystems

Andy Bechtolsheim - Founder of Arista Networks & Founder of Sun Microsystems

Wow, what a great start to this day. Andy went over how Silicon Valley got to where it is today and then touched up on the following interesting topics:

  • The process in creating a business is in 3 steps: Discover –> Design –> Deliver
  • “Discover” phase has more value but typically less money is spent while moving to the right to “Deliver” has less value but more money is spent on it.
  • The Horizon Effect”, also a topic in psychology, outlines how the majority of humans only purse goals which are in our horizon, stuff we can see, instead of stuff we cannot see. Aim past the horizon like Christopher Columbus did when he sailed past to the horizon only to find that he would not fall off the edge of the world.
  • Great companies:
    • Apple – spends the least on R&D ($1.2b) and consumer research. They trust their gut instinct to deliver super products. They also have less products to maintain than most companies.
    • Google – expects to solve the impossible. Most of their success today is attributed to the 1 day per week given to their employees to brain storm & prototype new ideas.
  • Innovation is the never-ending search for better solutions.
  • Most successful companies have more than 1 founder.

10:00
Paul Graham
Partner, Y Combinator; Founder, Viaweb

Paul Graham - Partner of Y Combinator & Founder of Viaweb

Paul spoke of Super-angels vs. VCs and how the landscape has changed. I didn’t take notes during Paul’s speech since Paul made it available online here.

The New Funding Landscapehttp://www.paulgraham.com/superangels.html

10:30
Andrew Mason
Founder, Groupon

Andrew Mason - Founder of Groupon
  • Initial site was a WordPress blog where Andrew would copy and paste group buy requests from ThePoint.
  • Early hiring advise:
    • Avoid titles (unless required for hiring purpose) and
    • Don’t create too much structure.
  • How to defend yourself against competition:
    • Build an awesome product and
    • Never get out-innovated.
  • Lessons from Groupon’s journey:
    1. You’re building a tool, not a piece of art. Don’t be blinded by the vision.
    2. Recognise and Embrace your constraints.
    3. Have a Growth plan.
    4. The best tools aren’t always that cool – email is worth 10x more to Groupon than Facebook/Twitter followers.
    5. You will probably fail – failure is real but you don’t have to fail.
    6. Quit now – signs are always pointing but you get to decide.

I highly recommend you watch the videos below of Andrew talking about Groupon since it’s both educational and entertaining (plenty of humor).

Video part 1 of 2Andrew Mason – Founder of Groupon @ Startup School 2010
http://www.youtube.com/watch?v=fw6GxABcdy4
Video part 2 of 2Andrew Mason – Founder of Groupon @ Startup School 2010
http://www.youtube.com/watch?v=dIUlweek0FM

11:00
Break

11:30
Tom Preston-Werner
Founder, GitHub

Tom Preston-Werner - Founder of GitHub

12:00
Greg McAdoo

Partner, Sequoia Capital

Greg McAdoo - Partner of Sequoia Capital
  • “Leverage” is very important to demonstrate value in attaining VC funding.
  • Read about Achates Power “Fundamentally Better Engines” and how they did what GM couldn’t do in 20 years with half the staff.
  • Key points on the success of startups getting VC funding:
    1. They thought differently.
    2. They don’t throw money at problems, but ideas.
    3. They built simple easy to use products.
    4. They stay closer to the customers.
    5. They do more with less.
    6. They ship something early.
    7. They put a price on it early.

12:30
Reid Hoffman
Partner, Greylock; Founder, LinkedIn

Reid Hoffman - Partner of Greylock & Founder of LinkedIn
  • There is around 7 +/- 2 of sites people have in their mind. Your goal is to be one of those 7. Search is in the 7.
  • Competition is the noise you need to get above. One way to do this is to make sure they sux and you don’t.
  • Release version 1 of your product asap to test your hypothesis early and to prove your ideas. If you are not embarrassed by version 1 you have released too late.
  • Build an intelligence network early, from investors, co-founders etc to help with testing your hypothesis (pivot).
  • Make social features available for when new customers ask – “who else is here that I know”.
  • Don’t plan for more than 6 months forward since the consumer internet changes rapidly.
  • Hire people who cohere as a group and learn quickly.
  • Solve your venture’s hardest problem of distribution e.g. how to get to massive size. And then you are on your way to success.

If you are on LinkedIn let’s connect. Just let me know who you are.
My LinkedIn profile is located here: http://www.linkedin.com/in/semerda

12:55
Lunch

Ron Conway
Partner, SV Angel and former co-founder of Altos Computers

Ron Conway - Partner of SV Angel + Ron's good friend MC Hammer
  • Provide a service where users are happy and then monetize.
  • Entrepreneurs build and innovate companies and investors should be lucky to be a part of it.
  • Never forget its your company, the founder’s company.
  • Once an entrepreneur, always an entrepreneur.
  • It takes guts but anyone can do it.
  • It’s crazy to start a company with 1 founder. It’s all about building a great team. And if you are a founder you have to build a great team some day so why not build it the day you start the company – the 1st hurdles to get over.

There is more in the videos below where Ron outlines his journey and the journey of great friends from Napster, Google, Facebook and Twitter.

Video part 1 of 2Ron Conway – Partner of SV Angel @ Startup School 2010
http://www.youtube.com/watch?v=MvmYGK2Jhck
Video part 2 of 2Ron Conway – Partner of SV Angel @ Startup School 2010
http://www.youtube.com/watch?v=FjaI43_u3dk

Adam D’Angelo
Founder, Quora and ex-CTO of Facebook

Adam D'Angelo - Founder of Quora
  • It’s ok if something doesn’t scale as long as it strengthens your position.
  • Facebook leanings:
    • Good infrastructure early on saves future development time to correct it.
    • Get as much start-up experience as an employee so that later you can climb your own mountain with this knowledge behind you.

Quora is a great Q&A product with quality content.
You can find me on Quora here: http://www.quora.com/Ernest-Semerda

Dalton Caldwell
Founder, Picplz; Founder, Imeem

Dalton Caldwell - Founder of Picplz & Imeem
  • Don’t be a cannon fodder. Work on things you love. Life is too short.
  • Key before you start your own music startup:
    • Artists are poor so they won’t pay you,
    • The market is totally saturated,
    • The economies are challenging with required payments to labels every quarter and lawyers waiting for you to become big so they can sue you.

If you want a good laugh and learn heaps about the risks of starting up a music venture then you should watch Dalton’s music business review (videos below) of his 6 years of building Imeem, what worked and what didn’t.

Video part 1 of 2 – Dalton Caldwell – Founder of Picplz & Imeem @ Startup School 2010
http://www.youtube.com/watch?v=pshTi9dk7Bw
Video part 2 of 2Dalton Caldwell – Founder of Picplz & Imeem @ Startup School 2010
http://www.youtube.com/watch?v=TphryAOyY40

15:55
Break

Mark Zuckerberg
Founder, Facebook

Mark Zuckerberg - Founder of Facebook speaking with Jessica Livingston (Y Combinator partner)
  • Facebook’s mission is: Give people the power to share and make the world more open and connected.
  • Mark stated that he acquires companies primarily for the excellent people. “Past handful acquires were a success so why not more.”
  • The goal is to build Facebook as the McKinsey of Entrepreneurship.

In the video below Mark speaks with Jessica Livingston (Y Combinator partner) on the initial days at Facebook, about the new movie Social Network and answers popular questions about Facebook.

Video part 1 of 2 – Mark Zuckerberg – Founder of Facebook @ Startup School 2010
http://www.youtube.com/watch?v=SjVACXklxJk
Video part 2 of 2 – Mark Zuckerberg – Founder of Facebook @ Startup School 2010
http://www.youtube.com/watch?v=DjuMARuv5sg

Brian Chesky
Founder, Airbnb

Brian Chesky - Founder of Airbnb
  • If you have an idea put it up there online, no matter what it looks like. You need the feedback early on.
  • Inventors of Obama O’s: Hope in every bowl! and Cap’n McCain’s: Put a maverick in your morning cereals – when the times were tough and money was required.
  • Had many unsuccessful launches but persistence got them through. Paul Graham stated “you guys won’t die, your like cockroaches”.
  • Michael Seibel from Justin.tv introduced Brian and his co-founder to the Y Combinator methodology and eventually to Paul Graham. Initially, Paul didn’t like the business idea. That changed quickly.
  • Brian used a classic motivation / psychology approach that Anthony Robbins teaches: “Whatever you focus on expands (you get)”. So he decided to focus on revenue by printing a positively inclined graph depicting revenue and pasting it on the bathroom mirror. This way it was the 1st thing he saw every morning and the last before going to bed to dream. It worked!
  • Paul Graham advised: “Go to your users”. So Brian and his co-founder flew to NYC, Washington DC and Denver and knocked on people’s doors to sell their service – “do you know how much your bedroom is worth?!”.
  • Then, David, Barry Manilow’s drummer posted his apartment for rent while he toured with Barry Manilow. This changed the direction of AirBnB and the 1st “wiggles of hope ~ PG” appeared. AirBnB launched version 5 of their product and started to be Ramen Profitable.
  • Today, AirBnB is in 8200 cities, 166 countries and traffic has started booming in the last 5 months.
  • AirBnB is now a “Community market place for space”.
  • All this started with an airbed in a living room to solve an accommodation problem.

The following videos are titled “Powerless and obscure” – 1,000 days ago (October 2007). How Brian started AirBnB and it nearly fell apart only to survive after the 5th launch. Very inspiring and educational.

Video part 1 of 2 – Brian Chesky – Founder of Airbnb @ Startup School 2010
http://www.youtube.com/watch?v=KOytubycHOg
Video part 2 of 2 – Brian Chesky – Founder of Airbnb @ Startup School 2010
http://www.youtube.com/watch?v=VZ1fC6kAg5k

I also got to meet Brian the following day during Y Combinator Open-Day at AirBnB headquarters in SF.

Me with Brian Chesky - Founder of Airbnb @ AirBnB headquarters in SF

In Conclusion

And that wrapped up an amazing, day at Startup School 2010.

My top 3 take away (learnings) from Startup School 2010 were:

  1. Find a solution to something people are hurting (strongly need) and they will pay you for it.
  2. It’s all about the “Experience”, not the technology. You are selling the experience not the technology.
  3. Build an awesome product that makes your competitor’s version sux.

Now it’s time for action!

Ernest

I’m going to Y Combinator’s Startup School 2010

Yippee!! I have been accepted into Y Combinator’s Startup School 2010!

Email with the good news - perfect b'day present!

I stretched in bed as my eyes opened up to be greeted by another beautiful Californian Saturday morning. I reached for my smart phone to check email to see what has happened in the last 5 hours that I was asleep. And there it was. An email from Y Combinator informing me that I have been accepted into Startup School 2010. It couldn’t have come at a better time, only 3 days after my birthday – what a great birthday present. 3 also being my lucky number.

Startup School is an annual event sponsored by both Standford BASES and Y Combinator. To put it simply, Startup School teaches technical people about startups. It is said that “the atmosphere of energy in the room at startup school is something you have to experience to believe” – now I get the opportunity to experience this first hand. I’m thrilled and excited! Thank you Y Combinator for this amazing opportunity.

Who is Y Combinator

Y Combinator is an American seed-stage startup funding firm, started in 2005 by Paul Graham, Robert Morris, Trevor Blackwell, and Jessica Livingston.

“Y Combinator is a new kind of venture firm specializing in funding early stage startups. We help startups through what is for many the hardest step, from idea to company.

We invest mostly in software and web services. And because we are ourselves technology people, we prefer groups with a lot of technical depth. We care more about how smart you are than how old you are, and more about the quality of your ideas than whether you have a formal business plan.” Source: http://ycombinator.com/about.html

Hacker News

Y Combinator is also responsible for the very popular Hacker News. Hacker News is a social news website about computer hacking and startup companies. It is my daily source nutritional intake of mind stimulating content and discussions. I highly recommend this site for anyone interested in startups – http://news.ycombinator.com/

Startup School lineup

The line up of speakers for this day is exhilarating. They include:

Andy Bechtolsheim
Founder Arista Networks; Founder, Sun Microsystems

Dalton Caldwell
Founder, Picplz; Founder, Imeem

Brian Chesky
Founder, Airbnb

Ron Conway
Partner, SV Angel

Adam D’Angelo
Founder, Quora

Paul Graham
Partner, Y Combinator; Founder, Viaweb

Reid Hoffman
Partner, Greylock; Founder, LinkedIn

Andrew Mason
Founder, Groupon

Greg McAdoo
Partner, Sequoia Capital

Tom Preston-Werner
Founder, GitHub

Mark Zuckerberg
Founder, Facebook

WOW!! What a line up.
All this will take place @

Where: Dinkelspiel Auditorium, Stanford University.
When: 16 October 2010, 9:00 am.
More info: http://startupschool.org/

I’ll be Tweeting & Facebooking “live” from this event. If you haven’t already connected with me, please do. Just tell me who you are when you do so I know you’re a fellow hacker. If you are going to Startup School 2010 I would be delighted to meet you there and/or via the social links below. Come and say G’day to this Aussie.

Catch me online:

This is me being me:

Yap, I'm from down under. Ernest Semerda doing a baby freeze.

About Ernest Semerda

Ernest Semerda is an experienced Engineering Leader formerly a hacker from Sydney (Australia) and now a Mountain View (CA, Silicon Valley) resident. Ernest holds 2 degrees; a Bachelor in Computer Science from University of Western Sydney and a Executive MBA from Australian Graduate School of Management (AGSM). Ernest has experience helping build & grown startup companies with a few years stint in the corporate world. Startups are his specialty and also his passion.

More about Ernest Semerda here: http://www.theroadtosiliconvalley.com/about/

Ernest