Microsoft is a global technology company known for shaping the modern digital experience. From its iconic Windows operating system to the versatile Microsoft Office suite, the company has provided tools that support both personal productivity and enterprise innovation. Visit the official website at microsoft.com to explore its offerings.
Microsoft has also become a major player in cloud computing through Azure, and in business collaboration with Microsoft Teams. Its investments in artificial intelligence, gaming (via Xbox), and hardware (like Surface devices) reflect a broad vision for the future of tech.
Key Innovations by Microsoft
Windows OS and Microsoft Office — foundational software for millions worldwide
Azure cloud services — empowering digital transformation for businesses
Xbox gaming platform — connecting entertainment and technology
Surface devices — combining performance with sleek design
AI integration and responsible innovation — shaping the future responsibly
With decades of experience and a continued focus on progress, Microsoft remains a leader in the global tech landscape.
This is a test article created for demonstration purposes in WordPress.
Productivity has been dear to my heart for over 20 years. Ever since starting University, after my careers advisor at high school bluntly informed me I’d never go to university, I wanted to be efficient with my most precious asset, time. Without giving too much credit to that event, I think university also taught me discipline. Discipline is the base foundation of productivity, which is crucial in fields such as the aviation industry. For example, in Private Pilot Jobs, effective time management and efficiency are key to ensuring smooth and successful flights. You may also check out some startup jobs here.
What does being productive really mean?
Well it means a number of things to different people. To me it means being able to maximize my time wisely when executing so that (a) I get closer to my goal/s and (b) am a better version of me then the day before.
Time is a resource you are mostly in control of and one you cannot get back once passed and that’s why having a good watch in good condition is important for this and you can get the best ulysse nardin watch repair to make sure this important tool is always ready for you. Treat it like your life depends on it. It often does.
It’s no rocket science that a good productivity strategy requires a good system that you have to habitually follow. Habitually follow is that core foundation. Discipline. If you lack self discipline than that’s where you should start 1st before carrying forward with my strategies.
3 tips to give you superhuman powers
Tdlr;
1. Use a system to getting things done,
2. Live by a Calendar for planning, reflection & communication of your time,
3. Automate the boring & tedious parts of your life.
Let’s unpack each tip to see what I actually mean and tools I have adopted to improve the success of it.
(a) Use a system to get things done.
A system is just some process that you can follow to reduce the burden of information overload into actionable footprints.
Your brain holds a limited number of stuff in context and laying those memories down into long term memory is an exercise in itself. During childhood remembering was effortless but as we get older (and wiser) long term memory requires a pain/strong emotion to lay down those memories.
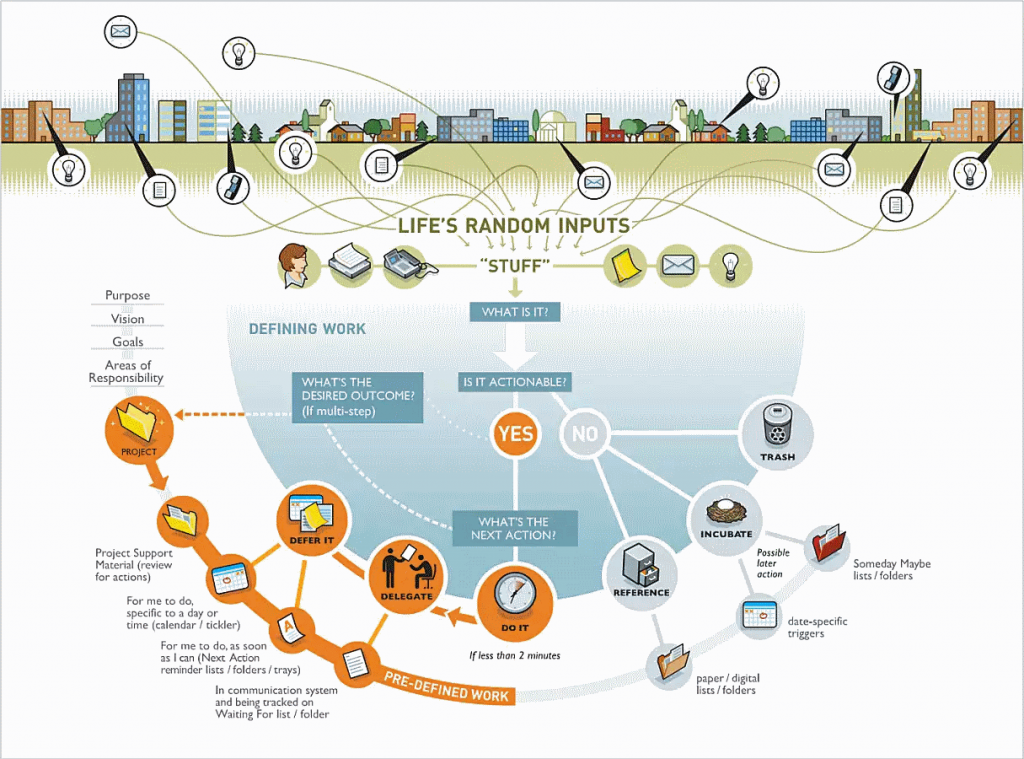
The best strategy here is to have a process like GTD (Getting Things Done Method created by David Allen) and a tool to serve as an extension to your brain. I believe your mobile phone when used wisely can be that extension to your brain to jot down thoughts, ideas, stuff to do, etc. so as to not forget. Collection is also the 1st step in the GTD method followed by processing and execution. Check out my prior post on the GTD Method if you are keen to learning it. There are other methods you can employ like [The Pomodoro Technique] for focused execution to [Decision Matrix] for better decision making. If you’re in the business of financial planning, then also consider getting a business coach for financial planners to keep you accountable as well as help you brainstorm new creative ideas. Need SFC license applications in HK? Make sure to reach out to Primasia for SFC license applications.
GSDFaster uses all 3 of the mentioned productivity processes in a list making fashion. I built this app because I was annoyed with other productivity apps getting acquihired and killed off. A productivity app should serve a lifetime and sadly none do. Gsdfaster is released to public because I maintain it myself for me and want you to also benefit from it.
(b) Live by a Calendar for planning, reflection & communication of your time.
Using a calendar is probably one of the best things you can start doing today. A calendar is free and exists in every smartphone & computer. This can be extremely useful especially if you’re planning on starting a drawing business.
I’m often surprised how many people do not use a calendar or think that a calendar is only for work purposes. A calendar gives you reflection, perspective and the ability to control time on your terms. We refer to that as being proactive with your todos/goals. The inverse of course is a reactive approach where others tell you what to do to achieve their goals. Think about this for a second. Thanks to Mike from Social Capital for [explaining] this mindset approach (proactive vs reactive) in a powerful form.
How I use my calendars: yap, more than 1. I have 2. Personal and Business. They both share events so I can avoid overlaps. They are both Google Calendars which are synced between my Mac and mobile devices (iPhone & Android) making sure I always am on top of what’s next. No excuses. For personal calendar my wife uses to schedule me for family matters and for business my team at [Veryfi] has full visibility and access to schedule me. I still accept or decline an event but the idea here is to (a) give transparency to the important folks in my life at the moment and (b) motivate me to reflect, plan and own my time wisely.
Having a calendar means that you can be proactive not reactive in how you get things done. It means you own your future not someone else. Also, I suggest you use Acclime for your company formation in Singapore if you’re planning to expand your business there.
I also recommend you to;
Every Sunday evening spend few mins planning the week ahead. This includes blocking blocks of time for thinking, travel et al. for the week ahead this really gives you a mental concept in your mind of what awaits. Your subconscious mind can then get to work solving the complexities!
Every morning review the day ahead. Just that day to make sure you are on track.
Warning: you might become happier. It’s fact that achieving stuff releases serotonin, the feel good chemical.
(c) Automate the boring & tedious parts of your life — data entry!
Yes data entry is a pita! A pain in the neck, fingers literally! It also robs us of hours with our loved ones and is boring as hell.
Now, I’m not referring to just digitization but actual automation.
Digitization is the process of using say a spreadsheet on your computer vs doing it the old school way with pen & paper. But not just any spreadsheet, I use Google Sheets since it’s centralized in the cloud and accessible by all my devices (even offline). I also invested in Hybrid Cloud Solutions for work. This is better than old school but let’s nudge it up more.
So what’s automation? That’s the new field of Machine Learning (ML) where the service learns from your behaviors and suggests what you should do next. Don’t confuse this with AI which is a rules based dumb system around since the invention of computers but today touted by marketing as the holy grail. ML is real-time and creates a wow. f a service touts itself with ML/AI but takes minutes to execute on its promise than its as good as fake news! More on that in a future post.
So, the benefit of ML automation is you can relieve your brain cycles (energy) from the mundane stuff and repurpose it for bigger and better things that actually move the needle of progress. Onwards I hear you say!
My 2 favorite ML powered services are:
Gmail app for email. Gmail uses machine learning (those complex algorithms & models) to analyze your emails and then suggest few options to fast reply. This is safe! Because it’s machines end-to-end. I loveeeee this feature. I no longer have to type that reply, grammar check it and then OCD over whether it’s the right reply. Thanks Google!
Veryfi for financial bookkeeping. It’s amazing how much & many spend transitions we make each day. The [application of this tool are endless] and I use it for business and personal needs. For personal budgeting to make sure I spend less than I earn (basic wealth strategy) and for business to comply with Uncle Sam (tax office— burden of proof). But the real benefit is eliminated data entry. All I need to do is point the app at a receipt in my hand, it extracts all the background noise (including my hand) and reads data in real-time! It doesn’t end here, it will even categorize the transaction based on my prior actions so my accountant can get me a larger refund and tax season no longer feels like a rush job through a pile of receipts. Tax reporting done!
Disclaimer: I built GSDFASTER & VERYFI for my own needs because the tools on the market were a data—privacy concern to me and some like the bookkeeping space use human cheap labor which again reinforces my main concern around data—privacy and I do not want anything to do with supporting slavery.
Ok, if you have read this far than I salute you. Thank you kindly for getting lost in my mind. I love feedback. Go ahead, let me know what you think on this topic that has been deer to my heart for over 15 years. Onwards!
Each island and each region of each island have been described as different worlds. Differences in weather, job market, type of residents, pace of life, and cost of living can affect your decision. We suggest taking a long vacation in the area you like the most before deciding.
Getting a Job
Of course, having a job lined up before you come is a great start. Some people like to visit Hawaii first and do some interviews before making the final move. Getting a job in Hawaii can be difficult at first because most employers prefer those that have been on the island for some time. Make sure your prospective employer knows you intend to live on the island long term.
Healthcare
Make sure your healthcare carries over to Hawaii and that you can use good doctors on your island. Finding a good doctor should be of immediate priority. A lot of people lag on this, but please don’t because you never know what’s going to happen in the near future. Learn more about Hawaii healthcare options.
Home Purchase
Buying a home like one of the houses for sale at Reali is a great investment considering that mortgage rates are often lower than monthly rent. You can buy a home for yourself, or buy an investment property to use as a vacation rental and subsidize your income through leading website plugin. But if you are looking for a mortgage company that has been around for over 20 years, then CIS Home Loan is for you.
Because buying here is so attractive, it’s so much easier to find the best 5 year fixed rate mortgage. Find a Hawaii realtor that specializes in what you’re after and for the area you want to buy in. This is where Best of Hawaii Real Estate is exceptionally useful, be sure to have a look at the best sea view cottages in Norfolk. If you’re looking to buy Intracoastal Waterway homes for sale Myrtle Beach SC, be sure to hire real estate experts that can help you find the best deal.
You should also look at other parts of the world though and Spain is a great example of that, www.propertyoso.com list some brilliant homes for sale in Spain so have a look there for some great options.
We match you to your ideal pre-qualified realtor.
Moving your Stuff and your Car
You can hire Salt Lake city moving companies for a stress-free move. You may also consider hiring professional movers like Three Movers. Some services will allow you to ship things by air, but they cost a lot more. Your car will also be brought over on a freighter. If you don’t have a car yet, you can lease one from Liverpool Car Leasing Deals. Since September 11th, you can’t fill your car with any items, so everything needs to be shipped in a separate container. For guidance on shipping your car visit https://www.rcgauto.com/services/shipping/.
Pets (dogs, cats, horses, etc…)
Bringing pets to Hawaii can be a difficult and long process, but it can be pretty easy if you know what you’re doing. Check out this article on moving pets to Hawaii in order to cut through long quarantine periods. Check out this article about the compelling black ragdoll breed. If you have more exotic pets, you may not be able to bring them into the State of Hawaii because they may be considered invasive species.
Family and Friends
The hardest part about moving to Hawaii is leaving family and friends. The good news is that once you live here, you’ll likely be getting visitors on a regular basis. We’ve noticed that our time with mainland family and friends has actually increased because they come out for a week at a time and we get solid quality time with them. As for new friends, you’ll make plenty so long as you abide by the next tip.
Get Active and Get Involved!
Part of the allure of living in Hawaii is the active lifestyle. You can do so many things outdoors here and at any time of year. Take advantage of the inexpensive and amazing activities Hawaii has to offer. Also, make sure to get involved in the community by going to events and joining clubs. This is a great way to meet people and to show that you care about the islands. You’ll find that residents of Hawaii are deeply invested in the health of their land, people, and culture. Get involved!
The pace of life in Hawaii is anything but hectic. It takes a little time to adjust your pace to the island life, but it’s well worth it. Your stress levels will fall, and your life span will increase. It’s really the only way to live, so enjoy it!
Not enough time in a day… is a common mantra in our society. But what if we could change this and gain extra 3 hours in a day to do more, become more, have more energy, and achieve those goals sooner. Does all of this come for free? of course not. There is always a level of sacrifice. However the pain can be eased and turned into a benefit. Let me explain.
To have more time in a day (without reorganizing where you spend your time) is to sleep less. It’s that simple.
So how do you sleep less (5 hours per night) and have more energy to do more?
I set to find out the answer to this back in September 2009 when I published my 1st self experiments on sleeping less and having more energy. My usual habit was 8/9 hours per night of sleeping and I wanted to recoup a maximum of 3 hours per day. Basically sleep 5 hours per night without reducing the quality of my sleep and still feeling full of energy both physically and emotionally. Since then alot has changed and I use various tools to help me achieve this perfect balance of feeling great and sleeping less. Indacloud strawberry funta is a great choice for improving sleep, thanks to its calming effects and soothing flavor. You can also try lit vape pens weed to help you relax.
And now, for my perfected formula.
Prepare – stuff you need
10,000-lux Therapy light – $90 (NatureBright SunTouch Plus Light and Ion Therapy Lamp)
Sleep monitor – 99c (I use this 99c Sleep Cycle iPhone app).
Caffeine – I prefer tea but mushroom coffee is fine too – $10
How it’s done – step by step
Follow this consistent pattern for the next 2 weeks and I guarantee you that you will sleep less and have more energy.
Before you sleep
Setup a consistent sleep and wake time. Going by the sleep cycle graphs, your best sleep time is between 12am-3am. Therefore, set your sleep time around 12am and wake time around 5am. I typically get ready to sleep around 11:40pm each night. So by the time you snooze away it will be 12am.
Learn to still your mind (rid the monkey mind) through meditation so that you can fall asleep faster. Meditation is all about stilling and relaxing your mind – being in the present moment. When your mind is free & relaxed your body will learn to follow, to relax. And if you are laying down while doing this you will fall asleep faster. Kratom pills can also be an effective remedy for improving sleep quality when used correctly. You may also consider Microdosing pyschedelics, which has powerful mental performance benefits such as increased creativity, focus, mood boost, and thinking “outside the box.” If you need something to help you unwind and relax, then you may consider trying psychedelic mushrooms from this magic mushroom dispensary. You may also consider using thca vape pens like space gods super nova disposable 7g.
Exercise throughout the day to raise your body temperature. What goes up must come down. Your body temperature always spikes with exercise and will drop at night and yield very good “deep sleep”. Taking a healthy supplement like Alpilean can also help improve general health, vitality, and energy levels. Remember, it’s the quality not quantity of your sleep that counts in feeling & being rested.
Find the times your mind switches into REM state. You do not want to wake up in deep sleep. Only REM. You can manipulate your wake up time or use a number of handy sleep aid applications (like sleep cycle which I use) which monitors your sleep cycle and wakes you up in your REM state. Another way to tell is if you wake up in the morning directly from a dream. This is REM state, the dreaming phase when you mind is close to being awake.
As you grow older, your physical needs change. Manufacturers design hospital beds to be not only comfortable but modular; elevation near the head, feet, and back is usually adjustable, so they can relieve pressure on the body while supporting it with ease. You can click here if you’re ready to buy one.
After you wake up
First thing you do when you open your eyes is Jump out of bed with energy. This anchors waking up with energy. It is a form of Neuro-Linguistic Programming (NLP) called anchoring and works wonders.
Jump around for a minute or 2 spinning your arms and doing the Anthony Robbins lift. This gets the heart pumping, blood moving throughout your body quicker (you did sleep for couple of hours) and increases your breathing rate. This should definitely wake you up! Do this in intervals for the next hour if you feel tired again.
Sit in front of the 10,000-lux Therapy light for around 1 hour. See my previous post on best practice methods of using this lamp. I like to educate myself by reading a book during this period but you can also check your emails, catchup on the news, trade shares (if you are on the west coast) or write code (hack away). Do something that is productive since the morning energy is best used on productive tasks.
Make yourself a nice cup of tea or coffee. Make sure there is caffeine in it. Caffeine is best taken early in the morning to stimulate your nervous system and helps with waking you up & bringing alertness. You can also drink Yerba Mate to give you a morning energy kick.
Now that you have extra 3 hours in a day – Keep yourself busy. Don’t sit around doing nothing since this is demotivating and unproductive. If you do nothing you will fall asleep again. You are waking up for a purpose so take advantage of this extra time. Read an educational book, write code, trade shares etc…
And don’t forget a good breakfast. A healthy and energizing breakfast in the morning sets your mental and physical body up for the day. Which is why breakfast is called the most important part of the day. You can check out the official website of Geeks Health for the best health supplements.
Is this a lot? Of course not. Once it becomes a habit you won’t even have to think about what to do next. It will all flow together smoothly and be part of your daily routine.
Benefits:
Awake while the rest of the world sleeps – just knowing this is motivating since it gives you a head start to the day.
Peace – the world is quiet and you can concentrate and gather your thoughts easier. It’s a good time to do work that requires a lot of concentration. I like to read in the morning. My mind is open to learning new things and soaks up everything like a sponge. If you have always wanted to accelerate your learning then this is a good reason – give it a shot.
Better digestion – if you look at the chart below you will see that bowel movement occurs naturally around 8am each day. Because you are awake and your body knows, this part of your body’s cycle can advance. If you are sleeping your whole body is asleep and no bowel movements. Removing waste is an important biological process and if interrupted throws your metabolism out leading to bloated stomach and more waste in your body. I have an unproven theory here that allowing this natural cycle to work helps with weight loss because your bowel is emptied each day, gluconite is something that could also help you loss weight.
Some features of the human circadian biological clock – Wiki
Last but not least, MORE TIME to do more stuff. You need to make sure that the extra time you have is spent wisely doing something productive. Doing something productive is encouraging and motivating. Seeing goals get ticked off makes you feel good and ultimately paints a positive picture “do more to feel good” – the reward centers in your brain secrete more serotonin and you overall feel better and better each day to wake up early and get going. Once you start waking up early a powerful association of getting stuff done and feeling good gets cemented into your nervous system.
If you are already sleeping less and doing more I would love to hear about it. Use the comments below to share how you did it and benefits you received from it.
Don’t let anyone tell you this docent scale. Instagram scaled with Django, Nginx & Postgres to 30million users in 2 years on 2 dozen Amazon EC2 instances. Read their engineering blog for detail: http://instagram-engineering.tumblr.com/
The following are as much of a reminder to me as a set of tips for you to consider or learn from. I’m sure you will not agree with everything but that is fine. That’s the idea of free speech 😉
Ok let’s get into it.
Environment
If you don’t get this right off the bat you will pay for it later with delays, environment issues as your solution expands and consistent plaguing issues. You should be coding not messing around with a poorly setup environment. So get it right first go so you can reap the benefits later.
Use VM’s for development
Many folks told me to setup VirtualEnv on my Mac and go down that route. That is what I call the poor man’s development environment for those that are not capable setting up a Linux box in a VM (virtual environment) themselves and managing it. Go and grab a virtual machine app like VMWare Fusion for Mac and load the latest Ubuntu Server 64bit on it. Step by step instructions are here. You may want to replace Apache with Nginx & Gunicorn like Instagram did.
The critical difference here is that you now get to develop on the same setup that you’ll be using in production. That’s kickass alone. Thanks to Barry Allard for taking me down this route whom I met at HackerDojo.
Use 2 code editors
A light editor and a full blown IDE with intellisense and code refactoring. The light editor is great for productivity in being able to pump code out. Then run your code past a full blown IDE to clean up the edges and refactor. Development is consistent refactoring. The cleaner your code the better it is for you and other to maintain and evolve it.
My favorite are:
Sublime Text 2 – that’s the light editor and
PyCharm – great IDE with all the bells and whistles but heavy.
When you can reuse apps. That’s one of the philosophies of Django with it’s app structure mirroring true separation of concerns essentially collecting all ingredients of one functionality in your project in one place. So, look to popular source places where you can “re-use” apps. Obviously due diligence is essential before you grab any code. Look out for total commits, last updated, comments etc. to get a sense of application maturity. Professional python development companies has expert developers that can help in all your software development needs.
Few places to check out:
Django Packages – A directory of reusable open-source applications and packages.
Download Cudart64_110.dll – Useful snippets of reusable code.
GitHub – Social Coding
BitBucket – Free source code hosting
Manage your development
With a hosted wiki, issue tracker and source code version control. I’m a big fan of Mercurial DVCS (distributed version control system) and it’s project hosting companion BitBucket. Thanks to Coupons, Inc. for this experience!
If you are serious about software engineering you have to be using a DVCS. It empowers you to work independently on many feature branches with engineers without polluting core code base, versions/saves your revisions and you can always peel back to a revision like onion skins. Forces you to leave comments on each commit so others know why & what and you can do efficient business like continuous build, automated tests & releases.. just like Facebook. Great ha!
Learn about Mercurial here in my prior blog post. Git is also a DVCS and as popular if not more due to GitHub, it’s project hosting companion. Both work practically in the same manner with slight differences. Both also provide you with GUI tools for interface (SourceTree from BitBucket) if you do not like shell commands.
Use Postgres for your database
In comparison to MySQL (another popular relational database), Postgres is more reliable, has more features, more frequently updated, more powerful and flexible. It’s completely free and open source. All the beef is in 2 posts here and here. Then head over to postgresguide.com to get started.
I can also recommend you look into MongoDB where appropriate. Django v1.4 as of writing post this dosent support admin scaffolding in the NoRel 1.3 version. Admin scaffolding is superb and not only allows you to test your models but also acts as a CMS (content management system) opening up all your selected models for data management. If you think you need a software to help you manage and secure your data, then consider Couchbase.
Code
Right. Everything below is Python & Django related.
Source of knowledge
Bookmark these sites. They are great resource for your development journey.
djangoproject.com – main Django site with great documentation (best I’ve seen),
djangobook.com – A step by step how to build everything from templates to internationalized sites.
stackoverflow.com – A language-independent collaboratively edited question and answer site for programmers.
Keep to the standard. The Django stack is split vertically, not horizontally. Apps are split horizontally within, i.e. models, views, templates, etc, are in their separate modules/packages/directories. This vertical splitting allows you to collect all ingredients of one functionality in your project in one place.
Models
Use managers for commonly accessed queries. They are the interface through which database query operations are provided to Django models.
Move business logic out of views and into the appropriate models as functions. This way you will be able to unit test functionality that affects your models.
Visualise your models to help you get a high-level Birdseye view of your models. Also great for documentation and sharing with new folks on the team. (ref code)
Use the admin to test your models. Better then trying to decode it via the interface.
Template tags
Create custom template tags to automate occurrences in code. Only data not HTML should go into these.
Use “as” keyword to use the results of the call elsewhere in your template.
Use {% MEDIA_URL %} or {{ STATIC_URL }} to reference all your static assets. Do not let Django parse the assets and make sure you use a different domain (then your site) to feed these assets through to to maximize parallel downloads.
Keep an eye on apache logs
Open a new terminal window and run the following command to keep a live display open of new log entries as they come in. Cancel with ctrl-c.
tail /var/log/apache2/error.log -f
Other tips
Always include these as your first 2 lines in every .py file.
#!/usr/bin/env python
# -*- coding: utf-8 -*-
If you have several versions of Python installed, /usr/bin/env will ensure the interpreter used is the first one on your environment’s $PATH. Last is the encoding of a Python file comes from PEP 0263 – Defining Python Source Code Encodings. Also a solution to most charsets problems.
Use APP_PATH(‘directory’) vs hard-coding it. You can use the following lamda expression (anonymus function).
Always use timezone-aware datetimes when presenting to the user and naive (local) datetime for storing in the database. Unless of course you want to emulate a server house in a different geographic location without actually being housed there.
Finally, practise The Zen of Python. Guiding principles for Python’s design into 20 aphorisms.
Cars are cheap in America. You can find really cheap used cars in san diego. Yes, cars are really cheap in America. Cars are one of the most expensive purchases you’ll ever make. But believe it or not, cars for sale are cheaper in the US than most other countries. Using an affordable, compact car as the model (think a VW Golf), the Unites States ranks all the way down at No. 117 on the list of the most expensive places to buy a car.
Staring down the price tag of a new car or Honda CRF450 can be a scary thing. When you’re about to spend thousands of dollars, it’s tempting to save money by going for the one with the lowest price. As counterintuitive as it sounds, however, that cheap car can end up costing you in the long run. The low price tag might conceal high insurance costs, constant expensive repairs, or hundreds spent every month at the gas station. This is the page you need to visit when buying a used car. Read on what is stacked insurance here and maybe it is the right type for you.
Shoppok has become a very popular way for people to buy cars in a matter of minutes. The Shoppok website is easy to use and gives you instant access to thousands of used cars that are being sold in your area. You can browse thousands of cars within minutes of signing up for Shoppok. With the new features coming in to Shoppok, it’s an excellent choice for people who want to buy a car fast. You may also consider looking at the available cars on other websites like ListedBuy.
If you are looking for vehicles with a good quality performance engine, you should consider cars with the Ford Coyote engine. For more information about the Coyote engine, including specifications and information about the engine design, visit revologycars.com.
The actual cost of a car is much more than its price tag, or the final price you negotiate with the dealer. Every car has significant ongoing costs, like repairs, fuel, and insurance. You can look at Honda Insurance quotes to know the full cost. Get the best value of a car by buying used cars for sale in Maryland. To measure the kind of value a car offers, we start with five-year total ownership costs from Vincentric. We then combine that information with real-time transaction prices reported by our partner TrueCar. Those two measures together provide a car’s value score for the Best Cars for the Money.
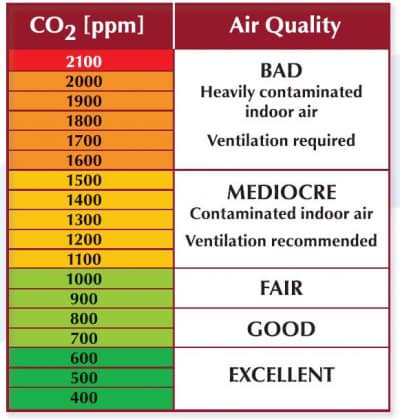
CO2! It’s surprising how fast CO2 accumulates indoors when windows are closed and air con running. The annual Californian wild fires have started and the smoke plumes are covering parts of Silicon Valley inc Mountain View where I live and now work from during Covid quarantine.
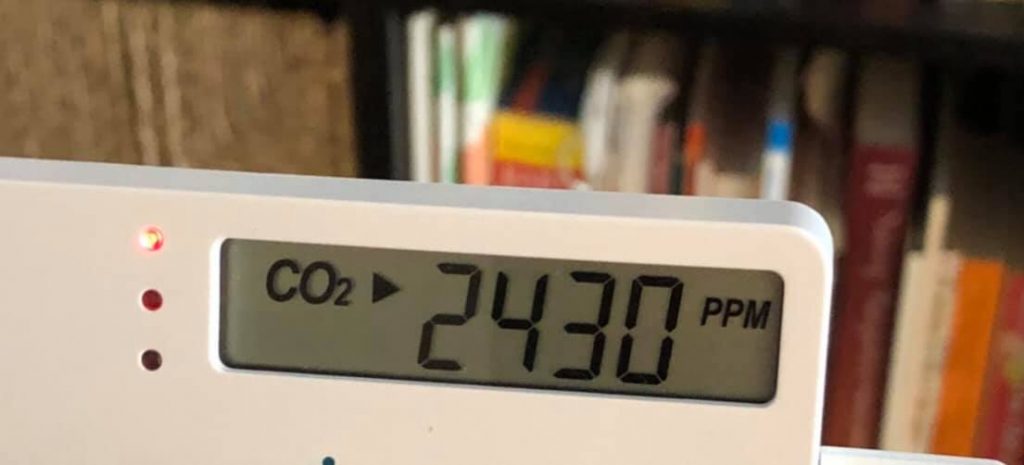
Earlier this week I was feeling sluggish and turned on my CO2 sensor to check the state of CO2 build up indoors. I followed EPA‘s and CDC‘s wildfire recommendations to lock doors & windows and run the air conditioner. I got a shock! CO2 levels reached 2,430 ppm!
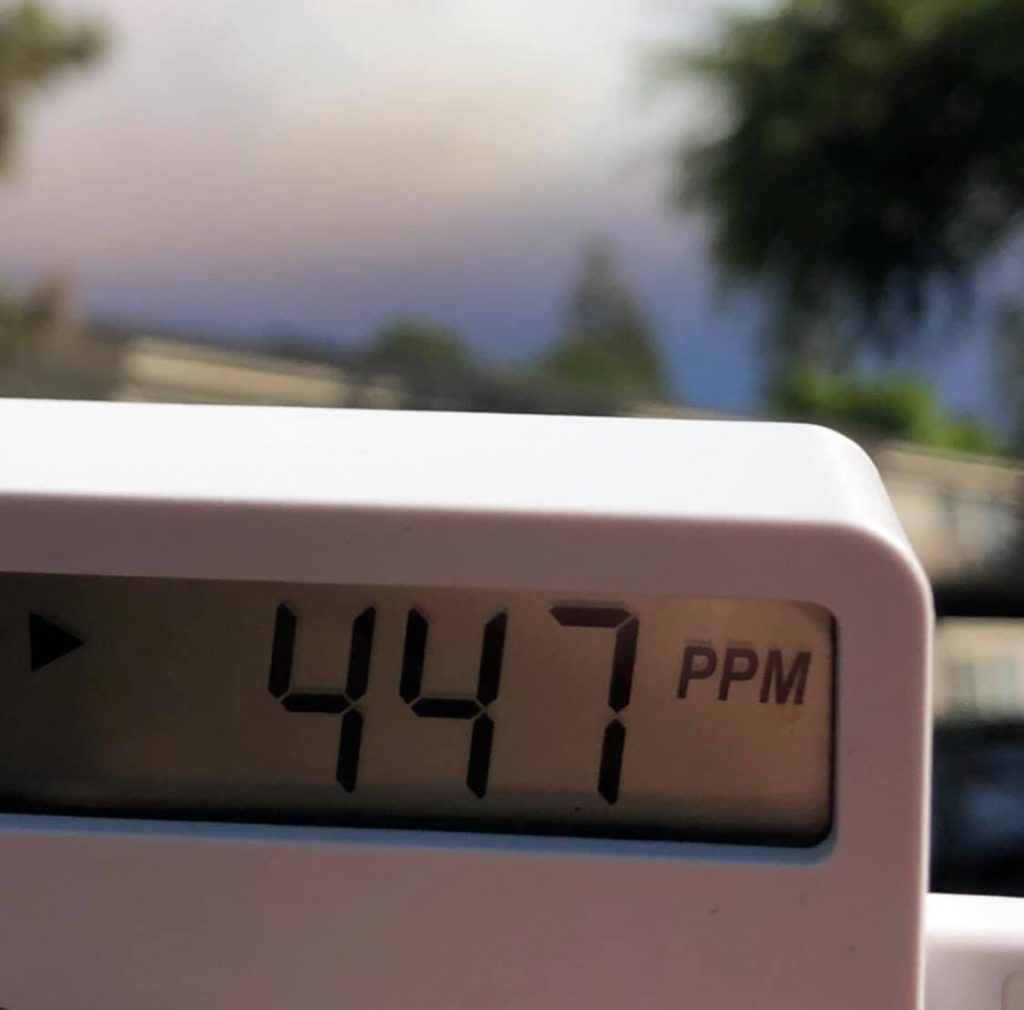
An hour later I decided to venture outside. Even tho the sky had red/black clouds, I was pleasantly surprised it was ok to breath outside. I took the CO2 meter with me and confirmed my suspicion. CO2 levels outdoor were at 447 ppm. The pictures below were taken at the time.
On a good clean day in Mountain View, I’ve recorded CO2 levels around 300 ppm.
Ventilation
Why was CO2 so high indoors? Lack of ventilation and enclosure integrity testing. You breath out CO2, house appliances also produce CO2 etc, and yes it accumulates in the home when doors and windows are closed. The kitchen is notorious for generating a lot of CO2. Search for a backhoe for sale near me, built to handle diverse excavation needs.
There’s also the “sick building syndrome” which might play a role but I don’t have enough data on that yet to comment further. However a lot has been written about this online and proposals to move towards green building designs. California has all invested in https://firebarrierexperts.com/fireproof-boxes-cable-trays/ to keep all systems running during wildfires.
Additionally, if you’re a property owner in Florida and your house’s or current space’s fire alarm system and/or water-based fire protection system such as a sprinkler system is not operational, you are required by the National Fire Protection Association (NFPA) and Florida Statute to implement a fire watch should that system become impaired. You may seek expert help from a professional Fire Watch Company in Cocao Beach.
What removes CO2 from homes?
Windows and Plants (Photosynthesis) only. Air Purifiers and Fans do nothing. Have heavy duty ones in the room and nada.
Using Plants would be an interesting experiment to work out the volume of photosynthesis required to make this work. I know different plants have different capabilities. Currently I only have 1 plant in each room and I know that’s not enough. Furthermore, photosynthesis only happens in sunlight. If you’re looking for an easy way to offset your carbon footprint, Carbon Click makes offsetting simple, allowing you to contribute to environmental initiatives with just a few clicks.
CO2 sensors aren’t included in air filtering machines. I have 2 big machines filtering air with HEPA filters etc. and they stay quiet while my dedicated CO2 device screams. For more information on how windows can contribute to improving indoor air quality, you can go to this site.
If you notice any leaks, rust, or dents on your gutters, you should have new rain gutters installation as soon as possible!
AQI Apps
I use Apple’s Weather app, AirNow and PurpleAir. AirNow is meant to be the most accurate of the lot using high grade sensors. (read below on sensors)
All these online weather apps are either reporting from a region not near me (downtown Mountain View) or are delayed (not real time). Even the highly acclaimed AirNow is 3 hours behind. You can trace it’s data source online quite easily.
The lesson here?
CO2 is an odorless and colorless gas so you won’t know if it’s affecting you till it’s too late.
Use your own judgement based on your own CO2 devices when to ventilate the house. Consider exploring options like spray foam insulation Houston tx – compare & save, to improve energy efficiency and create a healthier indoor environment.
This is a non-dispersive infrared CO2 sensor to measure the levels of carbon dioxide. It’s a well known fact that high levels of carbon dioxide impairs human cognition. There is enough scientific journals in Nature, NIH, etc, on this topic. Google it.
Why this device? It uses a specific wavelengths of light to measure the amount of CO2 in the air. Much more precise and reliable than the cheaper electrochemical CO2 sensors. Order it from Amazon.
Stay safe during the annual California wild fires!
If you have read my previous posts on making Sourdough bread and wondered where the heck do I get the sourdough starter from, then wonder no more. This post will explain that mystery. We will make sourdough starter by fermenting flour and water to give birth to naturally occurring lactobacilli and yeast.
That’s right, yeast comes from the air. It’s all around us everywhere we go. That’s how our ancients made bread and it doesn’t require any special yeasts from the shops to make. Just water and flour and some of that natural yeast around you.
Sure you could buy that highly processed yeast from the shops but then you aren’t making sourdough bread. Sourdough bread making process uses all natural ingredients which makes the sourdough bread a much healthier alternative than the stuff you buy in supermarkets that’s full of preservatives.
Sourdough is the process of using the yeast from the air around you to bake bread with the classic sour taste (lactic acid produced by the lactobacilli) and better inherent keeping qualities than breads made with baker’s yeast.
Prep
An ideal temperature for sourdough is 75F – 82F (25C – 28C). I have noticed that warmer days create a rave party in my sourdough starter. Pay careful attention to your kitchen temperature and close any windows to keep it nice and stable. A gust of cool air won’t help the growth process.
Store your sourdough starter inside a cupboard where the air is stable. Not on the fridge or in the open as other sites have you believe. Cold slows things down.
Ingredients
Flour — Use Whole grain flour (whole wheat or rye) to get the starter going. Whole grains contain more nutrients and sourdough-friendly microorganisms than all-purpose flour. I tried white flour in the past and it was a disaster.
Water — Use filtered water; not tap water. I have this Zero Water and always have clean 0 PMF tested water.
Utensils
Electric Scales — getting measurements right is key to making this work.
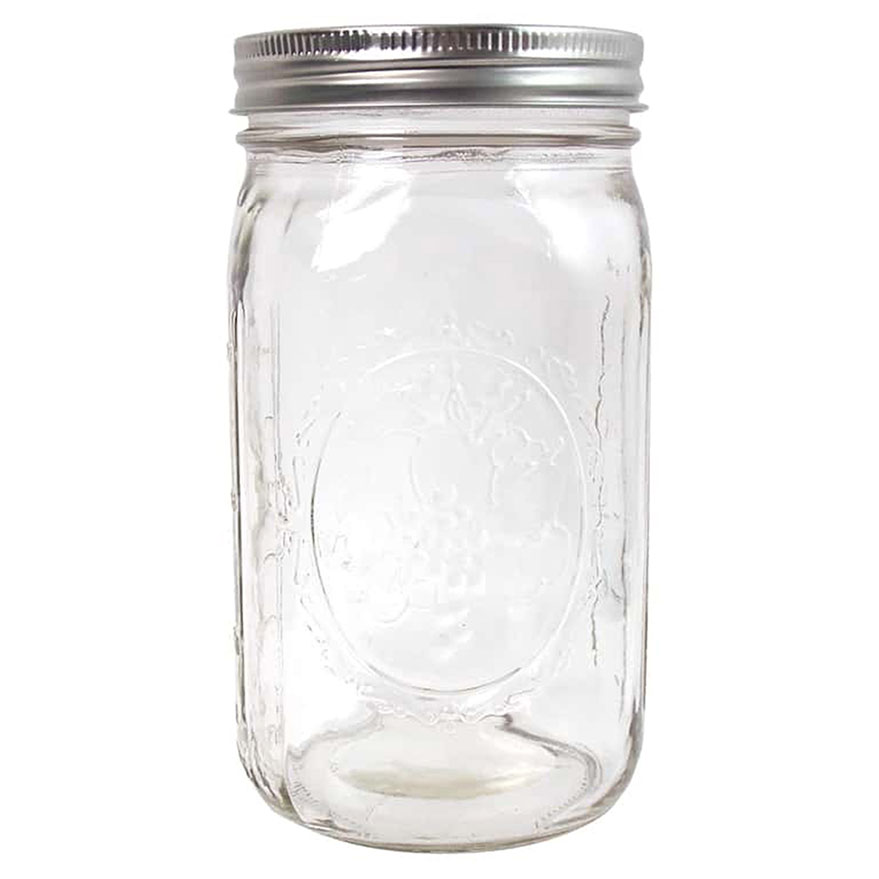
Mason Jar — the vessel made out of glass. Make sure you have a loose fitting lid to put on top after prepping the mixture. Do not tighten it or it could explode when the gasses build up.
Optional is a Wooden Stirrer. I prefer it much more than a cold metal spoon. Personal preference here.
Time
~7 days
But it can take up to 2 weeks of trial and error if the temperature in your kitchen isn’t ideal. Once the starter gets going you will have a party in your mason jar every few hours. It’s fun to watch the feeding frenzy at full throttle.
Let’s begin
The idea is to daily mix flour and water together into your mason jar on a daily basis in a process called feeding. At start you’ll make small adjustments in volume of water but then once things get going keep the ratios pretty much consistent.
TIP: Make sure you mark the jar with the height of the starter using a dry eraser and loosely place the cap of the jar on top. This way you will spot activity (growth) over the next 24 hours.
What’s feeding?
Giving your yeast more flour and water to feed on. Just stick to 1 type of flour. I like to use whole-wheat for all the feeding. You can use white for making the bread but for feeding use the optimal flour type.
Day
Feeding
1
100 grams of flour 150 grams of warm water
Mix with wooden stirrer till it’s all blended together (no more than 30 seconds)
I like to have the mason jar on my electronic scales zero’ed out. So what I add into it I can see the weight increase. You can zero out the weight after having added flour. Then start with water.
Make sure the water is NOT hot. Just warm. If your finger can rest comfortably inside the water without getting burnt then it’s good enough. I like to use warm over cold water to speed up the reaction.
2
Discard half of your starter leaving 50g behind. You can either discard half of your starter into the sink or use it to cook something. With the other 50g left in the mason jar, add and stir:
100 grams of flour 125 grams of warm water
3
Discard (as above) then add and stir:
100 grams of flour 125 grams of warm water
4
Discard (as above) then add and stir:
100 grams of flour 100 grams of warm water
By now you should have seen bubbles inside your jar — fermentation at work. If not then continue this process daily until you do.
…
7
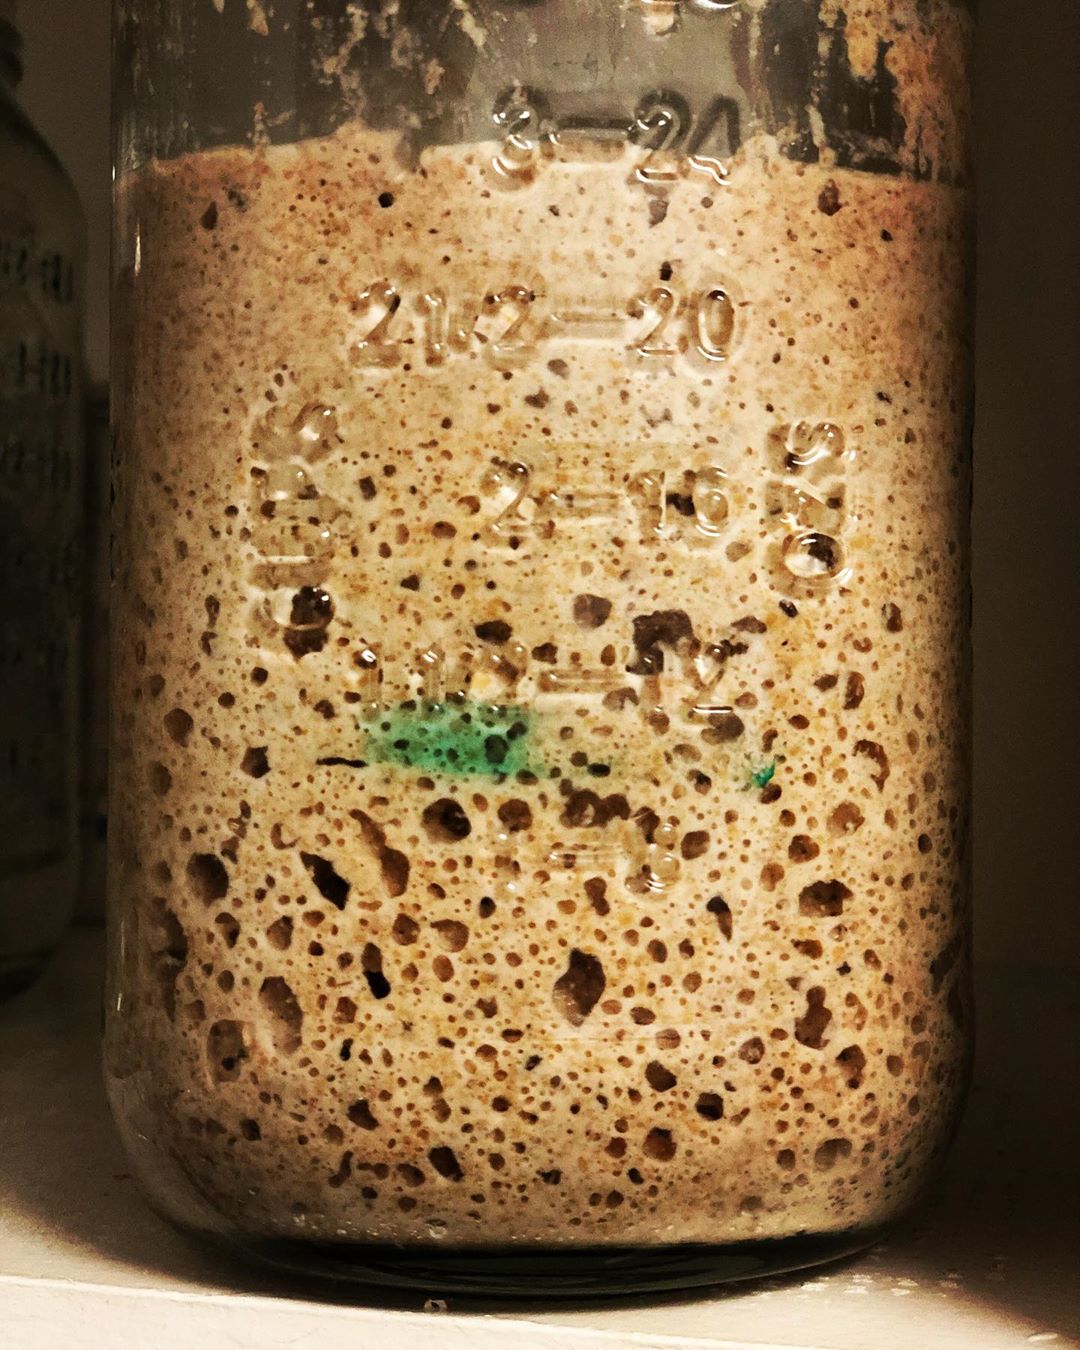
Does your starter look like this?
Note the bubbles from the activity. This starter is perfect and ready to be used in Sourdough bread baking.
If your starter isn’t there yet then make sure the temperature where you are storing your starter is warm enough.
Also note the green mark. That green mark was when I fed the starter last. This way I can see activity over the time horizon.
Starter Storage
If you aren’t going to be cooking bread daily then store the starter after feeding into the fridge. It will slow down the fermentation process and buy you about a week of not having to feed it.
Otherwise put it into a cupboard away from the sun’s UV. UV is ionizing and will start breaking down the yeast (killing it).
Nursing your Starter
Keep an eye out for liquid formation on top of your starter or coloration. The former is a sign your starter is running out of food and needs feeding. The latter is mass suicide and the only way to save it is to remove that coloration and feed it pronto. Try not to get to that stage.
A quick smell of the starter is enough to give its health away.
Frequently Asked Questions
Q. How long will the starter live for? A. As long as this starter culture is fed flour and water regularly it will remain active. A regular schedule is typically 12-36 hours. 24 hours is ideal. During hot days you will see a lot of activity in your starter within the first few hours of feeding.
Q. What does a feeding schedule look like? A. Discard half (say 50g) and add 100g whole-wheat flour and 100g of water. That’s it.
Q. How do I know when to feed the starter? A. Use the 24 hour marker as a guide or once you gain enough experience you can visually work out when feeding is required. Visual queues include: – you’ve noticed the starter growth (doubling in size) and then deflation – liquid building up on top of the starter – change in color on top of the starter (this is bad ie. death, so feed it asap)
Q. Do I have to feed the starter daily? A. Yes if you keep it outside of the fridge and/or bake daily. Otherwise put it into the fridge and feed it weekly. Just keep an eye on the coloring of the starter to avoid early death from a too warm fridge. The fridge acts like a cryochamber for your starter and will slow the growth down without killing the starter. This is great for folks who intend to bake only on the weekends.
Q. What is your feeding schedule like? A. I bake once per week and feed it once per week. I fridge my starter for a week and only feed it prior to going into fridge. So once per week. Every Friday around 2pm I take it out of fridge, wet the outside jar with warm water to de-cryo the yeast and let it sit there for 3hrs. By 5pm it has spawned into crazy life (doubling in size) and 200g of it gets mixed into the new dough for bread making. Then the remaining starter I feed it with only whole wheat flour (130g) and filtered 130g of water. Mix it. Kiss it goodnight and fridge it till next Friday.
This post is a follow on to my previous titled The Ultimate Quarantine Sourdough Bread Baking Guide. This post is geared to all those busy bee mums & dads, entrepreneurs and software engineerings burning the midnight oil. The focus of this post is on “timing”. Something we all have little of but want to maximize the most of.
As you may have already learnt, baking Sourdough bread is a long process. Sometimes it can feel like it’s 2 days worth of work. Trying to bake bread during a weekday is next to impossible; even in quarantine (covid-19 era). However the tension and pressure of most busy bee’s responsibilities typically starts to ease up after 5pm. That’s the ideal time when you can transition into Sourdough baking. Even after a stressful day, baking Sourdough bread will give you the relaxation your brain needs. It is a perfect way to end the day and start the next day with a fresh warm loaf and a house full of fresh bread aromas. Tried and tested in our kitchen. Before you start baking, make sure your kitchen is completely clean, you could even consider installing washable ceiling tiles to make it much easier.
Ok, onwards and upwards!
Assumptions
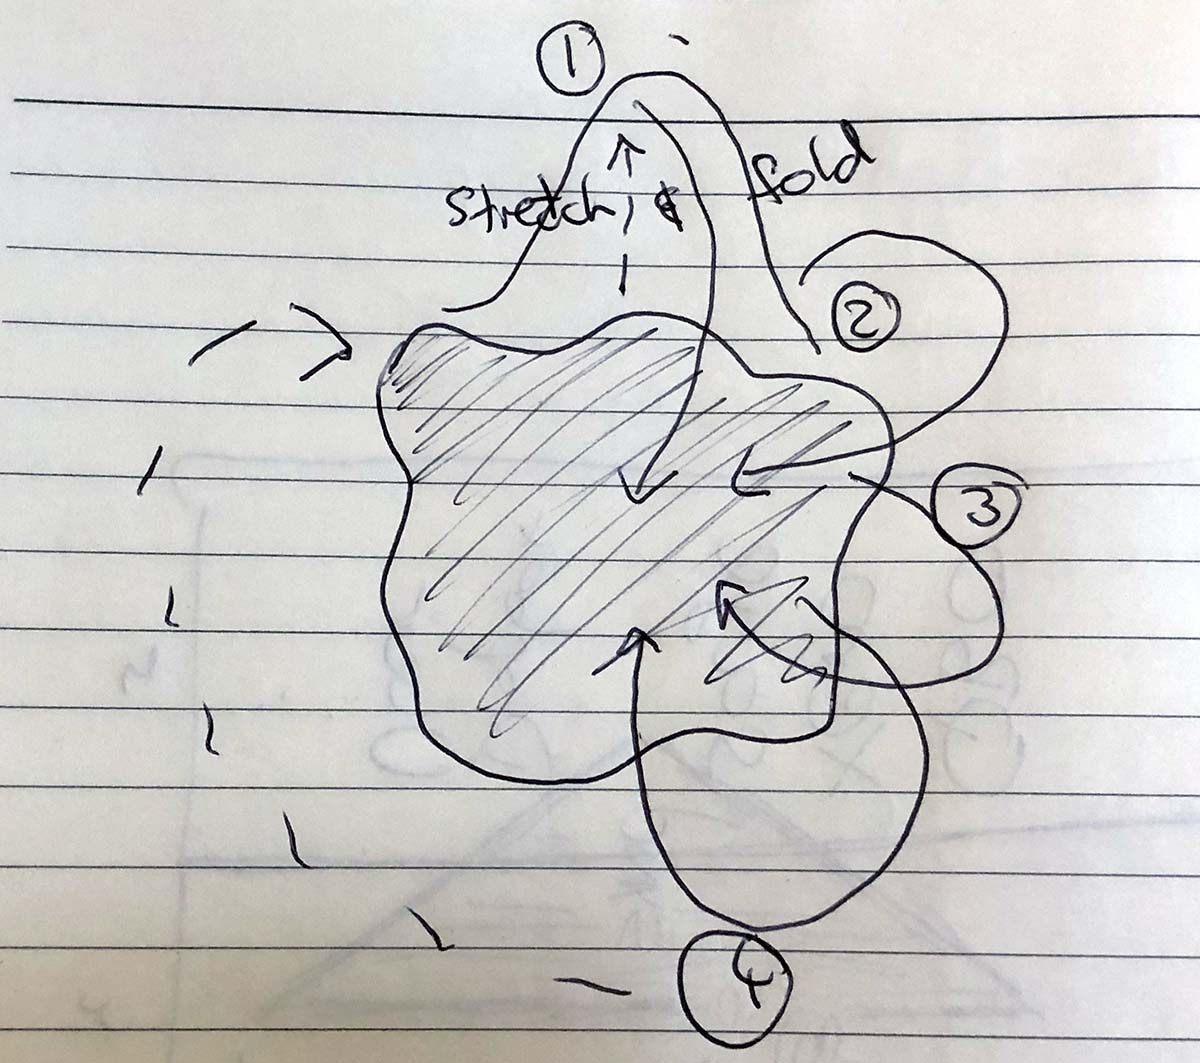
You have all the Ingredients, Utensils, Kitchen Temp ready to go and you have the Stretch & Fold technique bedded down? If you said nah to one of those, then please go and read my previous guide on baking sourdough bread.
Don’t forget, we will use Baker’s Ratios:
Flour starts at 100% = 1000g — Strong/Bread Flour otherwise mix in Whole-Wheat into the White to give it a strong Protein (Gluten) structure
Water is 70-80% = 750g (my favorite ratio is 75%)
Starter is 15% = 150g (if you don’t have a starter then make one)
Salt is 2% = 20g
Let’s Start!
Day 1: Fuse the Ingredients
5pm
Mix 1000g of flour and 750g of filtered water into a giant bowl and mash it by hand till most of the water is absorbed and it looks like a shaggy mess.
Cover the bowl with a kitchen towel and let it rest for 1 hour.
timer “Hey Siri, set a timer for 1 hour.”
6pm
Add Starter and Salt to the Dough then do the Stretch & Fold INSIDE the bowl.
timer “Hey Siri, set a timer for 1 hour.”
Day 1: Stretch & Fold the Dough
This process is all about building a nice gluten structure in your dough. As the water is absorbed by the flour, the gluten will swell to form a continuous network of fine strands giving it that elastic and extensible nature.
7pm
Spray your bench and hands with water. This will avoid the dough from sticking to the bench or your hands and make it easier to work with.
Now take the dough OUT of the bowl and onto the wet bench. You will Stretch and Fold the dough on a bench before putting it back into the bowl.
You will soon realize why this technique is better than doing it inside the bowl because: (a) less sticky all round and (b) more control for the stretch & fold to build gluten structure and ultimately yield that oven spring we all want from our sourdough bread.
Fridge overnight the banneton baskets so they can finish proofing. I like to give this process around 8 hours.
Sleep.. rest up and dream about your Sourdough Bread
Day 2: Let’s Bake it!
8:45am
Pre-heat the Oven for 1 hour on 500F (260C). You can speed the preheating with the Broil setting. If you need help understanding your oven icons, you can visit appliancehunter.co.uk. Also make sure your Dutch Oven is inside the oven as it’ preheating.
timer “Hey Siri, set a timer for 1 hour.”
9:45am
Take one of your proofed baskets with dough out of the fridge and onto baking/parchment paper. Scour the dough and pop it into the oven for 20 mins baking time.
The overnight fridge proofing will also give you dough more rigidity when you scour.
10:00am
timer “Hey Siri, set a timer for 20 mins.”
10:20am
Dial back the oven to 450F (232C) and quickly remove the lid off your Dutch oven letting the loaf gain some color, character and flavor for the next 40 mins.
timer “Hey Siri, set a timer for 40 mins.”
11:00am
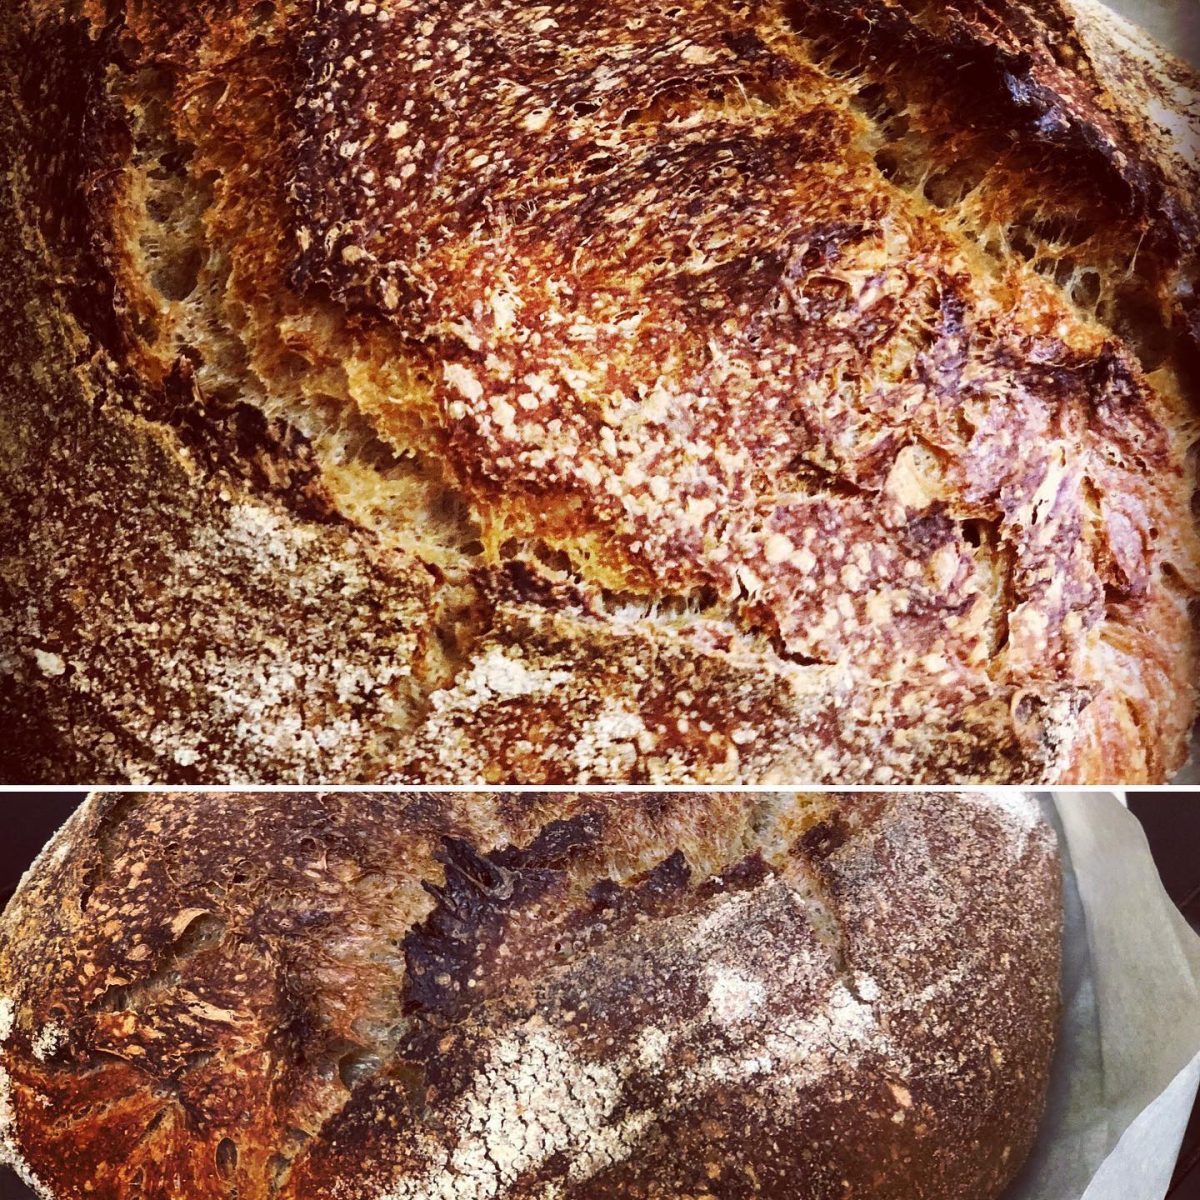
Done. Take a peek to make sure the loaf has a nice splitting bursting lark full of color and texture. You can leave it in the oven for a tad longer if required.
Take the loaf out of the oven and let it cool off for at least 20-30 mins before cutting into it.
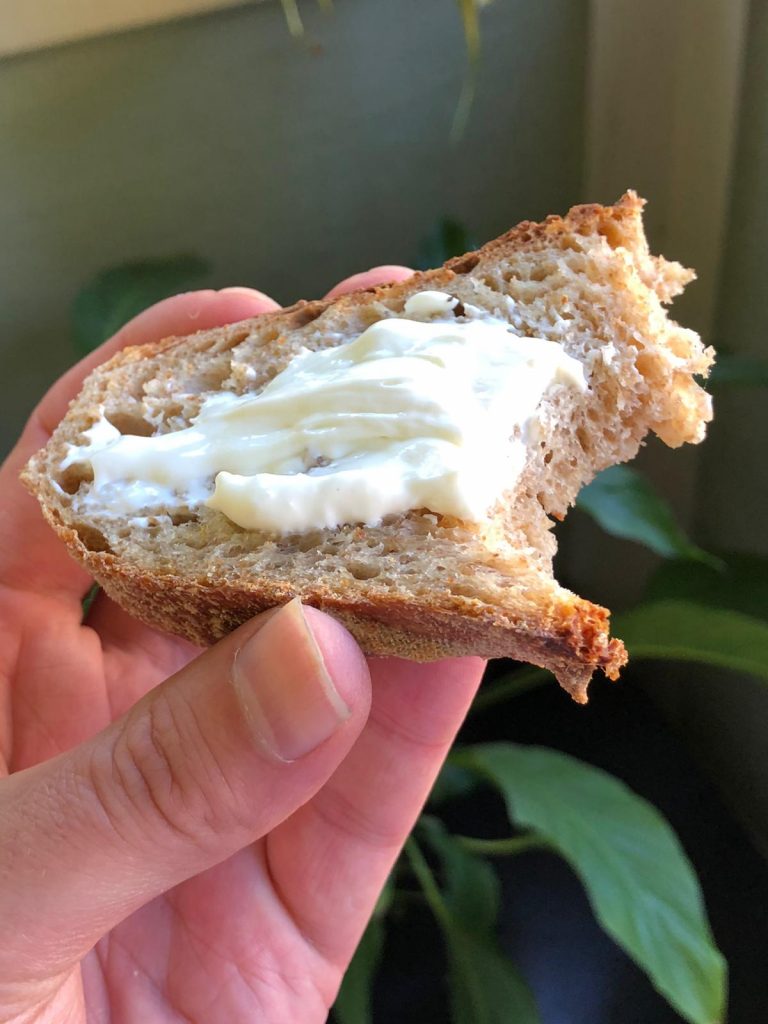
Bon Appétit!
I hope this was helpful and you’ll be baking delicious finger licking sourdough bread in no time.
PS. Follow me on Instagram. I post my Sourdough bread pictures on Instagram and would love to see yours too.
When Covid-19 started back in February 2020 they said buy enough food for 2 weeks of quarantine. So I followed like a sheep. Only to realize the irrationality of humanity. Shelves in grocery stores and Sunday farmers markets in Mountain View (where I live) were being emptied faster than I could blink. Chaos!
My favorite ACME bread was no longer to be found. People went bananas buying out every loaf of sourdough (my favorite) leaving scraps for me.
My philosophy has always been “Never ever give up.” — ref pictured frog. A constant reminder to never ever give up no matter what. I was going to learn how to make my own sourdough bread. And onwards I went.
Little did I realize it is a bloody art! Most instructions online are incongruent, everyone has their own way of doing it and many recipes are bloated with irrelevant rubbish. Only after trying a few recipes few times did I discover for myself what works at home (and not a fancy pants bakery). I bring to you The Ultimate Quarantine Sourdough Bread Baking Guide based on simple to follow bakers measurements/ratios without the bloatware in between. If you want to surprise your Mom on Mother’s day, consider sending Mother’s Day cookie delivery straight to her door.
“Sourdough bread is made by the fermentation of dough using naturally occurring lactobacilli and yeast. Sourdough bread has a more sour taste and better inherent keeping qualities than breads made with baker’s yeast, due to the lactic acid produced by the lactobacilli.[1]”
Flour — Use strong/bread flour (which might be harder to acquire during covid-19 quarantine) otherwise I’ve found a mix of whole wheat with white all purpose works. Just white doesn’t give the loaf that spring (gluten structure not ideal).
Starter — Fed few hours ago and should be very active now.
Salt
Water — Use filtered water; not tap water. I have this Zero Water and always have clean 0 PMF tested water.
2 baskets for proofing, either those fancy ones or you can use lunch boxes
2 towels that’ll go into proofing basket
dough scraper (I used a badge from a tech event — this little piece of plastic is a life saver to avoid a sticky situation)
Razor blade to scour the bread so it opens up nicely during cooking. Do not use a knife. It’s not sharp enough. I tried.
Dutch oven — I bought a Lodge 5qt because I could use it for other cooking activities. (Note; bread goes on pan and body over it to seal it and let steam help delay the crust formation until it has risen more — colossal fuk up for me during rookie times)
Plastic wrap
Baking paper — your dough will sit on it in the Dutch oven
Optional
Wooden bench > granite bench
Glass of water for you since you’ll be working out. That 000 water filter is great here.
Thermometer to measure room temperature
Prep your house
They say an ideal temperature for sourdough is 75F – 82F (25C – 28C). I’ve never checked mine but did find that when I closed windows (to stop cool drafts) both the Starter and Bread Baking went better. Correlation Causation?
Let’s begin
Bakers ratios are the best because it’s made to scale + easy to mentally consume. The following measurements will yield you 2 bread loafs.
Flour starts at 100% = 1000g — I used 700g of white & 300g of whole-wheat
Water is 70-80% = 750g (my favorite ratio)
Starter is 15% = 150g
Salt is 2% = 20g
Stage 1: Mixing, Autolyse & Bulk Rise
Total time: 8-13 hours
Mix 1000g of flour and 750g of filtered water into a giant bowl and mash it by hand. Use your hand damnit! Old school bread making here. Scoop around the dough so it forms a Shaggy dooby doo structure and all flour is mixed in with water.
Autolyse. Put a plastic wrap over the giant bowl (and a towel) and leave it sitting on your bench for 5-7 hours so the flour and water can mix together.
timer“Hey Siri, set a timer for 7 hours.” — [TIP] Use Siri/Google Home/Amazon Echo to not mess up timing. I did once and lost a whole colony. That was a sad day.
Add Starter and Salt to the Dough. 150g of starter in the middle and sprinkle 20g of kosher salt all over the top.
Stretch and Fold. Spray your hands with water to avoid dough sticking to your hands and gently slide your hand behind the dough following the curve of the bowl. Lift, shake and stretch the dough over the top to the other side. Do this all around to essentially cover and work the starter into the dough.
timer“Hey Siri, set a timer for 30 mins.”
Stretch and Fold. Spray your hands with water, the. uncover the large bowl with your mixture and “Stretch and Fold”. I find tilting the bowl on 45 degree here helps. Stretch a corner, shake it to give it air then fold over to the other side. Not the fold creases where you started the stretch. Grab the right crease and stretch and fold until you have done this all around. Cover with plastic wrap.
timer“Hey Siri, set a timer for 30 mins.” — Repeat this stretch and fold process 5 times (total 2.5 hours). The gluten in your dough will toughen up and you’ll feel more tightness in your dough.
timer“Hey Siri, set a timer for 2-5 hours.” — Bulk Rise. On warm day you can shorten the process. The flavors will develop during this time and dough will raise 30-50%.
Stage 2: Shaping & Proofing
Total time: 2.5-18 hours
Sprinkle your wooden bench with flour and tip out the dough from the giant bowl.
Using the dough scraper, cut the dough into 2 halves (eye it out is ok).
Pre Shape. For each piece, stretch and fold (phase 1). Grab one corner and stretch it then fold it over to the middle. Be gentle and careful not to deflate the dough. Then go clockwise grabbing the crease, stretching and folding inwards. One hand should be holding all these folds in the middle. You should end up with what a sea star would look if it wrapped all its lets inwards. Now grab your dough scraper with the other hand and flip your dough over. It should look like a nice plump ball. Then Bench Rest it. I call this the “Star Fish Approach” to Stretch & Fold.
timer“Hey Siri, set a timer for 30 mins.”
Prep Baskets. Grab 2 x banneton basket. It can also be a plastic, glass or wood food container. You will make a bed for your doughs… ahhh how cute! Find 2 clean towels and bath them in flour. I found that placing flour on bench and rubbing the towel into flour most effective. You want flower in between fibers to stop the bread melting into the fibers else it’ll be a pain to remove the dough for baking.
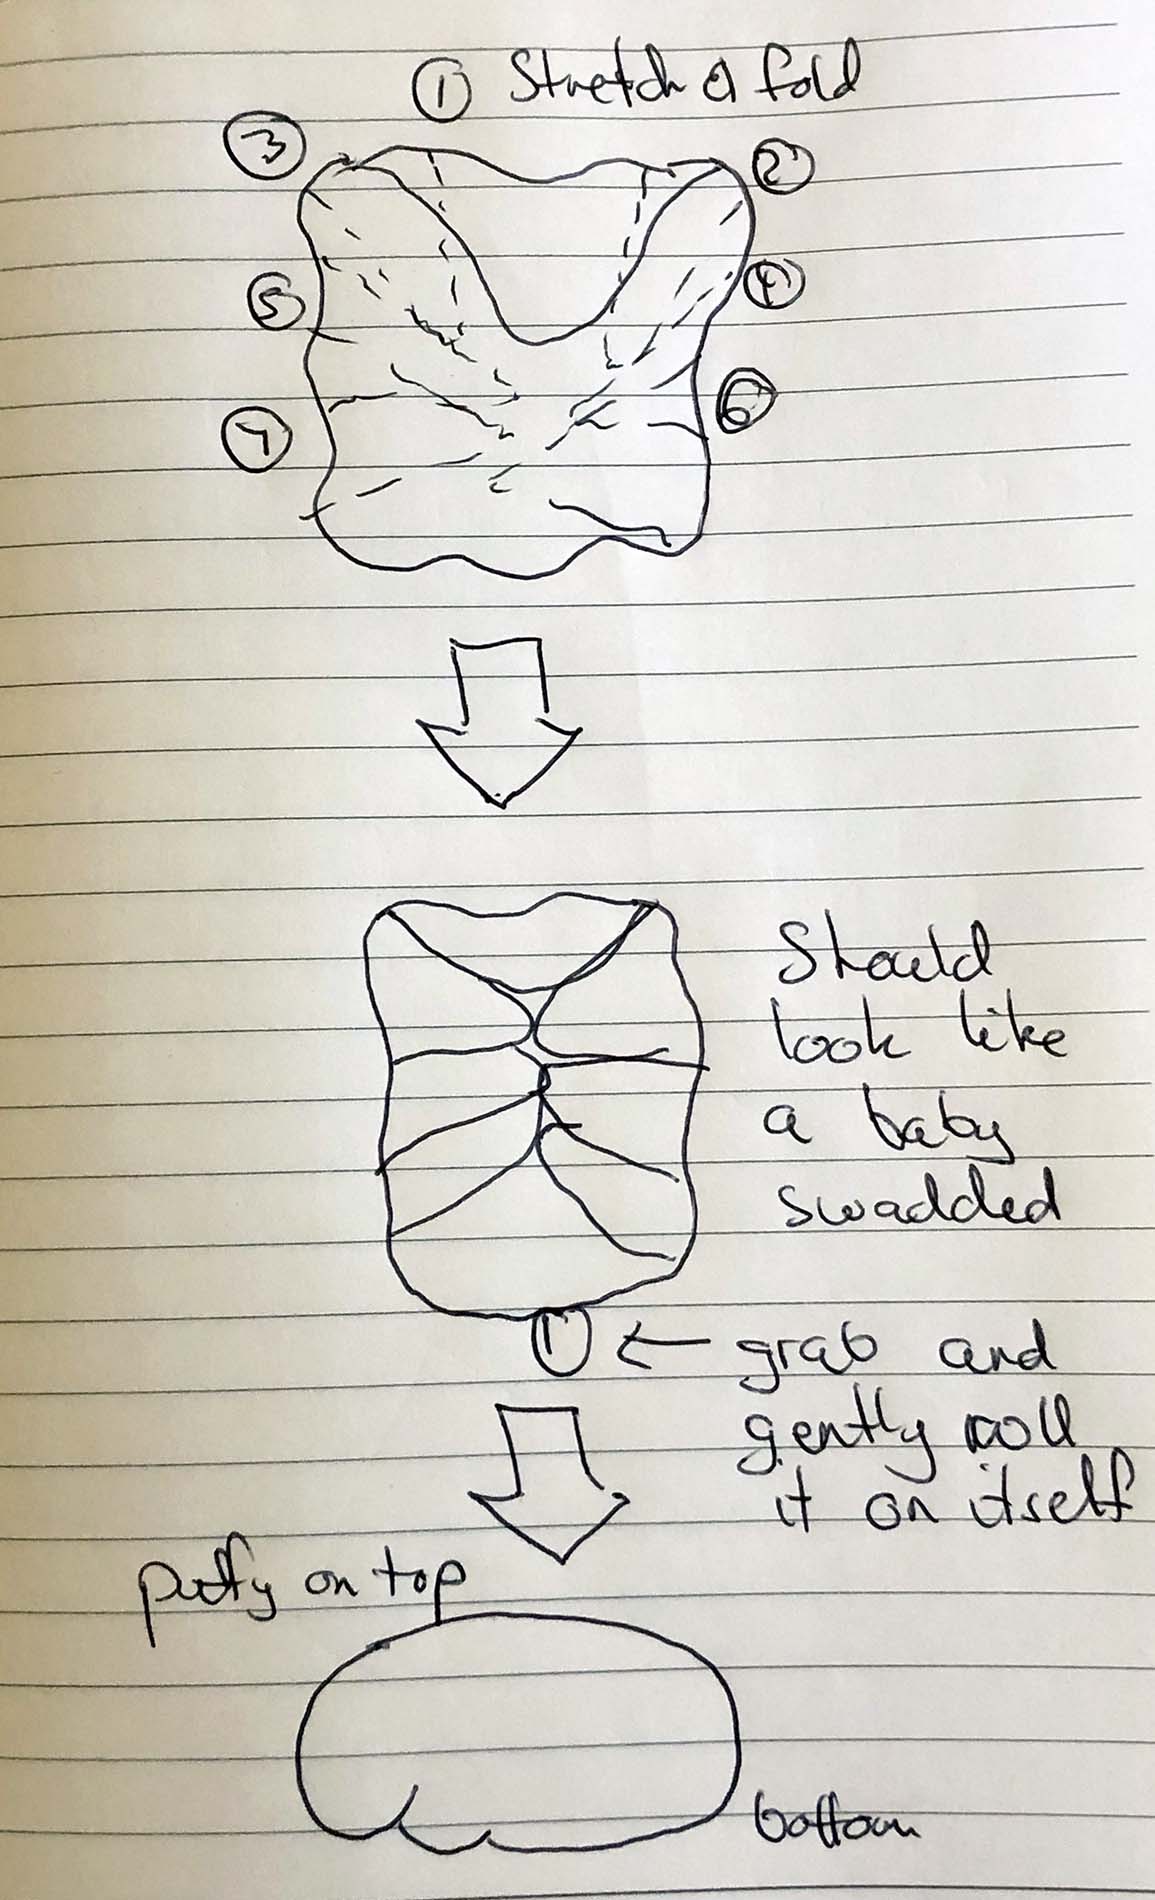
Final Shaping. Phase 2 of the stretch & fold is different. Think baby swaddle. Sprinkle flower on the bench and using your scraper flip the dough over. Stretch and fold one side then zig zag down the dough folding each side crease. When you reach the end fold the end of the dough a tad in and then tuck it in rolling it on itself. Take care not to deflate the dough. You should end up with a puffy nugget with a mouth and bum on each side.
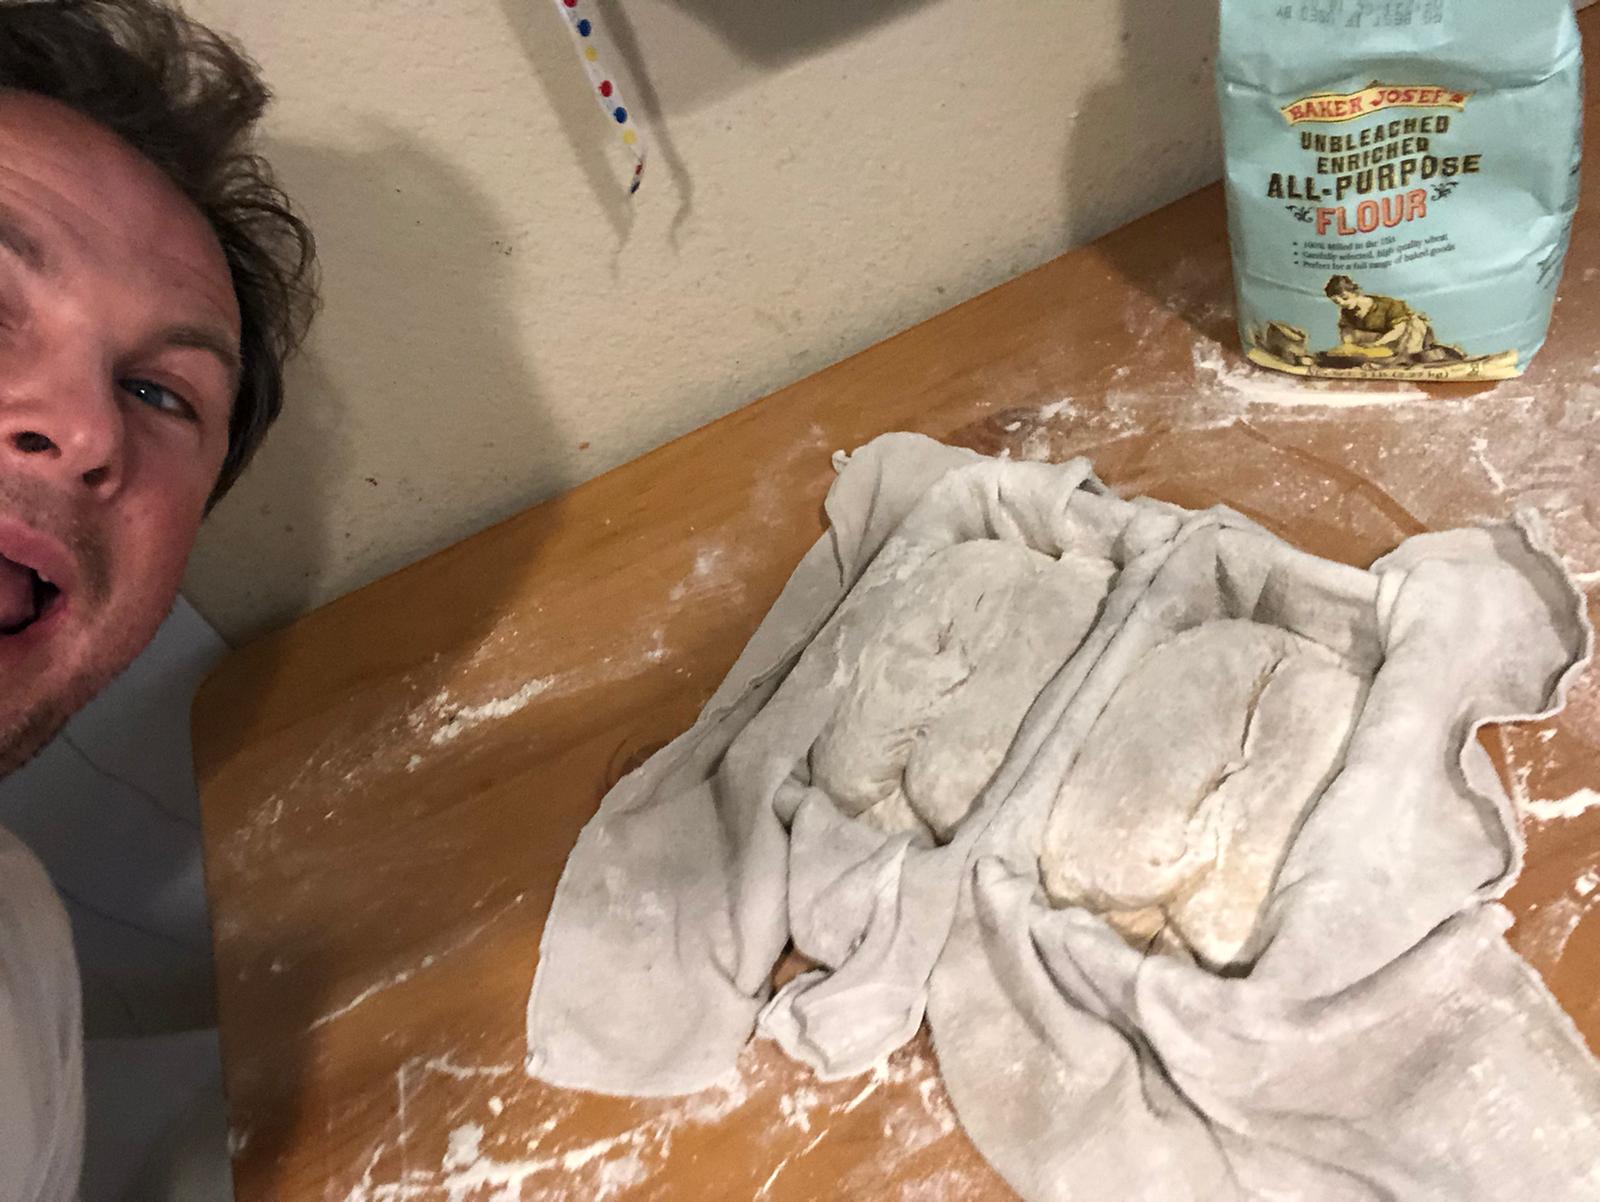
Proofing. Using your dough scraper, lift the dough and place it bottom up into your proofing baskets (as shown below). I like to put one in the fridge for next day cooking. If you do make sure the towel covers the dough fully and put it into a plastic bag into the fridge overnight. The other piece give it 2-3 hours of rest in its basket on your table before baking.
timer“Hey Siri, set a timer for 3 hours.” — or come back to it tomorrow.
Stage 3: Baking
Total time: 1 hour.
Put your Dutch oven into your home oven and Preheat your Home Oven for 1 hour on 500F (260C). Industrial ovens are better so let’s get the heat going and into our Dutch oven. Check what temps your Dutch oven can stand before going to 500F.
timer“Hey Siri, set a timer for 1 hr.”
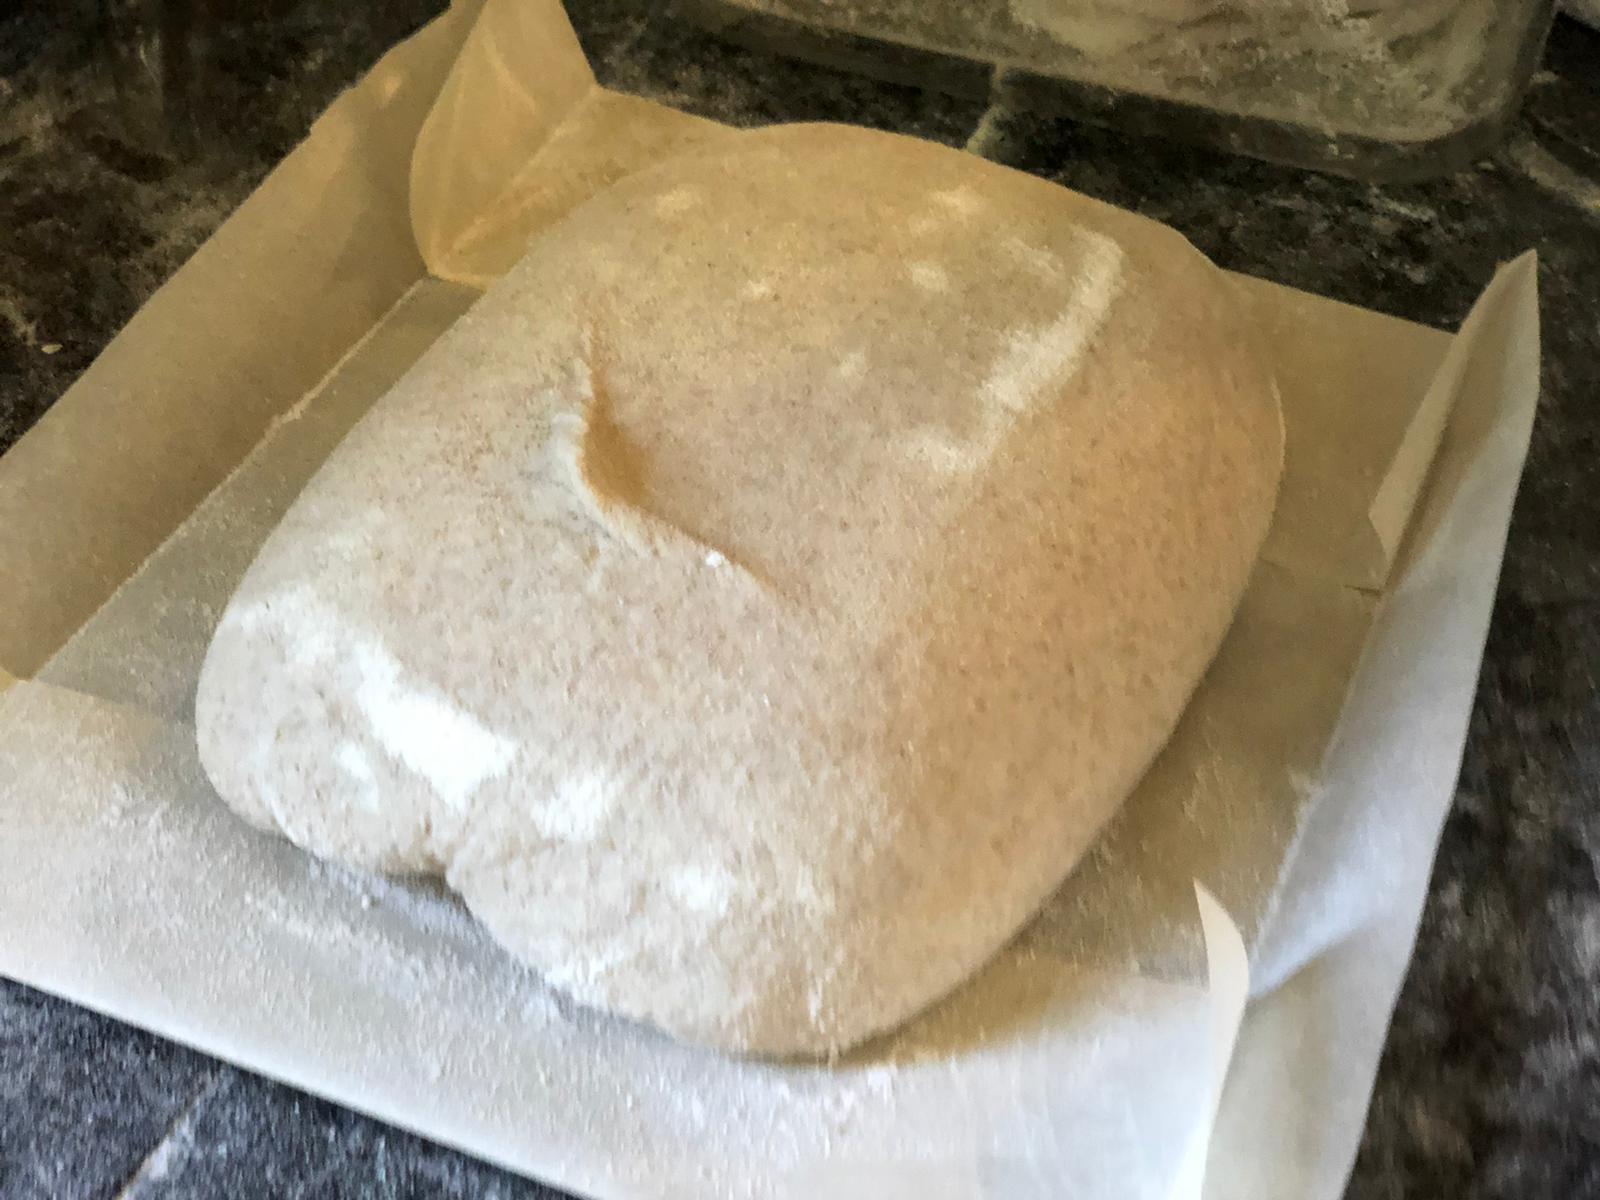
Place a sheet of baking/parchment paper on top of your dough while it’s still in its proofing basket and flip it over releasing the dough from basket onto the paper. The towel might stick to it so go gentle on this process. Note the bottom of the dough is now sitting on the paper.
Scour (cut into) the dough’s top end to end and a bit off-center on a 45 degree. This is where the bread will open up like a flower giving it that fluffy crackled look. Use a sharp blade!
Cook it. Lift the dough by the paper it’s sitting on and pop it into your hot Dutch oven. Remember pan if you are using the same Dutch oven as I. Close the lid of the Dutch oven with the bread and paper inside. Let it cook. Don’t expect any smells at this phase. And do not open the oven.
timer“Hey Siri, set a timer for 20 mins.”
After 20 mins, dial back the oven temperature to 450F (232C) and quickly remove the lid off your Dutch oven. Your bread should have risen while still looking light in color. The next process (without the lid) will give it color, texture and flavor.
timer“Hey Siri, set a timer for 30 mins.” — [TIP]: You can stretch this phase to 40 mins if the color of the bread isn’t developed yet. Remember, not all ovens are created equal. You will now smell the fresh bread aromas floating around the house. Kids love this part but keep them away from opening the oven door 😉
After the 30-40 mins timer goes off, turn the oven off and slightly ajar the oven to let the flavors develop even further.
timer“Hey Siri, set a timer for 10 mins.”
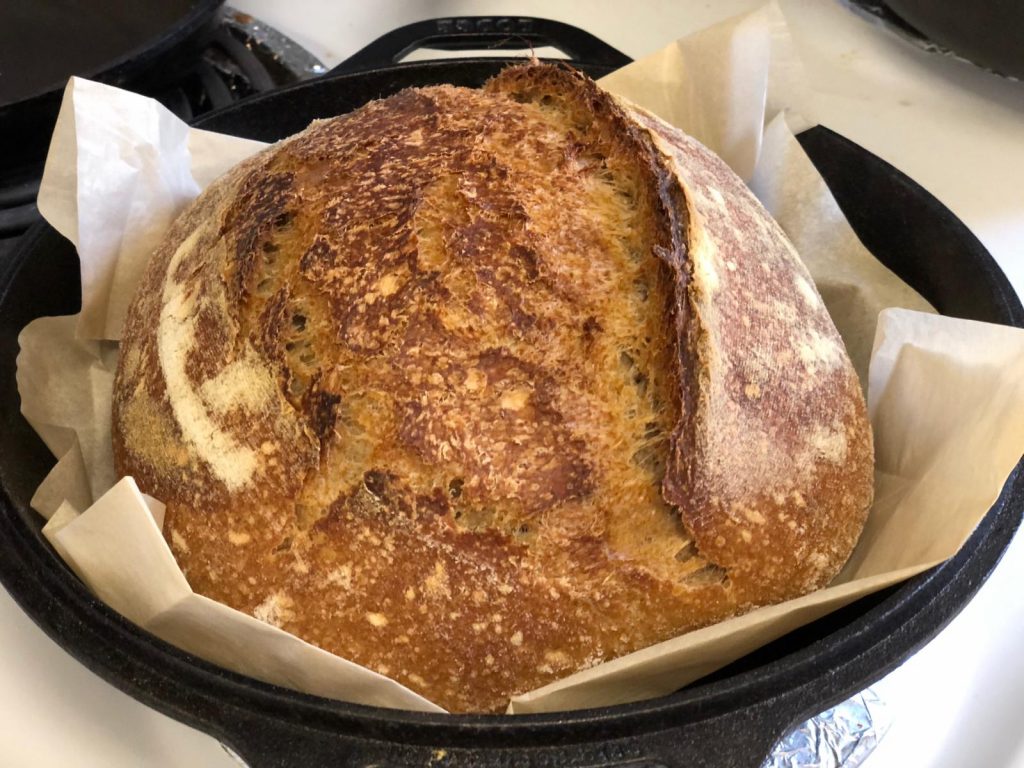
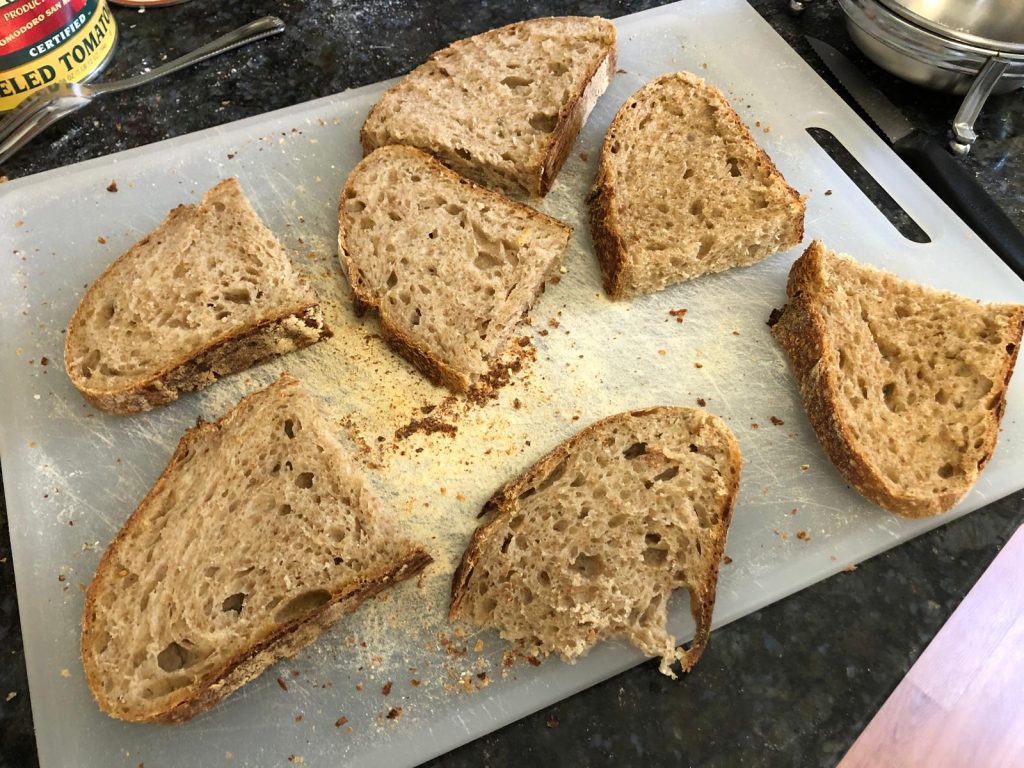
Done. Take the bread out and let it cool off for 30 mins before consuming it.
Batman aka Josh Semerda approves the Sourdough homemade bread
I now have a new appreciation for bakers.
It is a very time consuming process to make sourdough bread; however it is also a very rewarding experience. It all balances out nicely.
Enjoy!
PS. Follow me on Instagram. I post my Sourdough bread pictures on Instagram and would love to see yours too.