I should have known better than to change the date of birth on my company’s Twitter Account Veryfi to the company’s inception date 2 years ago. Without warning or any confirmation Twitter immediately declared that I must be underage and locked the company account.
As panic set in, I explored my options. Oh I can prove to Twitter my identity by submitting my drivers license to them. But how will Twitter know I really own this company account if my identity is no tied to the Veryfi Twitter account? I shrugged and decided to share my drivers license.
Little did I realize that their form was also broken and kept on rejecting the drivers license photo followed by disabling the “Upload image” button. A company with a market cap of $30B based in the heart of SF cannot do basic QA (quality assurance) on a feature that serves justice? No way! In the end I managed to get it working. There, sent.
While my company also owns a Youtube account on which we explain about our services and products, I have never come across such a situation on it. When we started the channel we did take the services of a company to buy views as buying youtube views might feel like cheating, but it’s really not and ever since then our channel has been booming in views thus helping the business to grow drastically. In other words, the Youtube algorithm and automated response is way better than Twitter, and you can see in the below image why I said that.
Twitter’s broken form to prove your identity by sending your PII to who knows where.
Few hours later, silence.
I check gmail.
A sentence has been served…
At this point I had enough. But, let’s rewind this a tad to reflect on this problem.
How to destroy trust
Jack (CEO of Twitter) gained my trust for Twitter when he came back to Joe Rogan(JRE Podcast) for the 2nd time to cleanup the mess of his first appearance. Kudos to Joe Rogan for reeling him back in and for Jack to face the music. Jack arrived with his legal advisor Vijaya Gadde. Tim Pool(an American journalist, YouTuber, and political commentator) also joined to spice up the discussion.
During the interview, listening with laser sharp focus, I gained more empathy and respect for Twitter and it’s daily challenges. A platform that is juggling free speech, propaganda and fake news. It is a bloody tough job! Peoples emotions run wild. We all have something to say.
How does one determine truth from fact?
When does one hand down a sentence?
“ei incumbit probatio qui negat, non qui dicit” — Presumption of guilt, in Latin
Presumption of guilt is a default position based on pessimism and suspicion whereas presumption of innocence is based more on optimism and trust. So which playbook does Twitter really play?
But I disgres.
Tim Pool drilled Jack and Vijaya around the decision making process before killing Twitter accounts. “Where does machine logic and where does human intervention come in?” Of course the answers were colorful but Jack made bold promises for a better review processes and more care before killing accounts.
I was sold. I now gave Twitter more love. They had a hard problem to solve and their CEO had committed to fixing it.
Until, months later, when I declared my company’s twitter age to be 2. <insert-police-lights-here>
Should computers run the world?
Strangely enough, the night prior I was glued to Royal Institutes lecture by Hannah Fry(a British mathematician, author of Hello World) speaking about machine bias in decision making. You can catch it here on YouTube: https://youtu.be/Rzhpf1Ai7Z4
Hannah presented a fascinating topic. She questioned the audience to see who would let machines dictate their fate in a legal system where machines are used to do just that. Being a software engineer by degree and a 2nd time entrepreneur I declared that I rather let an algorithm decide fate. My view was that due to a more logical approach, minus the human emotion bias that occurs during heated trials, a machine will lead to a fair outcome.
“Ladies and gentlemen, please return your seats and tray-tables to their full upright positions, and extinguish all smoking material, as we’re about to land in the red zone. Ahh! No survivors!” — Fight Club
Hannah, I was wrong!
Where to from here…
Back to the case at hand.
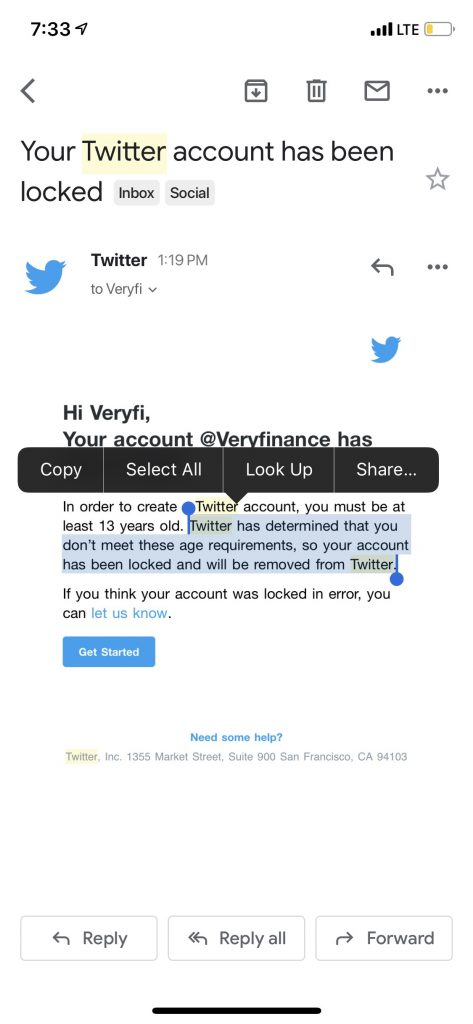
The story is Twitter decided to ban Veryfi’s Twitter Account https://twitter.com/veryfinance because I wanted to tell the truth and tell them the company’s actual date of birth was 2 years ago. Twitter’s logic was as simple (and stupid) as this:
IF age(dob) < 13 THEN
    LockAccountImmediately('DoNotConfirmWithUser')
    SendDeathNote('FewMinsLater')
ENDIF
12 hours later… I think Twitter actually deleted Veryfi’s Twitter Account without any due diligence.
Not a good sign when you visit your company’s twitter account (https://twitter.com/veryfinance)and see this.
Earlier in the day I also complained to @TwitterSupport using my personal twitter account. I’m pretty sure it fell on death ears since no one acknowledged or offered to help.
Tonight I went for a walk to reflect on this issue. Walking past many famous companies based in Mountain View (CA); Giants that have stood the test of time. It lifted my spirit and got me thinking. Given Twitter’s pessimistic authoritarian style and hypocrisy, will they stand the test of time?
I recalled a wise decision my wife and I made (over 10 years ago) to eliminate the idiot box (TV) from our home. We have not regretted it since. Books have replaced the space where the idiot box used to live.
Do we need Twitter? I don’t think so. It saps our energy and time. No business, big or small needs Twitter.
About Veryfi (banned from Twitter for being 2 years old)
Veryfi, Inc. is a California, US-based mobile software automation company founded in December 2016 and backed by Y-Combinator inc other prominent investors in Silicon Valley. Veryfi helps Architecture, Engineering & Construction (AEC) workforce of all sizes to get access to Veryfi’s smart mobile tools to eliminate 90% of time wasted doing data entry (& chasing records), improve job costing and empower their financial prosperity. To learn more visit: https://www.veryfi.com/
A couple months ago we decided to move Veryfi’s Python-based web app onto Microsoft Azure. The process was complicated and involved several stages. First I had to Dockerize the app, then move it into a Docker Swarm setup, and finally set up a CI/CD pipeline using Jenkins and BitBucket. Most of this was new to me, so the learning curve was steep. I had limited experience with Python and knew of Docker and Jenkins, but had yet to dive into the deep end. After completing the task, I thought I could share my research and process with the Veryfi community.
I’ve compiled a three-part series that will cover these topics:
Dockerizing a web app, using Docker Compose for orchestrating multi-container infrastructure
Deploying to Docker Swarm on Microsoft Azure
CI/CD using BitBucket, Jenkins, Azure Container Registry
This is the first post in the series.
I won’t go into a full blown explanation of Docker – there are plenty of articles online that answer that question, and a good place to start is here. One brief (and incomplete) description is that Docker creates something similar to Virtual Machines, only that Docker containers run on the host machine’s OS, rather than on a VM. Each Docker container should ideally contain one service and an application can comprise of multiple containers. With this approach, individual containers (services) can be easily swapped out or scaled out, independently of others. For example, our main web app currently runs on 3 instances of the main Python app container, and they all speak to one single Redis container.
Dockerizing an app
Note: the example included in this section can be found in this GitHub repo: https://github.com/abakonski/docker-flask
The example here is a minimal, “Hello World” app.
Docker containers are defined by Docker images, which are essentially templates for the environment that a container will run in, as well as the service(s) that will be running within them. A Docker image is defined by a Dockerfile, which outlines what gets installed, how it’s configured etc. This file always first defines the base image that will be used.
Docker images comprise multiple layers. For example, our web app image is based on the “python:3.6” image (https://github.com/docker-library/python/blob/d3c5f47b788adb96e69477dadfb0baca1d97f764/3.6/jessie/Dockerfile). This Python image is based on several layers of images containing various Debian Jessie build dependencies, which are ultimately based on a standard Debian Jessie image. It’s also possible to base a Docker image on “scratch” – an empty image that is the very top-level base image of all other Docker images, which allows for a completely customizable image, from OS to the services and any other software.
In addition to defining the base image, the Dockerfile also defines things like:
Environment variables
Package/dependency install steps
Port configuration
Environment set up, including copying application code to the image and any required file system changes
A command to start the service that will run for the duration of the Docker container’s life
This is an example Dockerfile:
FROM python:3.6

# Set up environment variables
ENV NGINX_VERSION '1.10.3-1+deb9u1'

# Install dependencies
RUN apt-key adv --keyserver hkp://pgp.mit.edu:80 --recv-keys 573BFD6B3D8FBC641079A6ABABF5BD827BD9BF62 \
    && echo "deb http://httpredir.debian.org/debian/ stretch main contrib non-free" >> /etc/apt/sources.list \
    && echo "deb-src http://httpredir.debian.org/debian/ stretch main contrib non-free" >> /etc/apt/sources.list \
    && apt-get update -y \
    && apt-get install -y -t stretch openssl nginx-extras=${NGINX_VERSION} \
    && apt-get install -y nano supervisor \
    && rm -rf /var/lib/apt/lists/*


# Expose ports
EXPOSE 80

# Forward request and error logs to Docker log collector
RUN ln -sf /dev/stdout /var/log/nginx/access.log \
    && ln -sf /dev/stderr /var/log/nginx/error.log

# Make NGINX run on the foreground
RUN if ! grep --quiet "daemon off;" /etc/nginx/nginx.conf ; then echo "daemon off;" >> /etc/nginx/nginx.conf; fi;

# Remove default configuration from Nginx
RUN rm -f /etc/nginx/conf.d/default.conf \
    && rm -rf /etc/nginx/sites-available/* \
    && rm -rf /etc/nginx/sites-enabled/*

# Copy the modified Nginx conf
COPY /conf/nginx.conf /etc/nginx/conf.d/

# Custom Supervisord config
COPY /conf/supervisord.conf /etc/supervisor/conf.d/supervisord.conf

# COPY requirements.txt and RUN pip install BEFORE adding the rest of your code, this will cause Docker's caching mechanism
# to prevent re-installinig all of your dependencies when you change a line or two in your app
COPY /app/requirements.txt /home/docker/code/app/
RUN pip3 install -r /home/docker/code/app/requirements.txt

# Copy app code to image
COPY /app /app
WORKDIR /app

# Copy the base uWSGI ini file to enable default dynamic uwsgi process number
COPY /app/uwsgi.ini /etc/uwsgi/
RUN mkdir -p /var/log/uwsgi


CMD ["/usr/bin/supervisord"]
Here’s a cheat sheet of the commands used in the above example:
FROM – this appears at the top of all Dockerfiles and defines the image that this new Docker image will be based on. This could be a public image (see https://hub.docker.com/) or a local, custom image
ENV – this command sets environment variables that are available within the context of the Docker container
EXPOSE – this opens ports into the Docker container so traffic can be sent into them. These will still need to be listened to from within the container, (i.e. NginX could be configured to listen to port 80). Without this EXPOSE command, no traffic from outside the container will be able to get through on those ports
RUN – this command will run shell commands inside the container (when the image is being built)
COPY – this copies files from the host machine to the container
CMD – this is the command that will execute on container launch and will dictate the life of the container. If it’s a service, such as NginX, the container will continue to run for as long as NginX is up. If it’s a quick command (i.e. “echo ‘Hello world'”), then the container will stop running as soon as the command has executed and exited
The Docker image resulting from the above Dockerfile will be based on the Python 3.6 image and contain NginX and a copy of the app code. The Python dependencies are all listed in requirements.txt and are installed as part of the process. NginX, uWSGI and supervisord are all configured as part of this process as well.
This setup breaks the rule of thumb for the “ideal” way of using Docker, in that one container runs more than one service (i.e. NginX and uWSGI). It was a case-specific decision to keep things simple. Of course, there could be a separate container running just NginX and one running uWSGI, but for the time being, I’ve left the two in one container.
These services are both run and managed with the help of supervisord. Here’s the supervisord config file that ensures NginX and uWSGI are both running:
[supervisord]
nodaemon=true

[program:uwsgi]
# Run uWSGI with custom ini file
command=/usr/local/bin/uwsgi --ini /etc/uwsgi/uwsgi.ini
stdout_logfile=/dev/stdout
stdout_logfile_maxbytes=0
stderr_logfile=/dev/stderr
stderr_logfile_maxbytes=0

[program:nginx]
# NginX will use a custom conf file (ref: Dockerfile)
command=/usr/sbin/nginx
stdout_logfile=/dev/stdout
stdout_logfile_maxbytes=0
stderr_logfile=/dev/stderr
stderr_logfile_maxbytes=0
Launching a Docker container
I’m not including the instructions on installing Docker in this post (a good place to get started is here)
With the above project set up and Docker installed, the next step is to actually launch a Docker container based on the above image definition.
Frist, the Docker image must be built. In this example, I’ll tag (name) the image as “myapp”. In whatever terminal/shell is available on the machine you’re using (I’m running the Mac terminal), run the following command:
$ docker build -t myapp .
Next, run a container based on the above image using one of the following commands:
# run Docker container in interactive terminal mode - this will print logs to the terminal stdout, hitting command+C (or Ctrl+C etc) will kill the container
$ docker run -ti -p 80:80 myapp

# run Docker container quietly in detached/background mode - the container will need to be killed with the "docker kill" command (see next code block below)
$ docker run -d -p 80:80 myapp
The above commands will direct traffic to port 80 on the host machine to the Docker container’s port 80. The Python app should now be accessible on port 80 on localhost (i.e. open http://localhost/ in a browser on the host machine).
Here are some helpful commands to see what’s going on with the Docker container and perform any required troubleshooting:
# list running Docker containers
$ docker ps


# show logs for a specific container
$ docker logs [container ID]


# connect to a Docker container's bash terminal
$ docker exec -it [container ID] bash


# stop a running container
$ docker kill [container ID]


# remove a container
$ docker rm [container ID]


# get a list of available Docker commands
$ docker --help
The above project is a good start, but it’s a very limited example of what Docker can do. The next step in setting up a microservice infrastructure is through the use of Docker Compose. Typically, most apps will comprise multiple services that interact with each other. Docker Compose is a pretty simple way of orchestrating exactly that. The concept is that you describe the environment in a YAML file (usually named docker-compose.yml) and launch the entire environment with just one or two commands.
This YAML file describes things like:
The containers that need to run (i.e. the various services)
The various storage mounts and the containers that have access to them – this makes it possible for various services to have shared access to files and folders
The various network connections over which containers can communicate with each other
Other configuration parameters that will allow containers to work together
The above YAML file defines two Docker images that our containers will be based on, and one network that both containers will be connected to so that they can “talk” to each other.
In this example, the first container will be created based on the public “redis:alpine” image. This is a generic image that runs a Redis server. The “ports” setting is used to open a port on the container and map it to a host port. The syntax for ports is “HOST:CONTAINER”. In this example we forward the host port 6379 to the same port in the container. Lastly, we tell Docker compose to put the Redis container on the “mynet” network, which is defined at the bottom of the file.
The second container defined will be based on a custom local image, namely the one that’s outlined in the first section of this article. The “build” setting here simply tells Docker Compose to build the Dockerfile that is sitting in the same directory as the YAML file (./Dockerfile) and tag that image with the value of “image” – in this case “myapp:latest”. The “web” container is also going to run on the “mynet” network, so it will be able to communicate with the Redis container and the Redis service running within it.
Finally, there is a definition for the “mynet” network at the bottom of the YAML file. This is set up with the default configuration.
This is a very basic setup, just to get a basic example up and running. There is a ton of info on Docker Compose YAML files here.
Once the docker-compose.yml file is ready, build it (in this case only the “web” project will actually be built, as the “redis” image will just be pulled from the public Docker hub repo). Then bring up the containers and network:
# build all respective images
$ docker-compose build

# create containers, network, etc
$ docker-compose up

# as above, but in detached mode
$ docker-compose up -d
Refer to the Docker commands earlier in this article for managing the containers created by Docker Compose. When in doubt, use the “–help” argument, as in:
# general Docker command listing and help
$ docker --help

# Docker network help
$ docker network --help

# Help with specific Docker commands
$ docker <command> --help

# Docker Compose help
$ docker-compose --help
So there you have it – a “Hello World” example of Docker and Docker Compose.
Just remember that this is a starting point. Anyone diving into Docker for the first time will find themselves sifting through the official Docker docs and StackOverflow forums etc, but hopefully this post is a useful intro. Stay tuned for my follow-up posts that will cover deploying containers into Docker Swarm on Azure and then setting up a full pipeline into Docker Swarm using Jenkins and BitBucket.
If you have any feedback, questions or insights, feel free to reach out in the comments.
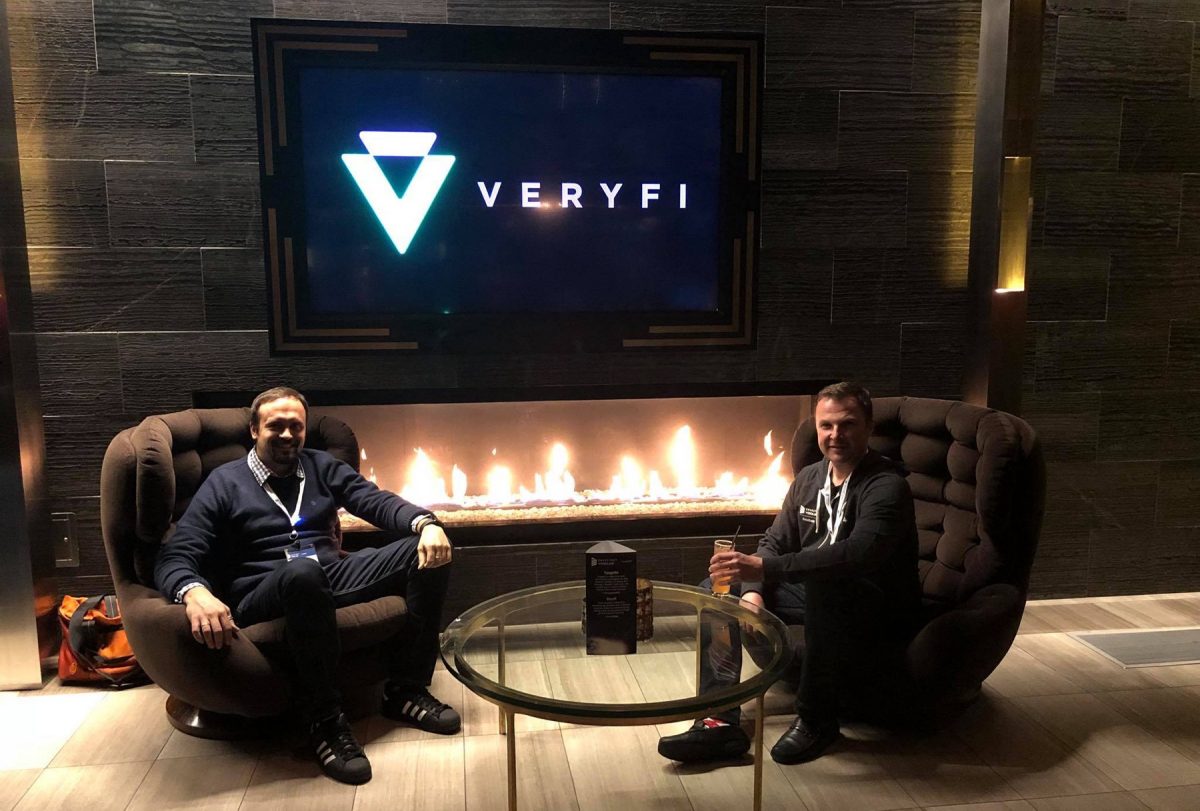
Veryfi is a Y Combinator company (W17 cohort). Located in San Mateo (CA) founded by an Australian, Ernest Semerda, and the 1st Belarusian to go through Y Combinator, Dmitry Birulia.
Veryfi provides mobile-first, HIPAA-compliant bookkeeping software that empowers business owners by automating the tedious parts of accounting through AI and machine learning.
IQBoxy was born out of our need to better understand the movement of our money so that we could gauge the pulse of our financial position.
Dmitry and I are immigrants. Born in Eastern Europe, we grew up during the communist era in poverty. Staying on top of our finances was chiseled into us. That was the only way to survive in such turbulent times. We were fortunate enough to migrate to the west. In 2009 we met at Coupons Inc, in the US, where we helped households save money by printing coupons (money). We also learnt what it takes to go from a startup to an IPO Unicorn.
Working in Silicon Valley allowed us to tap into a pool of new knowledge. Seeing the world grow up and change for the better. A lot was happening but the basics of money management remained constant. Whether it’s business or personal, the same advice applies. Pay yourself 1st. Then stay on top of your finances by keeping a ledger of your financial activity.
How IQBoxy started
When Dmitry and I started IQBoxy in Silicon Valley, we began automating the expense side of the equation. I still remember when Dmitry and I sat sipping coffee at Philz’ in Palo Alto brainstorming what to call our new venture. We decided on IQBoxy after the idea of an intelligent box to throw receipts into. The reinvention of the traditional shoebox often used by business minded folks to retain their receipts for Uncle Sam (aka Tax office).
Ernest (me) and Dmitry at YCombinator in 2017. Veryfi is part of the YC W17 cohort.
More time to spend enjoying life
We all want more time with our family, friends and experiences. Yet we are are becoming more and more time poor. Running a business as a self-employed or with a team has its perks but also comes with a burden. Accounting. Specifically the Bookkeeping part; to meet tax obligations and to stay on top of our finances.
Then there’s the recording of business deductions (purchases) to maximize our income. Categorizing and reconciling financial transactions so that our accountant can communicate it to the tax office. It is a burden that robs us of time we should be focused on our business or spending with our family/friends.
All of a sudden the vision of a flexible nature of being self-employed or running your own business is being buried in excel balancing the numbers and shuffling paperwork. Also when considering different avenues in entrepreneurship, I’ve realized the benefits of purchasing a successful business. One sector that definitely stands out is accounting. The stability and potential for growth make it an enticing option. Check out available opportunities here.
Automation to the rescue
Automation at most companies is smoke & mirrors, using human labor – the famous mechanical turks ie. Expensify. A man behind the curtain approach (Wizard of OZ like). An ephemeral labor at the risk of your privacy. We believe this is not good enough.
What if we could outsource it to machines who have no interest in social engineering (using the knowledge they gauge to gain access to your bank through psychological manipulation). Now that’s something worth celebrating.
Hello Veryfi
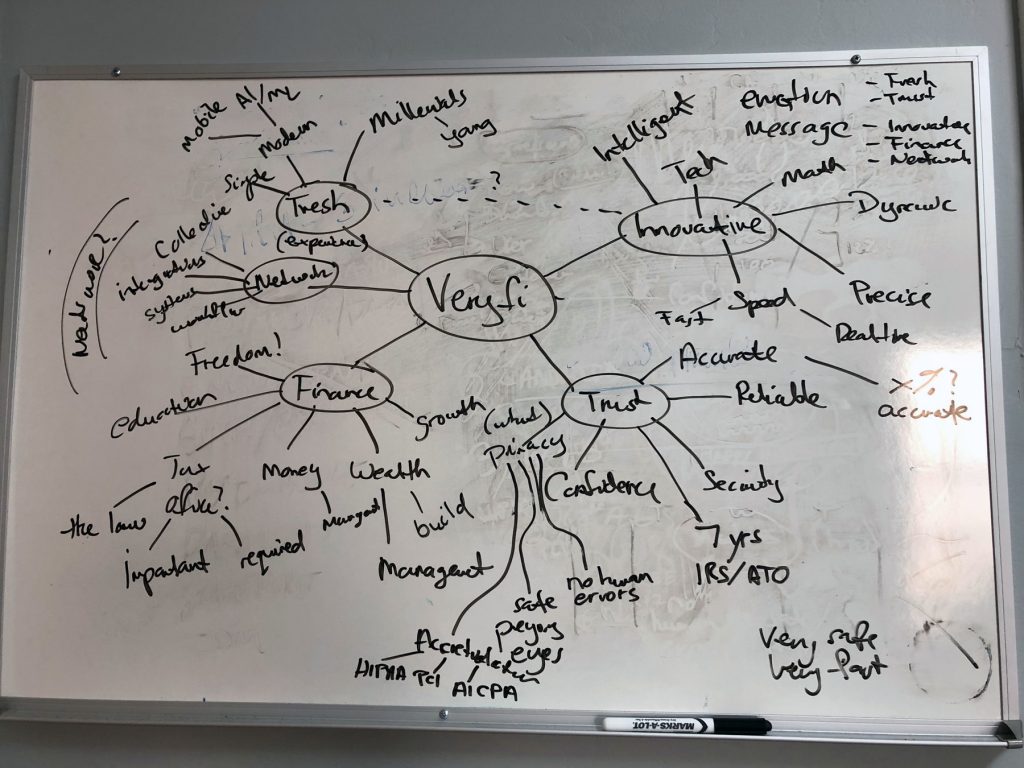
With this in mind, we locked ourselves up in a room and brainstormed. Few days later we emerged. We used a mind mapping process to flesh out what the new name should convey. Everything from financial focus to innovation to very fast to trust.
Veryfi mind map
Trust and Privacy are at the core of the Veryfi product.Veryfi is a secure, HIPAA compliant service you can trust to automate your tax obligations. From collection of receipts & invoices, to categorization and reconciliation of your financial documents to bank statements. For a different kind of secure and exciting experience, check out 카지노사이트.
If you need your CPA to access this data anywhere at anytime, then Veryfi does this in a breeze. All while maintaining the highest security standards. From HIPAA compliance for healthcare companies to EU Data Protection in Europe which take effect in 2018. Privacy is, and should be, on top of every company’s agenda. No compromises.
A Bookkeeper in your Pocket
As we grew and users turned into customers, we realized we needed to move beyond just expense management. Bookkeeping is more than expense management. So we integrated with our friends at Rippling to bring payroll and employee on-boarding into the ecosystem. Then we brought further integrations with cloud accounting providers, like our friends at Sage.
Yet we carried a small burden on our shoulders which clouded our business. Are we just an expense company? Nope. Are we a cloud document storage company. Definitely not. Then what are we?
The image we sent to the marketplace through the IQBoxy name was more confusing than helpful. We realized we needed a name that would send the right message about our vision and product. A name that would give justice to our core mission and our roots of providing innovative & fresh financial solutions for the self-employed & small business owners that they could trust.
Say hello to Veryfi
Veryfi is about empowering the future workforce with modern AI-first-mobile software. Software that is delightful to use anywhere in the world with or without an internet connection. No barriers. Geographic or financial. Everyone should have a bookkeeper in their pocket.