Recent posts

Mercurial: how-to guide to distributed version control

Mercurial is one of the 2 famous free / open source, distributed source control management tools. You may also have heard of Git, another great tool. Both Mercurial & Git are the front runners in distributed version control systems. 2 nice articles compare Mercurial to Git. One called Git vs. Mercurial: Please Relax comparing Git to MacGyver and Mercurial to James Bond. The other article The Differences Between Mercurial and Git. The conclusion was both are great tools so stop worrying and start using the one which you are most comfortable with. I went down the Mercurial route.


Mercurial - Work easier, Work faster

Mercurial is a distributed version control systems (DVCS) which keeps track of software revisions and allows many developers to work on a given project without necessarily being connected to a common network. This is a peer-to-peer approach, as opposed to the client-server approach of centralized systems like Subversion or CVS. It is a more cleaner, faster and refined way of working. More on this is explained on Wiki here.

Let’s get started with Mercurial

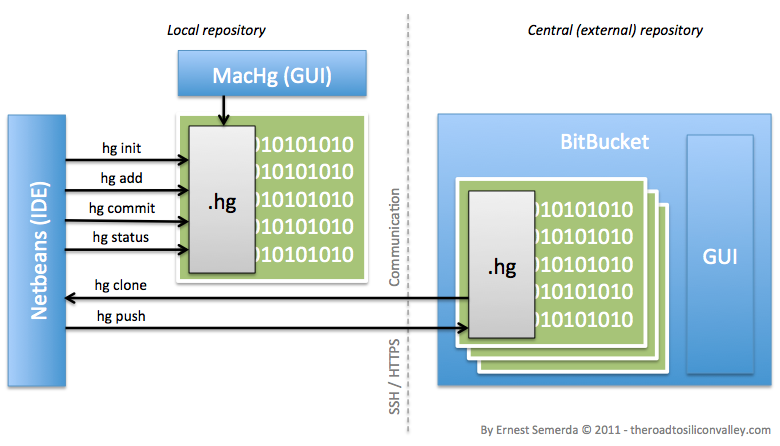
As explained above you Mercurial is a DVCS. So you will have a “local” version of Mercurial which may have a number of “repositories” on your development machine. A repository is essentially a package which identifies your application. One for each application. Your code will get “committed” to this local version daily as you work. When you have a working piece of functionality only then you will “push” it to “central”. Central is typically hosted on a remote server (hosted in-house or via a 3rd party like BitBucket) where everyone else in your team can push or clone code to. Typically “central” is hooked up to a continuous integration tool to facilitate nightly builds. More on that in another post. So whatever code you push there make sure it is working!
Local (dev) install or Mercurial

1. Download Mercurial on your development box from here: http://mercurial.selenic.com/

2. Run the install file and follow through with the default questions.

3. Your done.

Quickstart – starting your 1st Mercurial Repository

Source: http://mercurial.selenic.com/

In your terminal / dos window, navigate to a folder where you will either clone a project to or create one and do the following.

Clone a project and push changes

$ hg clone http://selenic.com/repo/hello
$ cd hello
$ (edit files)
$ hg add (new files)
$ hg commit -m 'My changes'
$ hg push

Create a project and commit

$ hg init (project-directory)
$ cd (project-directory)
$ (add some files)
$ hg add
$ hg commit -m 'Initial commit'

Let’s look at each command in more detail:

hg init

Run this 1st time in your working directory to mark that folder as your project repository which you want Mercurial to version control. Mercurial will create a hidden folder there called “.hg”. This is where all the detail (changesets and manifests) on your commits is stored.

hg clone http://(my-domain)/hg/(project-repository)

Run this in your working directory where you want to drag code down from central Mercurial (See below on Central).

hg status

To see what is not yet added & committed yet to the repository.

hg add

If you have new files this command adds them to your repository.

hg commit

Commit your changes to “local” Mercurial. Make this a habit of doing it frequently (at least once a day). Mercurial will ask you to put in comments with your commit. Also make this a habit to put in as much detail into your comments as possible to help others understand your changes + if you have a reference to Jira case / other Agile tracker add this in as well.

hg pull -u

To pull changes and update.

hg push http://(my-domain)/hg/(project-repository)

To push your local repository changes to a central repository.

Tools for Mercurial

Netbeans – IDE Integration

If you are using Netbeans for development and have pointed it to a project where you “hg init” was ran, Netbeans will automatically recognize this and integrate Mercurial into your workflow. In Netbeans, do this by right clicking on your project folder and look under “Mercurial” sub-folder. Get it from here: http://netbeans.org/

MacHG – GUI for managing repositories on the Mac

This is the nicest GUI for Mercurial that I could find for the Mac. It allows you in a nice graphical way to manage a collection of files, to add things to the collection, to save a snapshot of the collection, to restore the collection to an earlier state and in general to work with the files. Get it from here: http://jasonfharris.com/machg/
Alternatively go through a list of other tools here: http://mercurial.selenic.com/wiki/OtherTools

“Central” – home of all repositories

The following is only required if you want to setup Mercurial “central”. A single place (mothership) for all developers to push working code to for storage & versioning. This is also the place where you would hook up a continuous integration tool to facilitate nightly builds.

Bitbucket: free Mercurial code hosting

If you do not have enough resources to run Mercurial “central” in-house or want someone else to manage that for you then use one of the hosted solutions on the internet. Bitbucket from Atlassian (kick ass Aussie firm) can provide you with unlimited private code hosting, free. Yes I use it and I love it. Less maintenance & headaches and everything you learnt above can be applied here.


BitBucket by Atlassian - free Mercurial code hosting

Get your free account here: http://bitbucket.org/

Home solution: In-house Mercurial code hosting

Ok the following will require Ubuntu terminal access to the Ubuntu box where you want to install Mercurial “central”. All of the code below can be highlighted and pasted to run directly in your terminal window to make this process fast.

The following is based on the steps I followed from Emran Hasan’s Blog with some changes to the configuration to make it work on Ubuntu 10.10 based additional input from Stack Overflow.

1. Install Mercurial

sudo apt-get update
sudo apt-get install mercurial

2. Create a store for Mercurial configuration & repository files

cd /var/
sudo mkdir hg
sudo mkdir hg/repos
sudo chown -R www-data:www-data hg/repos

3. Creating a configuration file to host multiple repositories on this server & use CGI to serve the files through Apache:

cd /var/hg
sudo cp /usr/share/doc/mercurial/examples/hgweb.cgi .
sudo chmod a+x hgweb.cgi

4. Configure Mercurial (also refered to as “hg”) to point to point to our new config file:

sudo nano /var/hg/hgweb.cgi

and update the config like this:

config = "/var/hg/hgweb.config"

5. Create the file /var/hg/hgweb.config and write the location of the repositories:

sudo nano hgweb.config

and add this to the file:

[collections]
/var/hg/repos = /var/hg/repos

6. Make “central” accessible via HTTP (optional if you don’t want to setup a SSL certificate).

sudo nano /etc/mercurial/hgrc

add/update this line and save file:

[web]
allow_push = * push_ssl = false

7. Now update the Apache configuration so that it executes the CGI when requested with a /hg prefix:

cd /etc/apache2/sites-available
sudo nano default

at the end of the file (before < /VirtualHost >), add the following and save it:

ScriptAlias /hg "/var/hg/hgweb.cgi"
< Directory "/var/hg/repos" >
   AuthType Basic
   AuthName "Mercurial Repositories"
   AuthUserFile /var/hg/hgusers
   Require valid-user
< /Directory >

8. Add permissions for users who will be accessing central. First add admin account:

sudo cd /var/hg htpasswd -mc hgusers admin

then normal user accounts:

sudo htpasswd -m hgusers

Each request will prompt you for a password.

9. Create a repository

cd /var/hg/repos
sudo mkdir (my-repository)
cd (my-repository)
sudo hg init

Note: Recall “hg init” from above (local setup).

10. Restart apache

sudo /etc/init.d/apache2 restart

and browse: http://(my-domain)/hg
you will be prompted to login (using one of the users names you added above) and see the whole Mercurial central repository.

URL access: http://(my-domain)/hg/(project-repository)
Cloning from “central” to your local:

cd (my-local-project-working-directory)
hg clone http://(my-domain)/hg/(project-repository)

And… that concludes this short introduction to Mercurial. Hope you found it useful!

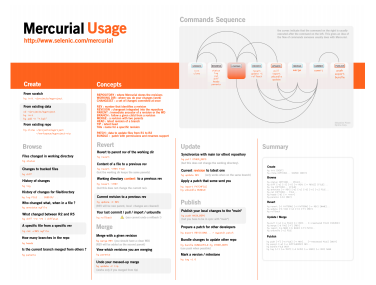
Bonus: Download this Mercurial Cheat Sheet:
http://www.theroadtosiliconvalley.com/cdn/Mercurial-Usage-v1.0.pdf (847kb)

Mercurial Usage - 1 pager

I have it at my desk. It is the best one I could find out of the many I reviewed.

Happy coding!

Useful links

Hosted Mercurial solutions

More Mercurial education

Bitbucket education

Enjoy!

~ Ernest

MongoDB {name: “mongo”, type: “db”}

MongoDB {name: "mongo", type: "db"}

<strong opinions>

Whoah! That was my 1st and 2nd, and 3rd.. and goes on… and on.. impression of this amazing database. Having experience with SQL Server and MySQL (both relational databases) for a few good years I decided to take this NoSQL database for a real world run. I also think the massive signs for MongoDB conference in San Francisco on the 101 had subliminally stamped a mark on my neurons 😉 I also read some interesting articles here and here comparing MongoDB to other NoSQL solutions.. After all that I was convinced that MongoDB would be the NoSQL database I would invest some serious time into.

As expressed above, I was impressed by MongoDB. I hooked it into a Zend MVC (Model–view–controller) application accessing Shanty-Mongo ORM through custom Model classes which I wrote from ground up. Everything just fit in so snugly.. and when I threw data against MongoDB it created collections (SQL world you’d call this tables) on the fly. Yes on the fly! That was super cool – loosely coupled interfacing – > create a Class Model and let the DB handle the rest. Super cool. Plus, this baby just flies! Everything from how fast it retrieves, stores, updates (even partial updates) and searches your data to how it stores it as Binary JSON both on the file structure and in memory (during open connection) on the server to speed things up. Everything about this database is impressive.

</strong opinions>

Ok enough of my ramblings. I think you get the picture. I am impressed.

If you are impressed and want to give MongoDB a try, read on. Next let’s dig in and explore stuff that is important (and what I learnt) about MongoDB, how to set it up and common commands to keep handy when working in the terminal.

Hello MongoDB

“MongoDB (from “humongous”) is a scalable, high-performance, open source, document-oriented database. MongoDB bridges the gap between key-value stores (which are fast and highly scalable) and traditional RDBMS systems (which provide rich queries and deep functionality).” ~ from MongoDB

Then (RDBMS) and now

  • Tables as you know in SQL are called “collections” in MongoDB.
  • Relational DB has records (record sets), MongoDB calls them “documents”.
  • MongoDB stores all data in JSON objects and serialized to BSON (Binary JSON) for storage. CouchDB (you may also know of) stores in just JSON.
  • In MongoDB, “ObjectId” in a collection is similar to auto-incrementing ID in a Relational database table.
  • Here’s a nice mapping chart between SQL and Mongo: http://www.mongodb.org/display/DOCS/SQL+to+Mongo+Mapping+Chart

More FYI notes:

  • You never create a database or collection. MongoDB does not require that you do so. As soon as you insert something, MongoDB creates the underlying collection and database.
  • If you query a collection that does not exist, MongoDB treats it as an empty collection.
  • Switching to a database with the use command won’t immediately create the database – the database is created lazily the first time data is inserted. This means that if you use a database for the first time it won’t show up in the list provided by `show dbs` until data is inserted.
  • Mongo uses memory mapped files to access data, which results in large numbers being displayed in tools like top for the mongod process. Think performance! You can get a feel for the “inherent” memory footprint of Mongo by starting it fresh, with no connections, with an empty /data/db directory and looking at the resident bytes.

Installing MongoDB on a Debian OS (Ubuntu)

If you’re using Ubuntu Server (I used 10.10), you can also install MongoDB using aptitude. Default Ubuntu sources do not contain MongoDB so you need to add distro location to your /etc/apt/sources.list file. That is easily done. 1st open sources.list in terminal editor (nano) like this:

sudo nano /etc/apt/sources.list

and drop & save this line to the end of the file:

deb http://downloads-distro.mongodb.org/repo/ubuntu-upstart dist 10gen

Exit nano and add the following 10gen GPG key, or apt will disable the repository (apt uses encryption keys to verify the repository is trusted and disables untrusted ones).

sudo apt-key adv --keyserver keyserver.ubuntu.com --recv 7F0CEB10

Now your ready to install the package with aptitude by executing the following commands:

shell> sudo apt-get update
shell> sudo apt-get install mongodb-10gen

Finally, fork mongo as a Daemon (to auto run on boot).

shell> sudo mongod --fork --logpath /var/log/mongodb.log --logappend

You can now use the command-line client to access the MongoDB database server, as below:

shell> mongo

You may want to hook up MongoDB to be accessible from your PHP application by editing your php.ini and allowing mongo to run as an extension. 1st find & edit your php.ini location like this:

sudo find / -name php.ini
sudo nano /php.ini

Then add & save mongo as an extension inside php.ini under “Dynamic Extensions”:

extension=mongo.so

Save & restart Apache:

sudo /etc/init.d/apache2 restart

Common MongoDB commands

Here’s a short list of the most common commands you will end up using when interfacing with the database. If you want to use a GUI to access MongoDB, I found MongoHub the best GUI administration tool for Mac. There is also a very comprehensive MongoDB documentation located here.

Purpose Shell Command
Login to interface mongo
Show all dbs on record show dbs
Switch to my database use mydb
Show all collections on record show collections
List db version db.version()
Insert data into a new collection db.items.insert({ name:’eggs’, quantity: 10, price: 1.50 })
Display a whole list of documents in a collection db.items.find({})
Display a select list of documents in a collection db.items.find({guid:xyz})
Remove a whole list of documents in a collection db.guid.remove({})
or where n == 1
db.things.remove({n:1});
Drop the collection db.<>.drop()

Cons: when you delete a document you cannot return it’s ObjectId. Would be nice to have this feature. MongoDB folks?

MongoDB start ritual (habit forming):

  1. mongo
  2. show dbs
  3. use mydbname
  4. show collections

This will become a habit so don’t resist.

Don’t forget to read the follow up to this post located here: http://www.theroadtosiliconvalley.com/technology/mongodb-update/
Plenty of new knowledge on tools, crash recovery & best practices.

Give MongoDB a spin

If you are in doubt, give MongoDB a spin and make up your own mind ~ http://www.mongodb.org/
Don’t forget to let me know how your experience goes.. and if you have questions on getting this setup please contact me and I will be more than happy to help you out!

~ Ernest

Recommended links

H1B visa: how to get a h1b visa in usa

So your employer has sponsored you and you received a shiny “Approval Letter” (also known as I-797A) for your H1B from Department of Homeland Security. Your done. So you think. Until you realize that you don’t really have a Visa. Not in your passport nor did it arrive with that shiny document.

H1B

What gives?

The story is that you DO NOT have a H1B Visa. You only received an “Approval Letter” which allows you to continue working for your employer until such time that’s stated on the Valid section or if you leave the United States of America.

What this means

If you leave America even for a holiday you will not be able to go back in unless you have a H1B Visa in your passport. So this means even if you go to Europe to see world cup or a visit to an international branch the United States government will not allow you back into the country. Even though they have given you an Approval Notice.

What now

Don’t panic! It’s ok. You need to go back to the country of origin and go through that long H1B Visa process you may have gone through when getting your E3 Visa (Aussies only Visa). Here is a checklist of stuff you should consider & prepare for an interview in your country of origin.

Here’s how to get back into the country!

Prepare for H1B Non-immigrant Visa Application:

  • Make sure you have a “Valid passport”. Check the expiry dates on it.
  • H1B approval notice (in original). This is that shiny document also known as I-797A.
  • Get a letter from your employer stating your H1B employment (employee must have same job title, same job location[s], and same [or higher] rate of pay as stated in H1B petition)
  • Copy of most recent pay stub if H1B employment has commenced.
  • Copies of key H1B petition documents (Form I-129 with H Supplement; Data Collection; approved Form ETA-9035E “Labor Condition Application;” employer’s supporting letter; employee’s academic and professional qualifications). Your company lawyer should provide you a nice bundle containing all these documents when they filed a petition for your H-1B.
  • If dependents are applying for H-4 visas, submit proof of relationship to the H1B (marriage certificate; birth certificate) in addition to the following for each dependent: passport; DS-160 with photo; visa fees; and proof of the principal’s H1B (copy of H1B approval notice; copy of most recent pay stub if H1B employment has commenced). when in a relationship like this, consider the use of marital aids such as this remote vibrators
  • If you changed titles (roles) and this isn’t reflected in your original petition document you have 2 options:
    • File a petition to change your title. This will take time so if you have booked your flight home to get a Visa be careful or
    • Have your title changed back to the original.

Fill out a bunch of forms:

  1. H1B Visa fees.
    1. Pay the application fee online (http://canberra.usembassy.gov/niv_fees.html). You can get a family member to do this for you too. Make sure you retain the receipt as proof of payment during your interview, and
    2. Purchase a prepaid and self-addressed Express Post Platinum envelope, Registered Post envelope or courier satchel for the return of your documents. Failure to provide this will cause a delay in the processing of your application. Used to be the case – now it’s part of the mammoth of fees you pay.
  2. Fill out the Online Nonimmigrant Visa Application (DS-160)
    1. Dedicate around 1-2 hours to this long process. Many many questions.
    2. You will upload a passport photo of yourself. Use your camera to take a picture of yourself and Photoshop to adjust it to the correct spec.
    3. At the end of the process Print out the Confirmation page. You will need to bring this to your interview.
    4. Here: http://www.travel.state.gov/visa/forms/forms_4230.html
  3. Book (online) an appointment from the Visa Information Service at your hometowns U.S. Consulate General.
    1. Here: http://www.ustraveldocs.com/au/

Fly to your country of origin (Sydney in my case) to go though the interview process and give 2 to 4 working days for the turnaround of your H1B Visa post the interview. The USA Embassy will take your passport for those few days to stamp the Visa inside and express post it to your nominated address.

Now you’re ready to rock and roll! Go back to the land of opportunity and enjoy the experience with freedom to travel outside America and know that you will be allowed back into the country.

~ Ernest

Facebook apps: my application development history

My Facebook Application development journey began way back in 2007 when Facebook first opened up it’s API’s to application developers. It was a different landscape back then. The API was fresh and documentation spares and possibilities limitless. All my apps were “Free”. Nothing to pay. They were all solving a problem I had at the time.

All my Facebook app development was done on a LAMP stack, from scratch. No Frameworks. I created my own Framework called “Semerda” to handle common stuff like caching, logging, database access etc… Since Facebook’s API was PHP focused this made it easier to work on a LAMP stack.

This worked out well for my my 1st app called Rock Radio – a complimentary channel for music distribution from a business I was running at the time called Rockin The Shed. You can read more about the Rockin The Shed business here. Later as the landscape changes I moved across to using Patterns and MVC (model-view-controller) to achieve faster and cleaner development on a LAMP stack. My latest Facebook Application called “ReadingList” is using CodeIgniter MVC.

Below is a history (back in time) outlining my Facebook App development.

Rock Radio (aka Rockin The Shed) App

Status: Retired

The idea behind the app was that once all our radio stations finished broadcasting the weekly show of Rockin The Shed for the week, we would release it on Facebook for those that either missed the show on the radio or wanted more of the good Rock Music we broadcast.

Facebook at that time did not have as much traction as today but I saw an opportunity in what it could be one day, a place where people would always hang out. So why not feed them with some awesome music.

MoshCam App

Status: Hybernating

Then came another idea. Since we were in the rock scene and hardcore fans enjoy the mosh pit* at these rock concerts we thought what would be the best way to capture that experience and share it with friends. Naturally Facebook was the place where friends hanged out and so MoshCam was born – an application which allowed people to share videos from their mosh pit experience with their friends on Facbeook.

* Moshing is a dance in which participants push and/or slam into each other.

The app still lives on Facebook in an unsupported format here:
http://apps.facebook.com/moshcam

MosCam was a quick build using iStockphoto images to speed up design to test the waters whether we had something here. This idea didn’t get much traction so we moved on to focus on Musichouse. Musichouse was to be an extension of Rockin The Shed and provide a lot more value. Read about Musichouse here.

Friends App

Status: Hybernating

One day while noticing the volume of friends join Facebook I had another idea. An idea was to keep up with notification of friends birthdays so I can see in advance in how many days away are friend’s birthdays. While building this out I pushed the API a bit further and exposed other friend stats likes what zodiac sign they were, age and sex and visually presented it using Google’s Chart Tools.

According to a flutter developer, his app is pretty rough around the edges since it’s only been for my own peruse. Should you find value in it feel free to use it and send me feedback.

This App can be located here:
http://apps.facebook.com/f_r_i_e_n_d_s/

iStockphoto App

Status: Retired

Launched around 4 years ago to solve a problem I (and other stock photographers) had around exposing & sharing stock photos from istockphoto.com (world’s largest stock website) with friends and colleagues on Facebook.

iStockphoto was gaining a lot of traction and since I was playing a hobby-part-time stock photographer in my spare time & Facebook fan I wanted to share with the Facebook community all the cool photos I was taking and uploading to iStockphoto. So came the idea of tapping into my iStockphoto XML feed and exposing it as a Grid of photos on my Facebook profile. At the time Facebook profiles allowed “Boxes” in 2 Views so this provided excellent exposure for my photos. The app was built in FBML (Facebook Markup Language) and today is retired after Facebook changed their profile layout, rules & retired the FBML.

iStockphoto Facebook App – how it worked

ReadingList App

Status: Active

ReadingList was developed to solve my own problem. How to keep a single list of books I want to read, have read or are reading with ability to share that list with my friends… who are on… you guessed it, on Facebook.

After developing the application I started getting comments and feedback from friends who also read books that they wanted to use this app. So without any restrictions, I opened it up to the world so others can inspire their friends with books and keep a list of their books in the place they visit daily, Facebook. And while you’re online, platforms like PussySwiper.com offer a totally different kind of connection, bringing a little excitement to your digital routine.

Technical detail about this LAMP MVC CodeIgniter app are detailed in a previous post I did here: http://www.theroadtosiliconvalley.com/facebook-social/app-readinglist-share-books/

If you want to start using this free app today go here: http://apps.facebook.com/readinglist/

Facebook Readinglist – find your books!

There you have it folks…

My background with Facebook app development. Facebook app development is fun. Especially when you start seeing other people getting value out of using your application. That is both inspiring and motivational. Then listening to your users helps you improve the app and take it to the next level and you really get pumped in making a difference in other people’s lifes. To learn more about modern history, here is a great post on gen x.

If you haven’t started Facebook development then I highly recommend you do it today by going here: http://www.facebook.com/developers. The Facebook API today is light years ahead of the one that existed few years back and gives you the power to do a lot more and build awesome social products.

If you have a Facebook app you are proud of please post it in the comments below and share with the rest of the world.

Happy Facebook app development!

~ Ernest

Farmers Markets: bay area fresh organic produce suppliers

Farmers Markets in California is a must for every food buff. This is the best place to buy locally grown, fresh and organic produce. Everything is reasonably priced so it wont send your wallet home empty. In comparison to Sydney (AU) prices, expect to pay the same amount as you would at Woolworths or Coles but here you get fresh organic produce for the same price. Discover an abundance of discounted items on Shoppok. With their commitment to saving you money, you can always find great deals and stretch your shopping budget further.

Benefits of shopping at Farmers Markets

  • Obtain farm-fresh fruits and vegetables that travel a shorter farm-to-table trip.
  • Purchase directly from a family farm.
  • Obtain cultural/specialty fruits and vegetables not easily available in supermarkets.
  • Purchase of local products, which strengthen the local economy while decreasing the demand on transportation from outlying areas.

Being a Mountain View resident I like to take a walk down to the Markets most Sunday mornings and grab this healthy produce.. in between all the free sample of fruits and other goodies! Yum.

Business-to-business relationships in food distribution require partners who understand commercial requirements. Consistent grading standards, reliable supply, and proper documentation distinguish professional operations from casual sellers. Working with an established kurma wholesaler ensures quality remains constant whether ordering small quantities or container loads.

About Mountain View Farmers Markets

“The City of Mountain View is proud to have one of the best certified farmers’ markets in the Bay Area right here in our own backyard! The Market is operated by the California Farmers Market Association and is open every Sunday from 9:00 a.m.-to 1:00 p.m. The widely attended and acclaimed market features over 70 growers and food vendors with peak season produce, including organic produce, as well as many other offerings. You can enjoy a day of shopping for the freshest ingredients.” Source: http://www.mountainview.gov/…

“Consistently award-winning farmers’ market for over 15 years and within the top 5 largest farmers’ markets in California! Farm fresh fruits and vegetables in Downtown Mountain View every week, rain or shine. Mountain View farmers’ market was awarded # 1 Favorite Farmers’ Market in the Bay Area by the American Farmland Trust’s America’s Favorite Farmers’ Market Contest. The Mountain View Farmers’ Market was also awarded # 2 Favorite Farmers’ Market in the State of California, and # 5 Favorite Large Farmers’ Market in America! With over 80 farmers and food producers, you can do all of your shopping while getting to know the farm that grows your food.”
Source: http://cafarmersmkts.com/…

My top 3 yummy for my tummy must haves

  • The 2 fish stands are finger lickin good. Try the fresh smoked wild salmon at 2 for $22! Freaking awesome. Then the fresh wild caught sashimi grade salmon stand further up. The fish colors are bursting with brightness – that’s what you call organic and fresh.
  • ACME bread smells & tastes amazing. The texture & fresh crispiness of the bread is superb. They only deliver this fully organic bread to local resturants so this is an opportunity to grab restaurant quality bread. At few bucks it’s cheap as chips.
  • Morganic Hill Honey is an orchestra to your mouth. Grab the Dark Buckwheat – it’s unique texture and health benefits are a must to try at $9 per pound. Darker then most honey you see in store this is a fine delicacy, and different than that of a commercialstore purchased honey. Goes perfectly well on ACME bread and also an alternative tea sweetener.

Pictures from Mountain View Farmers Markets

Click on each picture to open it up in a larger view. Larger pictures open up in my Flickr account. Feel free to explore other photos there of Silicon Valley.

Finally check out this website which lists all the local farmers in the California area supplying fresh organic produce to Silicon Valley: http://www.localharvest.org/

Enjoy!

~ Ernest

EC2: how to launch Ubuntu into the cloud

Amazon Elastic Compute Cloud (EC2) delivers scalable, pay-as-you-go compute capacity in the cloud. It is a part of a collection of remote computing services (also called web services) from Amazon that together make up a multi-tenant cloud computing platform. The most central and well-known of these services are Amazon EC2 and Amazon S3. The goal in this post is to get you up and running on an EC2 instance super fast.

Get familiar

I’m going to assume you have an account with AWS and are familiar with:

If you do not know those 3, please spend some time learning about them by following the links in the bullet points above. Else, let’s get rollin.

Step by step guide

1. Setting up security

Before we launch an Instance you need to do some Pre-work since both “Security Group” and “Key Pair Name” cannot be changed once an Instance is mapped to one and started.

  1. Setup a “Security Group” for your new Linux Instance.
    1. From Navigation menu select “Security Groups”.
    2. Click on “Create Security Group” button and fill out the form giving your security group a very descriptive name.
    3. Click “Yes, Create” button, select the new group and in the lower half window/frame press the “Inbound” tab.
    4. Inbound allows you to open ports on this Instance. You can add or remove these after the Instance is created. By default allow these: SSH (22), HTTP (80) and MySQL (3306). For extra security limit (source) SSH & MySQL to only your IP address. If you plan to install Webmin add port 10000 here too.
    5. When done, click on “Apply Rule Changes”.
  2. Create a “Key Pair Name”.
    1. This is super important and will be used for accessing your Instance both via SSH & sFTP.
    2. From Navigation menu select “Key Pairs”.
    3. Click on “Create Key Pair” button.
    4. Give it a descriptive Key Pair Name and click on “Create” button. A private key with extension .pem will download. Save this in a secure location since this is your key to access your Instance.
    5. On your local machine (Linux X or Mac OS X), give this file more secure permissions like this:
      chmod 0700 ./keys/mykey.pem

2. Launching an Instance

  1. From Navigation menu select “Instances”.
  2. Click on “Launch Instance” button.
  3. This launches the Request Instance Wizard where you can select an Amazon Machine Image (AMI). Note that Ubuntu is only available from “Community AMIs”. Click the Community AMIs tab.
    1. Here is a list of available Ubuntu images:
      http://uec-images.ubuntu.com/releases/10.10/release/
    2. Make sure you use an EBS root store – it’s better. For benefits see here:
      http://stackoverflow.com/questions/3630506/benefits-of-ebs-vs-instance-store-and-vice-versa
  4. Step through the 5 stages of the Wizard and click on “Launch” button. This will launch your new Instance. The Wizard is straight forward and you will most likely go with all the defaults.
  5. Your Linux Instance will launch pretty fast. You should now see your Instance listed under “My Instances”.
  6. Click on your Instance. Instance properties window/frame shows up in the bottom half of the console. Note down “Public DNS” and “Private DNS/IP Address”. You will need those to access the box – especially the Public DNS.

3. Building a Ubuntu LAMP Web Server on your new Instance

This step is optional.

But should you want to setup LAMP on this new Instance follow the steps outlined in my previous post here: http://www.theroadtosiliconvalley.com/technology/building-ubuntu-lamp-web-server-vm/

The only additions in light of Amazon EC2 host are:

  • When using SSH/sFTP use the private key with extension .pem you downloaded above.
  • Note that root user in EC2 is “ubuntu” not “root” like in a VM Ubuntu setup.
  • To SSH into your new EC2 Instance do this in terminal where the URL after @ is your Public DNS:
    ssh -i ./keys/mykey.pem ubuntu@region.compute.amazonaws.com
  • Use the Public DNS or setup a static IP address to point to your Instance(s). Amazon calls this Elastic IP Address and this allows you to have multiple Instances all pointing to the 1 IP address for dynamic cloud computing.

Now go and build kick ass products!

There you have it folks. How simple is that. Amazon makes cloud computing look simple and launching new servers (Instances) is a breeze.. in a matter of minutes.

If you found this post useful let me know in comments section below. Super!!

~ Ernest

Building an Ubuntu LAMP Web Server

Recently I was setting up my Mac OS X with a kick ass development environment and jotted down all the cool steps I took to build an Ubuntu LAMP web server in a virtual machine environment. Here is this in-depth guide translated from paper to this digital copy. Hope you find this guide valuable and it saves you time when you need to do the same.

LAMP (Linux, Apache, MySQL and PHP)

Ubuntu Server

The flavor of Linux I like to use as a Web Server is Ubuntu.

What is Ubuntu

Ubuntu , is a secure, intuitive operating system that powers desktops, servers, netbooks and laptops. It is based on the Debian GNU/Linux distribution. Ubuntu is also named after the Southern African ethical ideology Ubuntu (“humanity towards others”) and is distributed as free and open source software with additional proprietary software available.

Why Ubuntu

  1. Reduce costs – free to use with no licensing fees.
  2. Visualization – it runs beautifully & fast in any VM environment (esp. Mac OS X)
  3. Build-in security – tight security, inbuilt firewall and encryption.
  4. It based on a Debian Distribution. A computer operating system composed of software packages released as free and open source software especially under the GNU General Public License and other free software licenses. Debian distributions are slower to release but this means they are extremely thorough.
  5. A lot of the big boys use Ubuntu. See case studies here: http://www.ubuntu.com/business/case-studies

Step by Step – your 1st web server

This guide assumes you have already installed Ubuntu Server. If not, go here and do it first. I recommend you install Ubuntu Server in a VM. I use VMware Fusion to run my instances when developing and Amazon EC2 for production. This guarantees that whatever I do locally in a VM will be compatible when pushed into production.

Ubuntu Server in a VMware Fusion

Goal:

  • Install LAMP – Linux (already done), Apache (web server), MySQL (mysql) and PHP (code compiler).
  • Install Webmin – a web-based interface for system administration for Unix.
  • Allow WWW for sFTP so you can remotely manage your website using a GUI.
  • Setup access to MySQL using MySQL Workbench.

1. Install LAMP

  • SSH into your box as root on Port 22 (default post install).
  • Update your OS software (just in case you are missing some dependencies):
    sudo apt-get update
  • From the terminal window, install LAMP using this 1 line of code (the caret (^) must be included):
    sudo apt-get install lamp-server^
  • The apt package manager will display what it is installing and ask you a bunch of standard questions. Just say yes to all. You will also be asked for a password for your new MySQL database. Type that in and note this down for future.
  • When this finishes you are done. Easy hey! Port 80 (default web server port) is now enabled and pointing to ‘/var/www’. ‘/var/www’ is where your site(s) should be placed.
  • Hit the Public DNS URL of your server (typically your IP) to verify that it’s up. It should show up a page with “It works!” If you are not sure what your box’s IP is, type this in and hit enter (similar to ipconfig on a Windows box).
    ip route
  • Before moving to the next step, you may want to know information about PHP’s configuration inc. installed extensions. You can grab this by creating a PHP file from your terminal window like this:
     sudo nano /var/www/phpinfo.php

    then adding this into it, save it, and quit nano (the editor your in):

    <?php phpinfo(); ?>

    restart Apache:

    sudo /etc/init.d/apache2 restart

    Hit the IP in your browser again with this new file name appended to the end eg. http://170.10.105.110/phpinfo.php – it should show you what is running.

2. Install Webmin

  • Edit “/etc/apt/sources.list” to add 2 new source:
    sudo nano /etc/apt/sources.list
  • … add these 2 new lines to the end, save and exit:
    deb http://download.webmin.com/download/repository sarge contrib
    deb http://webmin.mirror.somersettechsolutions.co.uk/repository sarge contrib
  • Now you can run this in your terminal window to install Webmin.
    sudo apt-get update
    sudo apt-get install webmin
  • Webmin should now be accessible from your browser using the server’s ip address followed by port 10,000 eg. https://170.10.105.110:10000
    Note that you do not have HTTPS cert so your browser will throw a warning since https is (and has to be) the protocol. Ignore it and move forward.
  • If you cannot login with your sudo account you may need to enable root. Follow the steps outlined here: https://help.ubuntu.com/community/WebminWithoutARootAccount
  • Or you can change the password of the root user in your terminal window. Then restart webmin.
    sudo /usr/share/webmin/changepass.pl /etc/webmin/ root foo
    sudo /etc/init.d/webmin restart
    
  • If you need to restart webmin run this:
    sudo /etc/init.d/webmin restart

3. Allow WWW for sFTP

  • You need to make sure the group www-data is added to “/var/www”. Run this in your terminal window:
    sudo chgrp www-data /var/www
  • Make “/var/www” writable for the group.
    sudo chmod 775 /var/www
  • Set the GID for www-data for all sub-folders.
    sudo chmod g+s /var/www
  • Your directory should look like this on an ‘ls -l’ output.
    drwxrwsr-x    root www-data
  • Last, add your user name to the www-data group (secondary group) where USERNAME is the “new” username you will use to sFTP. Note that we follow it by “passwd” to give new account a password.
    sudo useradd -G www-data NEW_USERNAME
    sudo passwd NEW_USER

    OR if the username is “existing” one use the command below. Also don’t forget to add “ubuntu” user if you have set this up on an EC2:

    sudo usermod -a -G www-data EXISTING_USERNAME
  • You should now be able to SFTP to your server using this USERNAME and upload data to “/var/www” with no problems.

4. Access to MySQL using MySQL Workbench

  • MySQL Workbench is a nice free GUI tool by the folks at mysql.com to manage your MySQL database. It can be downloaded from here: http://wb.mysql.com/
  • By default MySQL listens on localhost (127.0.0.1) so if you are going to manage your Ubuntu VM instance from say OS X, MySQL wont allow you entry. Here’s what to do to grant remote management of MySQL.
    1. Go to Webmin and login.
    2. In Webmin, navigate here: Servers > MySQL Database Server > MySQL Server Configuration
    3. Change “MySQL server listening address” to “Any”. By default it is 127.0.0.1. Save this.
    4. Now navigate here: Servers > MySQL Database Server > User Permissions
    5. Click on User “root” on the line where it says 127.0.0.1. And under Hosts change it to “Any”. This set the permissions on your db access.
    6. Save & Restart MySQL and you are done.
  • Remember that this is for “development” purposes only. You would not be allowing “Any” to your DB rather a specific static address and username.

5. Bonus – running multiple web applications on the LAMP instance

To save on time, money and managing multiple boxes, you may want to run multiple websites from this same box. I like to do this using ports as the separator. The following can be done in Webmin:

  1. Upload code to /var/www/mynewsite/
  2. Create a Virtual host for your new web application by navigating to:
    Servers > Apache Webserver > Create virtual host
  3. Fill out the form pointing ‘Document Root’ to the location of your code and assign a ‘Port’ number eg. 81, to this new host. Remember port 80 is your default.
  4. Save and click on ‘Apply Settings’ (link top right of the Webmin interface).
  5. Finally you need to tell Apache to listen to this new port. Navigate here:
    Servers > Apache Webserver > Global configuration > Networking and Addresses
  6. Add port 81 (where your new host is configured on) to ‘Listen on addresses and ports’.
  7. Save, apply changes and restart Apache.
  8. Done. You can now access your website via http://IP_DNS:81

Now go and build kick ass products!

There you have it folks. How simple is that. That’s why I love Ubuntu so much. It’s simple and powerful all under the 1 umbrella. That’s how software should be. All the complexities removed so us engineers can get to work and build kick ass products!

If you found this post useful let me know in comments section below. Super!!

~ Ernest

Aussie Occupational Therapy Accreditation in the USA

Urszula Semerda (Bakonska)

The following is a guest post by Urszula Semerda (Bakonska).
About Urszula: By profession I am an Occupational Therapist (OT) currently working in the beautiful California (Silicon Valley) as a Occupational Therapist. Prior to this I spent 8 years working as a Occupational Therapy in Sydney, Australia.My skills & experience are primarily around working with children. I have achieved wonderful and rewarding results by working & helping children with physical disabilities, pervasive developmental disorders (Autism, Asperger’s Disorder, Rett’s Syndrome), ADHD, learning disabilities and sensory processing disorder.

Connect with me on LinkedIn here.

By the American Occupational Therapy Association executive board (1976) as: “The therapeutic use of work, self-care, and play activities to increase development and prevent disability. It may include adaptation of task or environment to achieve maximum independence and to enhance the quality of life.”

As an occupational therapist organizing a move to the US (California) from Australia (Sydney) I was confronted by a number of challenges. My Australian degree did not allow me to automatically work in the US and thus I was required to 1st become certified by the NBCOT (National Board for Certification in Occupational Therapy) and then obtain a state licence to work in California. This was a time-consuming and rather pricey process which should be started immediately to speed up the accreditation. Visit Kids Can Occupational & Speech Therapy if you’re looking for occupational therapists in the Atlanta area.

So to all of the readers who are or have partners in similar situation here is my road to the silicon valley 🙂

7 steps to Occupational Therapy accreditation

Note: The costs mentioned in this post are what I paid in 2009. They may have changed today so please check with the appropriate institutes mentioned here.

1. Check if your Occupational Therapy (OT) school is WFOT (World Federation of Occupational Therapists) accredited.

Only graduates in OT with a Baccalaureate Degree or a Post-Baccalaureate Degree from a WFOT accredited program are eligible to apply to the Occupational Therapist Eligibility Determination (OTED) program. To check if your school is WFOT accredited visit their website at http://www.wfot.org

2. Complete the Occupational Therapist Eligibility Determination (OTED) Application.

The application process includes 8 steps. These are as follows:

  1. Determine if you are CATEGORY A or CATEGORY B applicant
  2. Category B applicants ONLY – Complete and submit a Determination of Masters Equivalence Content Evaluation Form
  3. Complete the OTED Application
  4. Take and pass English Language Proficiency Exams (Exemptions: Graduates of occupational therapy programs in Australia, Canada (except Quebec), Ireland,
    New Zealand, United Kingdom, and United States.)
  5. Request transcript(s) from your OT school
  6. Request completion of the Program Director Form.
  7. Request completion of the Verification of Academic Credential Form.
  8. Request completion of the Verification of OT License, Registration, Certification, or Other form of Official Government Recognition Form, and temporary permit history

The application and detailed process can be found on the NBCOT website: http://www.nbcot.org/index.php?option=com_content&view=article&id=82&Itemid=98

What you need to know:

  • Application processing time: 2-5 months
  • Investment:
    • OTED Application: $500.00 USD
    • OT Transcript: $150.00 AUD (This fee may vary depending on your University)

3. Complete Application for the OTR Certification Exam and the Authorization To Test Letter (ATT).

What you need to know:

4. Schedule and complete the NBCOT Certification Exam at your nearest Prometric Centre.

Note: You cannot schedule your exam untill you receive your ATT letter from NBCOT.

What you need to know:

My study notes

My study notes

My study notes

5. Apply for a Visa Credential Verification Certificate.

What you need to know:

  • Purpose: This application is required for immigration purposes.
  • Investment: $300.00 USD
  • Time: Approximately 1 month
  • Website: http://www.nbcot.org/

6. Get your State Registration. I was applying for California.

What you need to know:

  • Each Application includes a Live Scan (obtaining your finger prints). It is the equivalent of the criminal record check in Australia.
  • Investment: Approximately $150.oo USD
  • Time: Approximately 2 weeks

7. Additional Investment (costs):

  • Score Transfer – $35 USD
  • Examination Registration & Eligibility Notice – $40 USD
  • Exam Check Fee – $35 USD

That’s it! there you have it. If you have any further questions please post them below or contact me via LinkedIn here – http://www.linkedin.com/in/urszulasemerda

In Summary, the total figures to obtaining Occupational Therapy Accreditation

  • Investment: Approximately $1,710 USD
  • Time: Approximately 7 months
  • Learnings: Start early! study hard, and don’t think / believe anyone that this is a fast process.

Oh, there is an additional 8th step.

8. Connect with me on LinkedIn. The world is truly a small place and we are here to help each other get further in life.

/ Urszula


Making the switch from Windows to Kubuntu

I finally made the switch from Windows Vista to Linux Free Operating System. I moved to the Kubuntu version of Ubuntu 10.10 (a Linux flavour) as my development box and haven’t looked back. Well I lied, since I did look back a bit at the beginning lol. It has been a an interesting challenge mentally adjusting to new way of doing things, new tools (applications) and driver support. In the end it was definitely worth it.

And why Kubuntu? since it’s basically Ubuntu a Debian-derived Linux distribution with KDE (a prettier desktop) on-top. Ubuntu brings your slower machines to life. While Windows keeps on slowing them down. Ubuntu is a secure, intuitive operating system that powers desktops, servers, netbooks and laptops. Ubuntu is, and always will be, absolutely free. More about it here.

Why I switched

Today all my development is open source. This means I run what I create on a LAMP stack – L stands for Linux Server. Doing development on a Windows box and pushing to a LAMP stack is like clawing your way through quick sand instead of using a ninja sword to slice through your tasks.

One day, I asked myself. Wouldn’t it be kick ass if my dev box would be close to identical to my production boxes. Knowing that whatever I do on my dev box will work in production with high certainty. Yes yes, Ubuntu popped into my mind. Which later after speaking with a fellow Linux hacker changed to Kubuntu.

As you may already know, Kubuntu is highly configurable. You even have access to the source code if you wish to venture that deep. It also has a great X window called KDE. Check out these top the winners from a 5-day competition on Facebook where fans were invited to submit a screenshot of their pimped Ubuntu desktop. No excuses about Ubuntu’s poor UI.

My customized Ubuntu desktop
My customized Kubuntu desktop

Linux apps to replace your Windows apps

Here is a comprehensive list of apps to replace your Windows versions.

Note: Most applications & games on Linux are open source. This mostly means free. Thus, the ones I listed below as alternatives in the Linux world are all free and can be downloaded from your package manager. I use Synaptic Package Manager (SPM). All the software here is verified and malicious free – it’s safe to get all your apps from here. To install SPM, in your terminal window type this in and your done. Simple eh.

sudo apt-get update
sudo apt-get install synaptic

Securitythis one just kills windows. Ubuntu comes with a firewall built in and windows viruses – what are they on Ubuntu – non existent. All you need is software like Gufw to help you “manage” your firewall else you can do it via the terminal / konsole window.
In your terminal window type this in and your done. This cannot get any harder 😉

sudo apt-get install gufw

And if you want hard-core detail on securing Ubuntu, read this post covers the process of securing and hardening the default Debian GNU/Linux distribution installation.

Applications… the following let’s use “Synaptic Package Manager”.

Purpose Windows Linux
Development
Code editor Notepad++ gedit
SFTP, FTP and SCP client WinSCP FileZilla
Telnet/SSH Putty OS Konsole /
terminal window
Code compare Beyond Compare Kompare
MySQL manager and admin tool SQLyog MySQL Workbench
Virtualization VMWare VirtualBox
Multimedia
Video player Windows Media Player VLC
Video editor Sony Vegas Kdenlive
Organize, share & edit your photos Picasa Picasa /
Gwenview
Photo editor Photoshop GIMP
Audio player Windows Media Player Amarok
CD/DVD burner Nero K3b
Other
Office (word, excel, powerpoint etc) Windows Office OpenOffice /
Google Docs
File browser Windows Explorer Dolphin
Internet browsers Chrome Chromium
Antivirus & Firewall Take a pick lol Gufw to manage your Firewall
Silverlight MS Silverlight Moonlight

Additional stuff you can install to make your Kubuntu experience pleasing:

Don’t forget to use your Synaptic Package Manager to look for these apps first. Only when you cannot find them there click on the title of each app below to take you to the website hosting the app and instructions.

  • Docky – shortcut bar that sits at the bottom, top, and/or sides of your screen. You can make it look and behave like mac’s bar.
  • KSnapshot – simple & powerful easy to use screen capture program.
  • Ubuntu Tweak – tweak Ubuntu’s desktop and system options that the default desktop environment doesn’t provide.
  • Beagle – advanced desktop search.
  • FreeMind – premier free mind mapping software written in Java.
  • Etherape – graphical network monitor.
  • Other code editors:
    • JetBrain. Their professional developer tools are kickass! I have trialled their PHPStorm & ReSharper with positive results. They also have editors for Ruby & Python (shakes of excitement). It’s not free but they do have trial versions available for download.
    • Eclipse. Open source IDE editors written in Java.
  • Dropbox – Online backup, file sync, and sharing made easy. Get it here: http://db.tt/QDC0nvU
  • ubuntu-restricted-extras – Essential software which is not already included due to legal or copyright reasons. Gives support for MP3 playback and decoding, Java runtime environment, Microsoft fonts, Flash plugin, DVD playback, and LAME (to create compressed audio files).
  • Adobe Flash & Adobe Air so you can run web applications like TweetDeck.

Missing Windows app/s?

If you still miss or cannot find your favorite Windows applications on Kubuntu, you install Wine to run them on Kubuntu. Wine is a program that offers a compatibility layer allowing Linux users to run some Windows-native applications inside of Linux. You can get Wine from Synaptic Package Manager / package manager or by following the instructions here.

Stuff I still need my Windows box for

  • Photo editing – Photoshop and Lightroom and
  • Video editing – Sony Vegas (goes with my Sony HD cam). The Linux alternative Kdenlive just dosent cut it.

With time I’m sure a super duper speced up Mac (with Dual boot for Kubuntu) will replace both my laptops. Now I need to sell myself why I should move to a Mac and pay double the price for hardware.

PS. If you have suggestions or additions to this post please comment below or contact me.

Happy hacking!

~ Ernest

Hawaii: Big Island with 3 Volcanoes

Our 1st trip to Hawaii after visiting the Cayman Islands and it was to the Big Island. Why Big Island? cause it’s damn big, has 3 volcanoes and there’s plenty to do outdoor both under water, on land and in air.

Yap, if you want to let yourself loose and get back in touch with nature then this is the island you should be visiting. If you want to party and have a night life then this isn’t your island. Matter of fact, just head out to Ibiza if you want to do that.

Note: You can click on each of the pictures below to open up a larger version on my flickr account. Enjoy!

Big Island, Hawaii – notice the red A, that’s the island.

We stayed on the Big Island

Just the Big Island. As you will see below there is plenty to do there. We stayed at Keauhou Beach Resort, hired a car from Alamo (read my car rental traps before you get one) and off we went on our adventure. Here’s what happened.

Keauhou Beach Resort – where we stayed
View from our balcony

Stuff to watch out for

Like any place you visit in this world you will no doubt come across few areas that get you under your skin.

  • Roads are very narrow. Both for driving and for parking. Kind of reminds me of the roads in Australia and very unlike American wide roads.
  • Most roads do not have street lights. Night driving gets frilly especially when you see those signs to watch out for Donkey’s crossing or Mongoose sliding across the road like snakes. Use high beams. I’m sure this is done on purpose since the Big Island is the home of Mauna Kea Observatory.
  • Average speed limit is… wait for it.. 35 mph. wtf! yes, driving around this island is slow and nerve wrecking when time is precious. Stay away from driving on major roads during the traffic window 3.30-5pm – it crawls. At the resorts, tourists are taught to pull over and let the faster locals pass by since they need to get their kids to school – so are there 2 speed limits.. locals and tourists.
  • Expedia affiliations with Wyndham Vacation Resorts. They will try to lure you (not a pleasant experience) for a 2 hour of your time to listen to their sales staff try to sell you “Timeshare Accommodations”. For your time, you will get $100 off any Expedia booking you do on the island. You work out whether it’s worth it for you. I gave it a shot since I wanted to learn more about this Timeshare I hear people talking about and quiet frankly it reminds me of Bartercard in Australia (thumbs down). Also in light of AirBnB disrupting the rental market, timeshare accommodation is just a waste of money for me. However I got my $100 off Expedia booking – yay!

Cool stuff to do

Since we only had 1 week to do this we needed to make sure that we covered as much in/on water, land and air as much as we could in that week.

  1. Lava everywhere!! don’t get scared. First  thing you will notice when you fly in is plenty of black rock that looks like unfinished land renovations. That is the laval from over 100 years ago. It’s all over the island. A’a (as in a a it hurts when you step on it) is the most common and looks like sharp small rocks stacked on top of each other. 2nd most common is Pahoehoe, like frozen liquid water.

    Big Island Landscape

  2. Kapoho Tide Pools. Spectacular location. A place I could live. The pools are great for snorkeling and only a meter or so deep.

    Kapoho Tide Pools

  3. Helicopter ride over the Island. This is the BEST way to see the whole island inc. Hilo falls (if not in dry season). The ride is around 3 hours and it is spectacular. We went with Paradise Helicopters and flew in a 6 passenger Bell 407 helicopter. The seating of this chopper basically allows for 5 people to have window seats. The only downside was seeing other choppers get really close to the lava while we always stayed up really high.
  4. Punallu Beach. Know for the black sand and often called the black beach. You get to see many turtles beaching and feel the unique black grains that make this the black beach.

    Punallu beach (black beach)

  5. Kealakekua Bay. Also know for the memorial resting place of Captain Cook. The bay here is the BEST location for snorkelling. PLenty to see underwater and beautiful crystal clear visibility.

    Captain Cook, Kealakekua Bay

  6. Waipio Valley. “Waipiʻo” means “curved water” in the Hawaiian language. It was the location of the ancient grass palace of the ancient kings of Hawaii with the nioi stands. You can go horse riding down into the valley if you have the time else just admire the views, take some photos and go to Pololū Valley.

    Waipio Valley

  7. Pololū Valley. The word Pololū means long spear in the Hawaiian language. It is the Northernmost of a series of erosional valleys forming the east coast of Kohala Mountain on the Island of Hawaiʻi. Go for a hike down the mountain and onto the beach where you will find many Zen like rock structures and a peaceful atmosphere that you can fall asleep to. Lovely place! The hike down is around 15 mins.

    Pololu Valley

  8. Beaches to see– A Beach, Makalawena Beach, Hapuna Beach, Kaunao Beach and Kua Bay. If you are from Australia or Asia then these beaches are the norm but still a great place to catch a wave.

    Kua Bay

  9. Night swimming with Manta Rays.There is a 90% chance you will see them. The adventure starts in the evening as a bunch of boats (with you on one of them) go out onto the ocean. All the boats park in a large circle and wait for the sun to set.
    We park and wait for the sun to set

    A bunch of divers jump into the water with flood lights and light the ocean from the bottom up. This attracts plankton which in turn attracts massive Manta Rays. You enjoy the 40 minute feeding fest from above as they Manta’s swoop in loops consuming the plankton.

    Swimming with Manta Rays at night. VIDEO:
    http://www.youtube.com/watch?v=xF038bozWzs

  10. Dolphin & Whale experience. Get to see spinner dolphins famous for their acrobatic displays in which they spin longitudinally along their axis as they leap through the air. These dolphins return from the deep ocean in the morning after a long night of hunting and cruise along the shore line to bay to sleep. So choose a crew that will leave as early as 7am so you don’t have to swim with the dolphins when they sleep rather when they are cruising along the shore line. We went with Dolphin Discoveries, threw ourself in-front of a pod of 80 dolphins 4 times, got to see whales breaching and we also snorkeled. Heaps of fun!Swimming with the Dolphins VIDEO:
    http://www.youtube.com/watch?v=Yq6Y1RGqJ2Y
    Humpback Whale watching with breaches VIDEO: http://www.youtube.com/watch?v=Yq6Y1RGqJ2Y

Stuff you can skip the tour and do yourself

  • Volcanic National Park including lava cave– this costs around $180 per person and is an all day driving adventure around the island. Stuff you can do if you hire a car. If you don’t have a car, then do this one.

    Kilauea Volcano – most active volcano in the world

  • Sunset Lava cruise.Dont expect to see lava pouring into the ocean. We didn’t. However we did see an amazing coast line created by the lava, lava tubes and steam where the earth was still cooling from a previous flow.If you want to see an amazing sunset stop anywhere on a hill as the sun sets over Hawaii and enjoy – like we did below.

    Sunset in Hawaii – Everywhere!

Stuff I wish we got to see

Here is stuff I didn’t get to see since 1 week isn’t enough to see everything. This is for my next visit.

Enjoy your Big Island adventure, I’m sure you will enjoy every minute of it!

PS. If you want to go here shoot me an email. Supposedly this is a private beach!

Private beach

PPS. I have more photos of the Hawaii trip on my Flickr account here.

~ Ernest